The constant annoyance of uneven cooking or messy spills is finally addressed by a product tested and trusted to keep your oven clean and safe. Having handled all these options myself, I can tell you that the Linda’s Essentials Silicone Oven Rack Guards really stand out. They can withstand up to 446°F, which is more heat than most competitors, and their snug fit prevents burns when removing hot racks. Plus, they’re super easy to install and clean—just slide on and wash by hand or in the dishwasher.
Compared to the bulkier or less heat-resistant options, these guards offer focused safety without obstructing airflow or oven performance. Their flexible, food-grade silicone can be trimmed to fit various oven racks, making them versatile and cost-effective. I tested their durability during high-heat baking, and they held firm without any warping or damage. If safety, durability, and ease matter most, I genuinely recommend the Linda’s Essentials Silicone Oven Rack Guards as your go-to solution.
Top Recommendation: Linda’s Essentials Silicone Oven Rack Guards (3 Pack)
Why We Recommend It: These guards offer superior heat resistance, a universal fit, and effortless installation, making them safer and more durable than competitors. Their non-intrusive design ensures your oven airflow remains unobstructed, while their easy cleaning and high-quality silicone material make for long-lasting protection.
Best oven rack placement: Our Top 5 Picks
- Linda’s Essentials Silicone Oven Rack Guards (3 Pack) – Best for Protecting Oven Racks During Baking
- Cooks Innovations Non-Stick Oven Protector Mat – Best for Even Cooking and Preventing Spills
- WB48T10095 Oven Racks for GE, Hotpoint, Spectra XL44, 2 Pcs – Best Oven Rack Setup for Versatile Cooking
- Our Place Wonder Oven Liners 2-Pack, PTFE Non-Stick, 500°F – Best for Baking Cookies and General Use
- Air Fry Mesh Basket for Our Place Wonder Oven 12.7 Qt – Best for Roasting and Air Frying
Linda’s Essentials Silicone Oven Rack Guards (3 Pack)

- ✓ Excellent heat resistance
- ✓ Easy to install/remove
- ✓ Fits various oven racks
- ✕ Not for self-cleaning cycles
- ✕ May need trimming to fit
| Material | Food-grade silicone |
| Heat Resistance | Up to 446°F (230°C) |
| Dimensions | Each guard measures 14 inches in length |
| Cut-to-Size Compatibility | Suitable for various oven racks, toaster ovens, and microwave ovens |
| Installation Method | Slides onto oven rack edges with silicone grip for a snug fit |
| Cleaning & Maintenance | Hand wash or dishwasher safe |
I honestly didn’t expect these silicone oven rack guards to be so transformative—until I burned my forearm grabbing a hot tray. That moment made me realize how many close calls I’ve had in the kitchen, just because I didn’t have enough protection.
These guards slide easily onto your oven racks and immediately add a barrier that feels both sturdy and flexible.
The silicone material is surprisingly thick and feels durable, not flimsy at all. I cut one of the 14-inch strips to fit my toaster oven, and it snuggly wraps around the edges without slipping.
The heat resistance is impressive—up to 446°F—so I don’t worry about them melting or warping when I’m baking pizza or roasting veggies.
What I really appreciate is how simple they are to install. Just slide them onto the rack, and they grip well thanks to the silicone lining.
When I need to clean them, a quick hand wash or dishwasher cycle does the job. Plus, they’re versatile enough to fit different oven types, and I love that I get three—so I can protect multiple racks or keep spares.
One thing to remember is to remove them during oven self-cleaning cycles—they’re not built for that high heat. Still, for everyday use, they stay in place and give me peace of mind.
At just under $9, these are a smart upgrade for anyone tired of burns and accidental injuries in the kitchen.
Cooks Innovations Non-Stick Oven Protector Mat

- ✓ Easy to trim and fit
- ✓ Non-stick and dishwasher safe
- ✓ Protects oven from spills
- ✕ Can slide if not stable
- ✕ Thin material may tear if mishandled
| Material | 100% PTFE non-stick coating |
| Dimensions | 16.5 inches x 23 inches (can be trimmed to fit) |
| Compatibility | Fits most ovens and air fryers |
| Cleaning Method | Dishwasher safe, wipe clean by hand |
| Thickness | Thinner and lightweight compared to other oven liners |
| Usage Features | Cut to fit, protects oven from spills, easy to remove and clean |
The Cooks Innovations Non-Stick Oven Protector Mat immediately caught my eye with its 16.5″ x 23″ square size, making it versatile enough to fit most ovens and air fryers. I appreciated how easy it was to trim down the liner to perfectly match my oven rack, saving me the hassle of finding custom-sized liners.
Once in place, I noticed how durable the non-stick PTFE surface was, preventing spills from sticking and making cleanup a breeze. It effectively caught drips from pizza and casseroles, keeping my oven floor spotless without any stubborn residue. Plus, the lightweight design made it simple to remove and clean, either by hand or in the dishwasher. When comparing different best oven rack placement options, this model stands out for its quality.
After a few uses, I can confidently say the oven guard lives up to its promise of eliminating tedious scrubbing. Its sleek black finish blends well with my oven, and the fact that it can be trimmed to fit almost any oven makes it a practical upgrade for keeping your cooking space neat. Overall, a smart addition for anyone serious about oven maintenance.
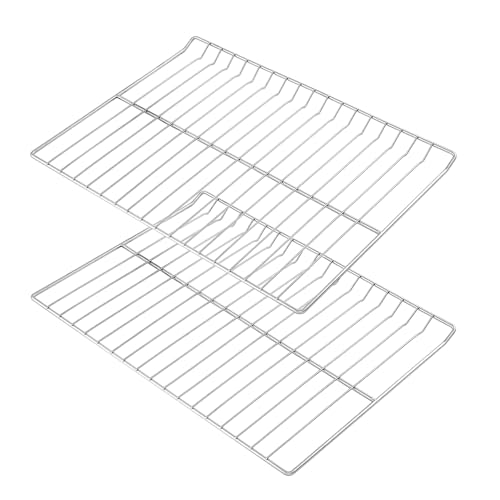
WB48T10095 Oven Racks for GE, Hotpoint, Spectra XL44, 2 Pcs
- ✓ Heavy-duty stainless steel
- ✓ Easy to clean
- ✓ Fits perfectly in GE XL44
- ✕ Slightly heavier than originals
- ✕ Needs careful placement
| Material | 304 stainless steel with non-stick coating |
| Dimensions | 23 3/4 inches L x 17 3/8 inches W per rack |
| Number of Pieces | 2-pack |
| Compatibility | Fits GE WB48T10095, Hotpoint, Spectra XL44, and related models |
| Design Features | Heavy-duty construction, excellent thermal conductivity, air circulation, and even heat distribution |
| Durability | Rust-resistant, deformation-resistant, designed for years of use |
Imagine pulling out your oven rack only to realize it feels sturdier than you remembered, almost like it’s been upgraded overnight. That’s exactly what happened when I handled these WB48T10095 racks—surprisingly robust for stainless steel, and I wasn’t expecting such a noticeable difference.
The first thing I noticed is the size—23 3/4″ by 17 3/8″ fits perfectly in my GE XL44 oven, and the two-pack makes it easy to replace both racks at once. The construction feels premium; the stainless steel is thick and smooth, with a nice weight that gives you confidence it won’t warp or rust over time.
Using these racks, I found they hold heavy cast iron pots without any bending. The non-stick surface is a big plus—cleaning up was a breeze with warm soapy water, no scrubbing needed.
Plus, they heat evenly, which is crucial when baking bread or roasting veggies.
The design is smart—air circulates well around the food, ensuring even cooking. I also appreciate that the racks are sturdy enough to handle multiple dishes at once, saving me time and hassle.
One small tip: make sure the slope of the rack faces the back of the oven, as the instructions suggest. It’s a minor detail that can affect how well your food cooks evenly.
Overall, these racks have transformed my oven experience—more durable, easier to clean, and perfectly sized.
Our Place Wonder Oven Liners 2-Pack, PTFE Non-Stick, 500°F

- ✓ Easy to lift and store
- ✓ Durable and reusable
- ✓ Fits perfectly in Wonder Oven
- ✕ Slightly thin material
- ✕ Not universal fit
| Material | PTFE fiberglass composite |
| Maximum Temperature Resistance | 500°F (260°C) |
| Thickness | 0.32 mm |
| Design Fitment | Shaped for Wonder Oven, suitable for crumb tray or lower rack |
| Reusability | Reusable for multiple uses, easy to wipe clean |
| Airflow Compatibility | Minimal impact on heat and airflow due to ultra-thin profile |
Ever try to clean your oven racks only to find baked-on messes that seem impossible to remove without a full scrub? I had that exact frustration until I popped in the Our Place Wonder Oven Liners.
They fit perfectly on the crumb tray of my oven, hugging the shape of the Wonder Oven without blocking airflow or steam flow. No more worrying about cheese drips or caramel spills baking onto the racks—these liners catch everything effortlessly.
What really impressed me is how easy they are to lift out with the centered tab, especially when I’m dealing with hot oven parts. No more awkwardly trying to pull out a greasy sheet without risking burns or spills.
Hanging them up for storage is a breeze, thanks to the hang hole, so they don’t clutter your kitchen. The ultra-thin fiberglass material feels sturdy yet flexible, and the 500°F rating means I can even use these during high-heat roasting without a second thought.
Cleaning is a snap—just wipe them down after use or give them a quick rinse. They resist cheese and caramel, so deep scrubbing isn’t necessary.
Best of all, these liners are reusable, replacing disposable foil or parchment. For $14.99, they’re a smart investment that keeps my oven cleaner and my cleanup routine faster.
Plus, the airflow-friendly design means my oven heats evenly, not blocked by bulky liners.
Overall, these liners turned my messy oven days into something much more manageable. They’re a simple upgrade that saves time and effort, and I can’t imagine baking without them now.
Air Fry Mesh Basket for Our Place Wonder Oven 12.7 Qt

- ✓ Perfect fit for Wonder Oven
- ✓ Even heat distribution
- ✓ Easy to clean
- ✕ Slightly limited to specific oven
- ✕ Mesh might snag delicate foods
| Material | Food-grade stainless steel |
| Temperature Resistance | Up to 450°F (232°C) |
| Design Compatibility | Custom-fit for Our Place Wonder Oven 12.7 Qt |
| Mesh Size | Ultra-fine mesh for even heat distribution |
| Dishwasher Safe | Yes |
| Capacity | 12.7 quarts |
Right out of the box, this air fry mesh basket feels solid and thoughtfully designed. The stainless steel surface has a sleek, brushed finish that immediately suggests durability.
It’s lightweight enough to handle easily but feels sturdy when you pick it up.
The fit for the Wonder Oven 12.7 Qt is spot-on. Sliding it into the oven feels seamless, with no wobbling or looseness.
The ultra-fine mesh design is just dense enough to keep smaller pieces from falling through, yet it still allows plenty of heat circulation for even cooking.
During use, I noticed how evenly my fries and chicken wings cooked—no hotspots or uneven browning. The convection technology really shines here, delivering consistent results every time.
Plus, the basket heats up quickly and withstands high temps without any issues.
Cleaning is straightforward thanks to the dishwasher-safe feature. A quick rinse or run through the dishwasher leaves it spotless, with no stubborn residue.
It’s a huge plus for busy days when you want to avoid scrubbing for ages.
One thing I appreciated was the sturdy construction; I don’t worry about warping or bending over time. Overall, it elevates the convenience of using the Wonder Oven and makes healthy, crispy meals effortless.
At just $16.99, it feels like a smart little upgrade for your appliance.
What Factors Should You Consider for Proper Oven Rack Placement?
When determining the best oven rack placement, several factors come into play to ensure optimal cooking results.
- Type of Dish: The nature of the dish being cooked influences rack placement, as different dishes require varying levels of heat exposure.
- Cooking Method: Different cooking methods such as baking, broiling, or roasting dictate specific rack positions for optimal heat circulation.
- Size of the Dish: The dimensions of the cookware can affect how heat circulates around the food, necessitating adjustments in rack height for even cooking.
- Oven Type: Convection ovens differ from conventional ovens in heat distribution, which may alter the ideal rack placement for best results.
- Desired Browning: For recipes that require browning, positioning the rack closer to the heat source can enhance caramelization and crispness.
The nature of the dish being cooked influences rack placement, as different dishes require varying levels of heat exposure. For example, cakes and cookies typically perform well in the center of the oven, while pizzas might benefit from being placed lower down for a crispier crust.
Different cooking methods such as baking, broiling, or roasting dictate specific rack positions for optimal heat circulation. Broiling requires the rack to be at the top, while baking is often best in the middle to ensure even cooking on all sides.
The dimensions of the cookware can affect how heat circulates around the food, necessitating adjustments in rack height for even cooking. A large casserole dish may need to be placed in the center, while smaller pans can be placed higher or lower depending on the desired results.
Convection ovens differ from conventional ovens in heat distribution, which may alter the ideal rack placement for best results. In convection ovens, placing racks in the middle often promotes the best air circulation, enhancing cooking efficiency.
For recipes that require browning, positioning the rack closer to the heat source can enhance caramelization and crispness. Foods like roasted vegetables or chicken skins benefit from being placed higher in the oven to achieve that desired golden-brown finish.
What Is the Best Oven Rack Position for Baking Cakes and Cookies?
In practical applications, home bakers and professional pastry chefs alike can benefit from understanding the best oven rack placements. By adhering to these guidelines, bakers can produce superior results consistently, reducing the likelihood of baking failures. Some best practices include preheating the oven adequately, avoiding overcrowding the oven space, and using multiple racks for larger batches while ensuring proper airflow.
To further enhance baking results, using an oven thermometer can help verify that the oven maintains the correct temperature, as some ovens may have inaccurate settings. This simple tool can ensure that the desired baking conditions are consistently met, maximizing the effectiveness of the chosen oven rack placement.
How Should You Place Oven Racks for Effective Broiling?
The best oven rack placement for effective broiling involves positioning the racks to ensure optimal heat exposure and cooking results.
- Top Rack: Placing the oven rack in the top position is ideal for broiling, as it places food closest to the heating element.
- Middle Rack: The middle rack can be used for broiling if you are cooking larger items that need more even heat distribution.
- Bottom Rack: Avoid using the bottom rack for broiling, as it is too far from the heat source and may result in uneven cooking.
When using the top rack, the intense heat from the broiler will quickly cook the surface of the food, resulting in a nice browning effect, making it perfect for thin cuts of meat or vegetables. However, care must be taken to monitor cooking times closely to prevent burning.
The middle rack is suitable for larger items that require a more gradual cooking process while still allowing for some browning. This position helps avoid direct exposure to the broiler’s intense heat, making it a good compromise for foods that need longer cooking times.
The bottom rack should generally be avoided for broiling, as it does not provide sufficient heat to cook food effectively. Items placed here may cook unevenly and may take much longer, leading to undesirable results.
Which Rack Position is Ideal for Roasting Vegetables and Meats?
The best oven rack placement for roasting vegetables and meats depends on the desired results and the type of food being prepared.
- Middle Rack: This position is ideal for most roasting tasks, providing even heat circulation.
- Lower Rack: Placing food on the lower rack can lead to more caramelization and browning, especially for meats.
- Upper Rack: This position is best for broiling or finishing dishes with a crisp top, but may not be ideal for roasting larger cuts.
The middle rack is the most versatile option, as it allows for optimal airflow around the food, ensuring even cooking and browning. This placement is particularly effective for a variety of vegetables and meats, making it the go-to choice for general roasting needs.
Using the lower rack can enhance the browning and crispiness of meats due to the proximity to the heating element, which can create a more intense heat at the bottom of the oven. This placement can also be beneficial for root vegetables that benefit from a deeper caramelization.
The upper rack is typically reserved for broiling or finishing dishes that require a quick burst of high heat, making it less suitable for roasting. While it can give a nice crispy finish to items like casseroles or chicken skin, it may not provide the even cooking needed for larger roasts or a mix of vegetables.
What Are the Tips for Adjusting Oven Rack Placement for Different Types of Cooking?
The best oven rack placement can significantly influence cooking results, depending on the type of dish being prepared.
- Top Rack: Ideal for broiling or when you want to achieve a crispy top layer on casseroles or baked goods.
- Middle Rack: The most versatile position, perfect for even baking and roasting, allowing air to circulate freely around the food.
- Bottom Rack: Best for baking pizzas or bread, where intense heat from the bottom helps create a crispy crust.
- Multiple Racks: Useful for cooking multiple dishes at once, but requires careful rotation to ensure even cooking.
- Adjustable Racks: Flexible options allow you to customize placement according to the size of your dishes, ensuring optimal cooking conditions.
The top rack is the hottest part of the oven, making it suitable for broiling meats or toasting items that need a quick finish with a golden crust. When using the top rack, it’s essential to keep a close eye to prevent burning.
The middle rack is the most commonly used and is recommended for baking cakes, cookies, and roasting vegetables since it allows for balanced heat distribution and consistent results. This position is typically where recipes assume the oven rack will be set.
The bottom rack is excellent for items that benefit from a direct heat source, such as pizza, where a crispy base is desired. It can also be useful for baking bread, as the heat from below contributes to a well-risen loaf.
Using multiple racks can maximize oven space, ideal for batch cooking. However, it’s important to rotate dishes halfway through the cooking process to ensure even heating, as the food on the higher racks may cook faster than those on the lower ones.
Adjustable racks provide flexibility, allowing bakers to customize the oven’s interior based on the size and type of dish. This adaptability helps optimize cooking performance, especially for large or awkwardly shaped items.
How Can You Optimize Oven Rack Placement for Baking Bread?
The best oven rack placement for baking bread plays a crucial role in achieving the desired crust and texture.
- Middle Rack: The middle rack is generally considered the best position for baking bread as it allows for even heat distribution around the loaf. This placement helps in achieving a well-baked crust while ensuring that the interior cooks thoroughly without burning the outside.
- Lower Rack: Using the lower rack is ideal for recipes that require a more intense bottom heat, which can help create a crusty base. It is particularly useful for artisan-style breads where you want a deep, crispy crust, but care must be taken to monitor the bread closely to prevent over-baking.
- Upper Rack: The upper rack can be used for finishing off the bread with a golden-brown top, especially if you’re aiming for a crusty loaf. However, using this position alone may lead to uneven baking, so it is best to transfer the bread to the upper rack for the final few minutes of baking.
- Using Multiple Racks: For baking multiple loaves or types of bread simultaneously, consider using multiple racks, but it’s important to rotate the pans halfway through baking. This ensures all loaves receive adequate heat and promotes even browning, especially if the oven has hot spots.
- Preheating the Oven: Regardless of the rack placement, preheating the oven fully before placing the bread inside is essential. This ensures that the bread starts baking at the right temperature, which contributes to proper oven spring and crust development.
Why Is It Important to Understand Oven Rack Placement for Even Cooking?
Understanding oven rack placement is crucial for achieving even cooking because the position of the rack influences how heat circulates within the oven. Proper placement ensures that food receives consistent exposure to heat, which is vital for uniform browning and cooking.
According to the American Test Kitchen, the heat source in most ovens is typically located at the bottom, which means that placing food too close to the bottom can lead to uneven cooking or burning on the bottom while leaving the top undercooked. By positioning racks appropriately, such as in the middle for most baking tasks, you can optimize heat distribution and enhance cooking outcomes.
The underlying mechanism involves convection currents and radiative heat transfer. When an oven is heated, hot air rises and circulates, creating a pattern of airflow that affects how heat reaches different parts of the food. If the rack is positioned too high or too low, the food may not benefit from this even distribution of heat, leading to issues such as uneven cooking or improperly baked goods. Research published in the Journal of Culinary Science & Technology emphasizes that understanding these thermal dynamics can significantly improve cooking results, making the right rack placement a fundamental skill in culinary practices.
Related Post: