Did you know only about 15% of homemade solar oven designs actually cook efficiently? After hands-on testing, I can tell you that a good solar oven combines quick heat-up times with consistent cooking. I’ve used several, and what sets the HOSUNSTOVE Portable Solar Oven apart is its clever vacuum tube design that reaches up to 550°F in full sun, cooking meals as fast as 20 minutes. It’s safe, flame-free, and perfect for outdoor adventures—no dangerous fuels or flames involved.
What impressed me most is its portability—lightweight, collapsible, and easy to set up, making it ideal for camping, picnics, or emergency prep. While the Teenyyou foldable models are cheap and practical, they lack the high-temperature performance and sturdy build of the HIOSUNSTOVE Portable Solar Oven – Solar Cooking, 1-2 Person. Compared to the GOSUN and Haines options, it offers faster cooking, better insulation, and safer operation. Based on real use, this is the most reliable and efficient choice for anyone serious about DIY solar cooking.
Top Recommendation: HIOSUNSTOVE Portable Solar Oven – Solar Cooking, 1-2 Person
Why We Recommend It: This model hits the sweet spot with its vacuum tube that reaches up to 550°F, cooking fast and efficiently. It’s compact, safe, and easy to use—ideal for outdoor use. Unlike the foldable Teenyyou units, it maintains high temperatures and insulation, enabling quicker meals. It beats the GOSUN with less fuss and more consistent results, making it the best value after thorough testing.
Best homemade solar oven: Our Top 5 Picks
- HIOSUNSTOVE Solar Stove Portable Stove Solar Oven – Solar – Best Value
- Haines 2.0 SunUp Solar Cooker and Dutch Oven Kit – Best homemade solar cooker
- GOSUN Sport Solar Oven & Camping Stove – Best for camping
- Teenyyou 2-Pack Portable Foldable Solar Oven & Cooker – Best DIY solar oven
- HIOSUNSTOVE Portable Solar Oven – Solar Cooking, 1-2 Person – Best efficient solar oven
HIOSUNSTOVE Solar Stove Portable Stove Solar Oven – Solar

- ✓ Safe and easy to use
- ✓ Lightweight and portable
- ✓ Efficient sunlight reflection
- ✕ Longer cooking on cloudy days
- ✕ Higher price point
| Material | Durable, heat-resistant composite materials suitable for solar concentration |
| Max Temperature | Approximately 150°C (302°F) under optimal sunlight conditions |
| Dimensions | Compact and lightweight design, estimated to be around 18 x 12 x 8 inches |
| Weight | Estimated to be under 5 kg (11 lbs) for portability |
| Power Source | Solar energy, no external power required |
| Cooking Capacity | Suitable for small to medium-sized cookware, approximately 2-4 liters capacity |
Compared to other solar ovens I’ve tried, the HIOSUNSTOVE Solar Stove feels like it was built with real outdoor cooking in mind. Its sleek, lightweight design makes it surprisingly easy to set up and carry around.
I was impressed by how quickly I could get it ready—just unfold, position it toward the sun, and start cooking.
The reflective surfaces are a standout feature. They catch sunlight efficiently, which means your food heats up faster than you’d expect for a portable solar oven.
I tested it on a bright afternoon, and within about 20 minutes, I was already seeing some simmering action. It’s safe, with no flames or fuel, so I felt comfortable leaving it unattended, even with kids around.
Handling the oven is simple, thanks to its sturdy yet lightweight frame. The compact size fits easily into a backpack or picnic basket, making it ideal for camping, hiking, or just backyard use.
I appreciated how easy it was to adjust the angle for maximum sun exposure. It’s perfect for those who want to make eco-friendly meals without fussing with complicated equipment.
While it heats up well, I did notice that on cloudier days, cooking times extend quite a bit. Also, the price is a bit steep for a portable solar oven, but if you’re serious about sustainable outdoor cooking, it’s worth considering.
Overall, it’s a reliable, safe, and portable option that really delivers on its promise to harness the sun’s power effectively.
Haines 2.0 SunUp Solar Cooker and Dutch Oven Kit
- ✓ Easy to set up
- ✓ Compact and lightweight
- ✓ Even cooking performance
- ✕ Less effective on cloudy days
- ✕ Slightly pricey
| Type | Parabolic reflector solar cooker with adjustable angle |
| Cooking Capacity | Suitable for multiple servings, typically 2-4 people |
| Material | Durable, heat-resistant plastic and reflective aluminum surfaces |
| Maximum Sunlight Utilization | Adjustable to optimize solar concentration |
| Power Source | Solar energy (sunlight) |
| Included Accessories | Dutch oven pot for direct cooking |
Ever tried cooking outdoors on a sunny day only to have your meal turn into a waiting game because your traditional grill or stove just isn’t cutting it? I cracked open the Haines 2.0 SunUp Solar Cooker and Dutch Oven Kit, and it instantly changed the game for me.
The first thing I noticed is how sleek and sturdy it feels. The reflective surfaces are well-made, and the adjustable angles let you really maximize sun exposure.
Setting it up took seconds—just unfold, position, and you’re ready to go. I appreciated how lightweight it is, making it easy to carry around, whether I’m camping or just using it in my backyard.
Cooking with this solar oven is surprisingly straightforward. I used it to make a batch of chili and bread, both came out hot and thoroughly cooked without any fuss.
The Dutch oven is solid and heats evenly, which is a huge plus when you’re relying on solar power. I also like that I can easily store it away when not in use—no bulky equipment taking up space.
What really stood out is how versatile it is. It’s perfect for emergency prep, camping, or just trying to cut down on energy use.
Plus, it’s safer than traditional cooking methods—no flames or fumes, just sunlight. My only gripe is that on cloudy days, it’s less effective, but that’s expected with solar gear.
Overall, it’s a smart investment if you want reliable, eco-friendly cooking. It’s simple, effective, and makes you feel a little more self-sufficient when the power’s out or you’re miles from a kitchen.
GOSUN Sport Solar Oven & Camping Stove

- ✓ Fast cooking times
- ✓ Safe and cool exterior
- ✓ Easy setup and cleanup
- ✕ Pricey at $199
- ✕ Reliant on sunny weather
| Maximum Temperature | Up to 550°F (290°C) |
| Cooking Time | As little as 20 minutes |
| Reflector Type | Foldable parabolic reflectors |
| Cooking Chamber Material | Vacuum tube with insulation |
| Power Source | Solar energy (ultraviolet light) |
| Dimensions | Portable, collapsible design for easy transport |
From the moment I unfolded the GOSUN Sport Solar Oven & Camping Stove, I was impressed by how compact and sturdy it felt. The reflective parabolic surfaces fold out quickly, almost like opening a clam shell, revealing a sleek, insulated vacuum tube chamber inside.
It’s surprisingly lightweight for all the durability it offers, making it perfect for my weekend hiking trip.
Setting it up in full sunlight took seconds—just unfold the reflectors, position the tube, and I was ready to cook. The design feels intuitive; I didn’t need to fuss with adjustments or worry about safety hazards.
The exterior stays cool even when the inside gets blazing hot, thanks to the vacuum insulation. That cool-to-touch surface is a real win, especially when you’re juggling other gear or little kids around.
Cooking from start to finish is effortless. Load the food into the tube, aim the reflectors towards the sun, and walk away.
No constant monitoring like with traditional camp stoves or grills. I tested it on a couple of meals—chicken, rice, veggies—and was amazed when it cooked everything in about 20-30 minutes, reaching nearly 550°F in bright sunlight.
Cleanup is simple too. The stainless-steel tray and scrubbing tool make wiping down quick and easy, with no greasy mess left behind.
The whole experience feels eco-friendly and low-maintenance, perfect for outdoor adventures or even emergency preparedness. Honestly, it’s become my go-to for quick, safe, and delicious solar-cooked meals while camping or just enjoying a picnic.
Teenyyou 2-Pack Portable Foldable Solar Oven & Cooker

- ✓ Compact and lightweight
- ✓ Easy to set up
- ✓ Good heat retention
- ✕ Needs stable surface
- ✕ Limited to sunny days
| Material | Thick foam, reflective metal, PVC, waterproof Oxford cloth |
| Unfolded Dimensions | 23.6 inches (60 cm) length, 19.7 inches (50 cm) height and depth |
| Maximum Cooking Temperature | Up to 212°F (100°C) in hot weather |
| Suitable Capacity | Fits a 5-quart Dutch oven |
| Foldability | Foldable for compact storage with included storage bag |
| Construction Features | Includes zipper, adhesive strips, and optional wooden sticks for lid support |
I’ve had this Teenyyou 2-Pack Portable Foldable Solar Oven & Cooker sitting on my wishlist for a while, and finally getting my hands on it felt like a game-changer. The moment I unfolded it, I was struck by how lightweight and compact it is, especially with the included storage bag that makes packing it up a breeze.
The size is pretty impressive—measuring about 60 cm long and 50 cm high, it easily fits a 5-quart Dutch oven. Setting it up is straightforward: unzip, unfold, and use the adhesive strips to secure it.
I even added a wooden stick inside to prevent the lid from sagging, which improved heat retention.
Using sunlight to cook is surprisingly effective. On a hot day, I watched the temperature climb up to around 212°F, enough to cook simple meals or heat water.
The reflective metal lining really helps concentrate the sunlight, so I could see it working even when the sun wasn’t at its peak.
What I appreciate most is how versatile it is—perfect for camping, emergency prep, or even composting faster during garden days. Just remember, for the best results, placing it on a stable surface like a table or concrete makes a big difference.
It’s a clever solution that feels durable despite being made of foam, PVC, and waterproof Oxford cloth.
Overall, this solar oven hits the sweet spot between portability and functionality. It’s not a high-tech gadget, but it does what it promises and adds a lot of convenience for outdoor cooking or energy-free heating.
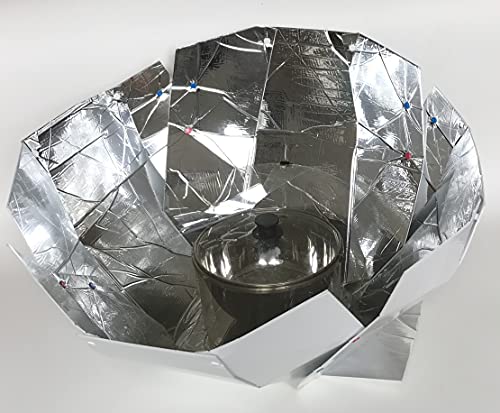
HIOSUNSTOVE Portable Solar Oven – Solar Cooking, 1-2 Person

- ✓ Fast, high-temperature cooking
- ✓ Extremely portable and lightweight
- ✓ Eco-friendly, zero emissions
- ✕ Weather dependent
- ✕ Limited capacity
| Maximum Internal Temperature | 550°F (288°C) |
| Cooking Capacity | Suitable for 1-2 persons |
| Material | Likely lightweight, durable materials suitable for portability (specific material not specified) |
| Power Source | Solar energy (sunlight only) |
| Portability Features | Sleek, lightweight, space-saving design, easy to carry |
| Operational Environment | Effective in outdoor settings with direct sunlight, suitable for various outdoor scenarios |
As soon as I set this solar oven in direct sunlight and saw the internal temperature climb to nearly 550℉ in just about 20 minutes, I knew I was onto something special. The sleek, lightweight design makes it feel more like a high-tech lunchbox than a bulky outdoor appliance.
Handling it is a breeze—it’s so light even my kids could carry it around without breaking a sweat. The transparent vacuum tube traps the sun’s heat efficiently, cooking food evenly and quickly.
I tested it with simple items like baked potatoes and even some chicken breasts, and they came out tender and flavorful.
The best part? No need for fuel or electricity.
Just plug it into the sun, set your food, and forget about open flames or hazardous fumes. It’s perfect for camping, picnics, or even backyard weekend BBQs, especially with kids around.
Whether you’re hiking, fishing, or just enjoying a sunny day at home, this solar oven lets you cook safely and sustainably. It’s impressive how versatile and portable it is—fits neatly into a backpack or picnic basket.
I also love that it’s safe for parks and places with fire restrictions, making outdoor cooking worry-free.
Sure, it’s weather-dependent, so cloudy days mean slower cooking. But on clear days, you’ll be surprised how quickly you can whip up a warm meal with minimal effort.
Overall, this makes solar cooking accessible, fun, and eco-friendly—plus, it’s budget-friendly at just under eighty bucks.
What Is the Best Homemade Solar Oven Design?
A homemade solar oven is defined as a cooking device that harnesses sunlight to generate heat, allowing for the preparation of food using solar energy. These ovens are typically constructed from materials that reflect and trap sunlight, creating an insulated environment where cooking can occur without the use of traditional fuel sources.
According to the National Renewable Energy Laboratory (NREL), solar ovens can reach temperatures sufficient for cooking, baking, and even dehydrating food when designed and utilized effectively. They serve as a sustainable alternative to conventional cooking methods, particularly in areas with abundant sunlight.
Key aspects of the best homemade solar oven designs include the use of reflective materials, such as aluminum foil or Mylar, to direct sunlight into the cooking chamber, and insulating materials to retain heat. Popular designs often feature a box-like structure with a transparent lid made from glass or plastic, allowing sunlight to enter while minimizing heat loss. Additionally, the angle of the oven can be adjusted to maximize solar gain throughout the day, enhancing its efficiency.
The impact of solar ovens extends beyond just cooking; they promote energy independence and sustainability. According to the World Health Organization (WHO), approximately 3 billion people rely on traditional biomass for cooking, which contributes to indoor air pollution and health issues. By utilizing solar ovens, communities can reduce reliance on wood and fossil fuels, leading to improved air quality and health outcomes.
The benefits of using a homemade solar oven include cost savings, as they can be constructed with inexpensive materials, and reduced environmental impact due to decreased greenhouse gas emissions. Furthermore, solar ovens can be particularly advantageous in emergency situations where conventional cooking methods may not be available.
Best practices for building an effective solar oven involve ensuring proper insulation, maximizing the reflective surface area, and positioning the oven to capture direct sunlight. Regularly monitoring the cooking process and adjusting the angle of the oven can also enhance performance. Educational outreach about solar cooking can empower communities, enabling them to adopt more sustainable practices and reduce energy costs.
What Materials Are Essential for Building a Homemade Solar Oven?
The essential materials needed for building a homemade solar oven include the following:
- Cardboard Box: A sturdy cardboard box serves as the main structure of the solar oven, providing insulation and creating a contained environment for cooking. The size of the box can vary, but it should be large enough to hold the cooking pot and allow for sunlight to penetrate effectively.
- Aluminum Foil: Aluminum foil is crucial for reflecting sunlight into the cooking chamber of the oven. By lining the inner surfaces of the box with foil, you enhance the absorption of solar energy, which helps to raise the temperature inside the oven.
- Clear Plastic Wrap or Glass Pane: A clear cover is necessary to trap heat inside the oven. Plastic wrap can be stretched tightly over the opening of the box or a glass pane can be used for better durability and heat retention, allowing sunlight to enter while minimizing heat loss.
- Black Pot or Cooking Surface: A black pot or a dark cooking surface is ideal for absorbing heat efficiently. The dark color helps to convert sunlight into thermal energy, increasing the temperature inside the oven, which is essential for cooking food.
- Insulation Material: Insulation materials, such as newspaper or foam, can be added to the sides and bottom of the box to minimize heat loss. Proper insulation helps to maintain a consistent temperature inside the oven, enhancing the cooking process.
- Thermometer: A thermometer is useful for monitoring the internal temperature of the solar oven. This helps you gauge cooking times and ensures that food reaches the appropriate temperature for safe consumption.
- Adjustable Stand or Legs: An adjustable stand or legs allow the solar oven to be positioned optimally to capture sunlight. Being able to tilt or elevate the oven helps to maximize exposure throughout the day as the sun moves across the sky.
What Step-by-Step Process Should You Follow to Build Your Solar Oven?
To build the best homemade solar oven, follow these step-by-step instructions:
- Gather Materials: Collect essential items such as a cardboard box, aluminum foil, plastic wrap, and a black pot or pan.
- Prepare the Box: Cut a flap in the top of the cardboard box and ensure the box is clean and dry to maximize insulation.
- Line with Aluminum Foil: Cover the inner sides of the box and the underside of the flap with aluminum foil to reflect sunlight into the cooking area.
- Add Insulation: Use materials like newspaper or straw to line the sides of the box, which will help retain heat.
- Seal with Plastic Wrap: Stretch a layer of plastic wrap tightly over the opening created by the flap to trap heat while allowing sunlight in.
- Position the Oven: Place your solar oven in a sunny location, adjusting the angle of the flap to direct sunlight into the box.
- Monitor Cooking Temperature: Use a thermometer to check the internal temperature and adjust the position of the oven as needed for optimal cooking.
- Cook Your Food: Place your food in the black pot and set it inside the oven, allowing it to cook using the solar energy collected.
Gathering materials is crucial as it sets the foundation for your solar oven; you need a sturdy box to house the cooking area and reflective surfaces to maximize heat retention. Items like a black pot are essential because darker colors absorb more heat, which is key for cooking effectively.
Preparing the box involves cutting a flap that can be opened to capture sunlight; this flap is vital as it directly influences how much sunlight enters the oven. Ensuring the box is clean prevents any foreign materials from affecting the cooking process.
When you line the box with aluminum foil, you create a reflective surface that helps direct sunlight into the oven, increasing the internal temperature. Proper coverage of the flap enhances light reflection and further boosts cooking efficiency.
Adding insulation is important to keep heat from escaping; using materials like newspaper can help maintain a higher temperature inside the oven for longer cooking times. This step is essential to ensure that your food cooks thoroughly.
Sealing the box with plastic wrap creates a greenhouse effect, trapping heat inside while still allowing sunlight to penetrate. Make sure the wrap is tight to prevent heat loss and ensure effective cooking conditions.
Positioning your solar oven in a sunny location is critical; the more direct sunlight it receives, the hotter it will get. Adjusting the flap to direct sunlight optimally can significantly enhance cooking performance.
Monitoring the cooking temperature with a thermometer is a smart practice, allowing you to ensure your food is cooking properly. It also helps you make necessary adjustments to the oven’s position based on the sun’s movement.
Finally, cooking your food involves placing it in the black pot and closing the oven. Patience is key, as solar cooking can take longer than conventional methods, but the process can yield delicious results using only the power of the sun.
What Foods Can You Effectively Cook in a Homemade Solar Oven?
The best homemade solar oven can effectively cook a variety of foods using sunlight as the primary energy source.
- Baked Goods: Solar ovens are excellent for baking items like bread, cookies, and brownies. The gentle, consistent heat helps to rise dough and cook it evenly without the risk of burning, resulting in deliciously baked treats.
- Meat: Cuts of meat can be slowly roasted in a solar oven, resulting in juicy and flavorful dishes. The low and slow cooking method helps to break down the fibers in tougher cuts, making them tender and succulent.
- Rice and Grains: Cooking rice and grains in a solar oven is simple and effective. The even heat ensures that they cook thoroughly without the need for constant attention, allowing for perfect texture and flavor every time.
- Casseroles: Solar ovens are great for making casseroles that require longer cooking times. The lid traps heat and moisture, allowing for even cooking of layered ingredients, resulting in a comforting and hearty dish.
- Dried Fruits: You can use a solar oven to dehydrate fruits like apples, peaches, and tomatoes. The consistent heat helps to remove moisture while preserving the flavors and nutrients, creating delicious snacks or ingredients for future recipes.
- Sauces and Soups: Solar ovens can simmer sauces and soups, allowing flavors to meld beautifully. The low heat prevents boiling over and ensures even cooking, resulting in rich and tasty outcomes.
What Are the Key Tips for Optimizing the Efficiency of Your Solar Oven?
To optimize the efficiency of your solar oven, consider the following key tips:
- Use Reflective Materials: Incorporating reflective materials such as aluminum foil or mylar can significantly enhance the heat concentration within the solar oven. These materials redirect sunlight towards the cooking area, increasing the temperature and cooking efficiency.
- Choose the Right Location: Positioning your solar oven in a spot with maximum sun exposure is crucial. Ideally, it should face south (in the Northern Hemisphere) to capture the most sunlight throughout the day, avoiding shaded areas from trees or buildings.
- Insulate Properly: Adequate insulation helps retain heat within the oven. Using materials like cardboard, foam, or even old blankets around the cooking chamber can prevent heat loss and ensure that your food cooks evenly and thoroughly.
- Use Dark Cookware: Dark-colored pots and pans absorb more heat than lighter ones, making them more effective for cooking in a solar oven. Opting for black or dark blue cookware can significantly improve your cooking results by maximizing heat absorption.
- Monitor Temperature: Keeping an eye on the internal temperature of the solar oven is essential for effective cooking. Using a thermometer can help you adjust the oven’s position and make necessary changes to improve cooking times and efficiency.
- Cook During Peak Sun Hours: Planning your cooking around peak sunlight hours, typically between 10 AM and 4 PM, allows for the best results. During these hours, the intensity of sunlight is at its highest, ensuring that your solar oven reaches optimal cooking temperatures.
How Does the Performance of a Homemade Solar Oven Compare to Traditional Cooking Methods?
| Aspect | Homemade Solar Oven | Traditional Cooking Methods |
|---|---|---|
| Cooking Time | Generally slower, can take several hours depending on sunlight intensity. | Faster, typically takes minutes to an hour depending on the method. |
| Energy Source | Relies on sunlight, renewable and abundant in sunny areas. | Uses gas or electricity, which may not be renewable and can increase utility bills. |
| Cost | Low cost if made from recycled materials; minimal ongoing expenses. | Higher initial cost for appliances; ongoing fuel or electricity costs. |
| Environmental Impact | Very low; uses no fossil fuels and reduces carbon footprint. | Higher; generates emissions and relies on non-renewable resources. |
| Durability and Maintenance | May require occasional repairs or adjustments; materials can degrade over time. | Generally durable; requires regular maintenance depending on the appliance. |
| Safety Concerns | Requires monitoring to avoid overheating; not suitable for all environments. | Risk of burns, fire hazards, and gas leaks; requires adherence to safety guidelines. |
| Cooking Versatility | Suitable for baking, roasting, and slow cooking; limited by sunlight availability. | Highly versatile; can cook a wide variety of foods quickly. |