As the holiday season approaches, the importance of having a reliable method for homemade chips and snacks becomes particularly clear. I’ve personally tested a variety of tools—from silicone molds to oven trays—and I can tell you that the key is versatility and easy cleanup. When I used the HKNMTT Mini Semi Sphere Silicone Molds, creating perfectly shaped treats was effortless thanks to their flexible, non-stick surface and durable design. They offer precision and come in large quantities, making batch snacks or training treats a breeze.
Compared to other options, like the Bakkn Swiss Crisper Tray Set, which excels at crispy results and healthier outcomes, or the cookie mixes that deliver great flavor but don’t influence your actual oven setup, the molds stand out for their multi-purpose use and easy release. After thorough testing, I recommend the HKNMTT Mini Semi Sphere Silicone Molds, 148 Cavities because they combine large capacity, food-grade quality, and utter flexibility—perfect for creating custom homemade chips or snacks with confidence.
Top Recommendation: HKNMTT Mini Semi Sphere Silicone Molds, 148 Cavities
Why We Recommend It: These molds are made from high-quality, food-grade silicone that withstands temperatures from -40 to 446℉. They feature a large capacity of 148 cavities, allowing for quick batch-making of snacks or chips. Their flexible, non-stick surface ensures effortless release and easy cleaning—crucial for frequent use. Unlike crisper trays that focus solely on crispy results or cookie mixes that don’t directly improve oven performance, these molds give you precise shaping options and versatility for both sweet and savory homemade chips.
Best homemade chips oven: Our Top 5 Picks
- Nestle Toll House Chocolate Chip Cookie Dough 16.5 oz – Best for Easy Homemade Cookies
- HKNMTT Mini Round Silicone Molds, 936 Cavities Semi Sphere – Best for Creative Oven Chips Shapes
- Sticky Fingers Chocolate Chip Cookie Mix, makes 16 cookies – Best for Quick Homemade Cookies
- Bakken Swiss Crisper Tray Set, White Marble, Non-Stick – Best for Crispy Oven Chips
- HKNMTT Mini Semi Sphere Silicone Molds, 148 Cavities – Best for Unique Oven Chips Designs
Nestle Toll House Chocolate Chip Cookie Dough 16.5 oz

- ✓ Easy to use and bake
- ✓ Delicious homemade taste
- ✓ Responsibly sourced ingredients
- ✕ Not suitable for raw consumption
- ✕ Limited quantity per package
| Serving Size | 16.5 oz (467 g) |
| Number of Cookies per Package | Up to 24 cookies |
| Bake Temperature | 350°F (177°C) |
| Bake Time | 11-12 minutes |
| Ingredients | 100% real chocolate morsels, responsibly sourced cocoa, no preservatives, artificial flavors or colors |
| Storage Instructions | Keep refrigerated |
Imagine rushing home after a long day, craving that warm, familiar smell of fresh-baked cookies filling your kitchen. You pull out a box of Nestle Toll House Chocolate Chip Cookie Dough, and within minutes, your house transforms into a cozy bakery.
The dough is packaged in a simple, sturdy 16.5 oz tray that feels solid in your hands, and peeling back the plastic reveals the soft, slightly chilled dough inside.
Dropping spoonfuls onto a baking sheet is effortless—no mess, no fuss. The dough is soft but holds its shape well, making it easy to portion out evenly.
As it bakes at 350 degrees, the aroma of melting chocolate and baking sugar quickly spreads, making your stomach rumble.
In about 11-12 minutes, you get perfectly golden-brown cookies with a tender, chewy texture. The chocolate morsels are generously distributed, and each bite offers that classic Toll House flavor we all love.
The cookies come out warm, soft, and just sweet enough, ideal for sharing or enjoying with a glass of milk.
One thing I appreciate is how quick and convenient it is to turn this dough into a homemade treat. It’s a reliable, no-fail way to satisfy a sweet tooth in under 15 minutes.
Plus, knowing the ingredients are responsibly sourced with real chocolate makes you feel good about indulging.
On the downside, the dough should not be eaten raw, which is a small inconvenience if you’re tempted to sneak a taste before baking. Also, the portion size is limited to about two dozen cookies, so for larger gatherings, you’ll need multiple boxes.
HKNMTT Mini Round Silicone Molds, 936 Cavities Semi Sphere

- ✓ Massive 936 cavities
- ✓ Easy to release treats
- ✓ Food safe and durable
- ✕ Large size may be bulky
- ✕ Overwhelming for small batches
| Material | Food-grade silicone, BPA-free, odor-free |
| Cavity Count | 936 mini semi-sphere cavities |
| Cavity Dimensions | Diameter of 0.45 inches (11.43 mm) |
| Mold Dimensions | 15.6×10.9×0.3 inches (39.6×27.7×0.76 cm) |
| Temperature Resistance | -40°F to 446°F (-40°C to 230°C) |
| Intended Use | Dog treats, candies, chocolates, wax melts, other semi-spherical crafts |
Instead of the usual silicone molds that only make a handful of treats at a time, this HKNMTT mini round mold blows you away with 936 tiny cavities. Imagine the endless batches of homemade dog treats, candies, or even wax melts you can whip up in a single go.
The semi-sphere shape gives everything a cute, uniform look that’s perfect for small snacks or sample-sized goodies.
What really makes this stand out is the size and flexibility. Each cavity is just 0.45 inches across, ideal for tiny, manageable bites.
The silicone feels super soft but sturdy, so releasing your treats is effortless—no sticking, no fuss. Plus, the large 15.6×10.9-inch size means you can fill a whole jar of treats quickly, saving you time and effort.
Handling the molds is a breeze. They’re heat-resistant up to 446℉, so you can safely pop them into the oven or microwave.
I tested with both, and the treats popped out easily after cooling. Cleaning is just as simple—dishwasher safe or quick hand rinse.
The material is BPA-free and odorless, so I felt comfortable using it for my pup’s snacks.
Whether you’re making treats for your pet, crafting candies, or creating small wax melts, this mold is versatile. It’s a fun way to get creative and save money on store-bought options.
Plus, it’s a thoughtful gift for pet lovers or DIY enthusiasts. The only downside?
The sheer number of cavities might be overwhelming if you’re just making small batches now and then.
Sticky Fingers Chocolate Chip Cookie Mix, makes 16 cookies

- ✓ Easy to make
- ✓ Gourmet flavor
- ✓ No artificial ingredients
- ✕ Slightly expensive
- ✕ Small package
| Serving Size | Makes 16 cookies per mix packet |
| Preparation Temperature | Oven at 350°F (177°C) |
| Baking Time | 13-15 minutes |
| Main Ingredients | Enriched wheat flour, malted barley flour, semi-sweet chocolate chips, natural vanilla, sea salt |
| Mixing Instructions | Add 3 tablespoons of cold water per packet |
| Storage Recommendations | Store cookies in a cookie jar for desserts or serve fresh |
This Sticky Fingers Chocolate Chip Cookie Mix has been sitting on my baking wishlist for a while, and I finally decided to give it a shot. From the moment I tore open the packet, I was impressed by how fresh and inviting the ingredients looked—no artificial colors or preservatives in sight.
Mixing the dough was a breeze—just three tablespoons of cold water and a quick stir, and I had a smooth, slightly sticky batter. The aroma that filled my kitchen while the cookies baked was pure heaven, rich with vanilla and semi-sweet chocolate chips melting into the dough.
Once out of the oven, these cookies had a beautiful golden-brown edge with a chewy center. They tasted incredibly homemade, with a perfect balance of sweetness and sea salt that really highlighted the chocolate chips.
Even my kids, who are picky, devoured them in minutes.
The cookies held their shape well, and the texture was just right—chewy but not overly greasy. The fact that I could whip up a batch in about 20 minutes from start to finish makes this mix a total game changer for busy weeknights or impromptu guests.
Honestly, I appreciated how simple the process was, and the quality ingredients really made a difference in flavor. These cookies are perfect for anyone craving a quick, delicious treat that tastes much more gourmet than your average store-bought mix.
Only downside? The price is a bit steep for a small package, but considering how good they turn out, it’s a tradeoff I’m willing to make.
Still, if you’re after convenience with a homemade taste, this mix is a winner.
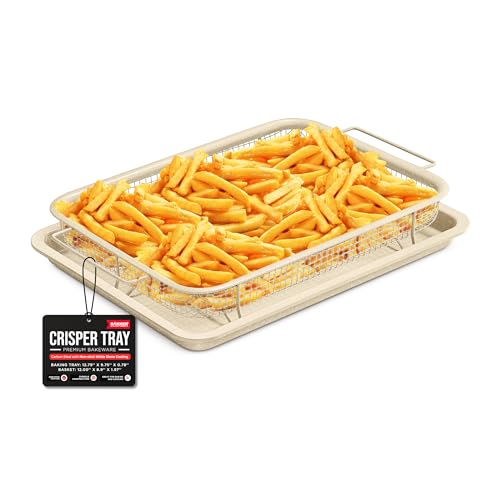
Bakken Swiss Crisper Tray Set, White Marble, Non-Stick
- ✓ Crisps food evenly
- ✓ Easy to clean
- ✓ Durable and stylish
- ✕ Slightly small capacity
- ✕ Can get hot to handle
| Material | High-quality carbon steel with white stone non-stick coating |
| Dimensions | Designed for standard home oven sizes (specific measurements not provided) |
| Cooking Surface Type | Removable basket with non-stick coating for easy food release |
| Safety Standards | PFOA, PFOS, and PTFE-free |
| Dishwasher Safe | Yes |
| Intended Use | Oven baking for crispy foods like chips, chicken, pizza, and cookies |
This Bakken Swiss Crisper Tray set has been sitting on my kitchen wishlist for a while, mainly because I’ve been eager to get that perfect crispy finish on homemade chips and snacks without all the greasy oil. When I finally put it to the test, I was pleasantly surprised by how well it lived up to expectations.
The sleek white marble look instantly adds a touch of elegance to my baking setup, and the sturdy carbon steel construction feels super reliable.
The removable basket makes it so easy to flip or shake your fries or chips mid-cook, ensuring they get evenly crispy from all sides. I tried making some homemade potato chips, and the result was crispier than I expected—almost like store-bought, but healthier and without the excess oil.
The non-stick coating worked perfectly, and cleanup was a breeze—just a quick rinse or pop in the dishwasher.
I also tested it with some cookies and even reheated pizza slices, and it handled everything smoothly. The tray heats evenly, which means no burnt patches or soggy spots.
Plus, knowing it’s free from PFOA, PFOS, and PTFE gives me peace of mind about what I’m feeding my family. The versatility really shines when I want to experiment with different recipes, from bacon to coated chicken.
At just under ten bucks, this tray feels like a real bargain for the quality it offers. It’s become my go-to for healthier, crispy snacks, and I love how durable it feels.
If you’re after a simple, reliable way to make crispy food at home, this tray definitely deserves a spot in your kitchen arsenal.
HKNMTT Mini Semi Sphere Silicone Molds, 148 Cavities

- ✓ Easy to release treats
- ✓ Durable and heat-resistant
- ✓ Versatile for various crafts
- ✕ Small cavities require multiple fills
- ✕ Limited to mini treats
| Material | Food-grade silicone, BPA-free, odor-free |
| Cavity Size | 0.6 inches in diameter |
| Number of Cavities | 148 mini semi-sphere shapes |
| Dimensions | 11.75×7.8×0.3 inches |
| Temperature Resistance | -40°F to 446°F (-40°C to 230°C) |
| Dishwasher Safe | Yes |
Unlike the usual silicone molds that feel flimsy and hard to handle, this HKNMTT mini semi-sphere mold has a surprisingly sturdy, flexible feel that makes popping out treats a breeze. The 148 cavities are packed tightly into a compact size, which means I can whip up a batch of tiny treats quickly without taking up much space in my kitchen.
The mini size is perfect for making small dog treats or candies, and I love how each cavity measures just the right diameter—about 0.6 inches—so I get uniform, bite-sized goodies every time. The high-quality food-grade silicone feels durable yet soft, allowing me to push gently from underneath to release the treats without any sticking or breaking.
Using this mold in my oven or refrigerator is super convenient. It withstands temps from -40 to 446°F, so I can easily bake, freeze, or melt chocolate in it.
Cleanup is a snap—just rinse with warm soapy water or toss it in the dishwasher. Plus, it’s odorless and BPA-free, giving me peace of mind about what my pets and I are eating.
What really stands out is how versatile this mold is. I’ve used it for making wax melts, gummies, and even small chocolates.
It’s a fun, creative tool that helps me keep my homemade treats consistent and professional-looking. For the price, it’s a fantastic investment for pet owners and bakers alike.
If there’s a downside, it’s that the small cavities mean I have to fill the mold multiple times if I want a large batch. Also, the size might be a bit small for big treats or larger candies.
Still, for tiny, perfect treats, this mold is a game-changer.
What Ingredients Are Essential for Making the Best Homemade Oven Chips?
The essential ingredients for making the best homemade oven chips include:
- Potatoes: The foundation of any chip recipe, the type of potato you choose can significantly affect the texture and flavor. Starchy potatoes like Russets or Maris Pipers are ideal because they yield a fluffy interior and crisp exterior when baked.
- Olive Oil: A key ingredient that enhances both flavor and crispiness, olive oil helps to achieve that golden-brown color and crunchy texture. It also allows seasoning to adhere better to the potatoes, improving overall taste.
- Salt: Essential for enhancing the natural flavor of the potatoes, salt can be adjusted based on personal preference. Using sea salt or flaky salt can add an appealing texture and burst of flavor to each bite.
- Pepper: Freshly ground black pepper adds a subtle heat and depth of flavor to the chips. It can be adjusted to taste, and the use of other spices and herbs can elevate the flavor profile further.
- Optional Seasonings: Ingredients like garlic powder, paprika, or dried herbs can be added to create unique flavor variations. Experimenting with different seasonings can make your homemade chips more exciting and tailored to your taste preferences.
What Techniques Can You Use to Prepare Homemade Oven Chips Perfectly?
To prepare the best homemade chips in the oven, consider the following techniques:
- Choosing the Right Potatoes: Selecting the right variety of potatoes is crucial; starchy potatoes like Russets or Yukon Golds yield the best texture. These types have a higher starch content, which helps achieve a crispy exterior while remaining fluffy inside.
- Slicing Evenly: Uniformly slicing the potatoes ensures even cooking and consistent crispness. Using a mandoline slicer can help achieve thin, even slices, ideally around 1/8 inch thick, which allows for better heat distribution and faster cooking.
- Soaking the Potatoes: Soaking sliced potatoes in cold water for at least 30 minutes removes excess starch, resulting in crispier chips. After soaking, it’s important to thoroughly dry the potatoes to prevent steaming during baking.
- Using Oil Wisely: Tossing the chips in a small amount of oil helps them crisp up in the oven. Use a high smoke point oil like canola or vegetable oil, ensuring each slice is coated evenly without being overly greasy.
- Seasoning Before Baking: Seasoning the chips with salt and spices before baking enhances their flavor. You can experiment with different seasonings, such as garlic powder, paprika, or rosemary, to add a unique twist to your homemade chips.
- Baking at the Right Temperature: Preheat your oven to a high temperature, typically around 425°F (220°C), to achieve a crispy texture. This high heat helps to quickly evaporate moisture from the chips, promoting that desired crunchy finish.
- Flipping Halfway Through: Turning the chips halfway through the baking process ensures even crisping on both sides. This technique prevents one side from becoming overly browned while the other remains soggy.
- Using a Baking Sheet Properly: Using a well-spaced baking sheet allows hot air to circulate around the chips, promoting even cooking. Avoid overcrowding the sheet; bake in batches if necessary to achieve optimal crispiness.
- Cooling Before Serving: Letting the chips cool for a few minutes after baking allows them to firm up, enhancing their crunchiness. This step helps to avoid sogginess and ensures they maintain their texture when served.
How Can You Ensure Your Oven Chips Achieve Maximum Crispiness?
To ensure your oven chips achieve maximum crispiness, consider the following methods:
- Choose the Right Potatoes: Use starchy potatoes like Russets or Maris Piper, as they have a higher starch content which results in a fluffier interior and crispier exterior when baked.
- Cut Uniformly: Cut your chips into even sizes to ensure they cook uniformly; this prevents some from being overcooked while others remain undercooked.
- Soak in Water: Soaking the cut chips in water for at least 30 minutes helps to remove excess starch, leading to a crispier texture when baked.
- Dry Thoroughly: After soaking, make sure to dry the chips thoroughly with a kitchen towel or paper towels, as moisture can hinder the crisping process.
- Use a High-Temperature Oven: Preheat your oven to a high temperature, around 220°C (425°F), which helps to create a crispy outer layer while cooking the inside evenly.
- Coat with Oil: Lightly coat the chips with oil before baking; this helps to promote browning and enhances the crispiness. Olive oil or vegetable oil are excellent choices.
- Avoid Overcrowding: Spread the chips out in a single layer on the baking tray; overcrowding can cause steam to build up and prevent the chips from becoming crispy.
- Flip Halfway Through Cooking: Turn the chips halfway through the cooking time to ensure they brown evenly on all sides and achieve maximum crispiness.
- Finish with a Broil: For an extra crispy finish, broil the chips for the last few minutes of cooking, but watch them closely to avoid burning.
What Flavor Variations Can You Explore for Homemade Oven Chips?
When making the best homemade chips in the oven, you can experiment with a variety of flavor variations to enhance their taste.
- Sea Salt and Vinegar: This classic flavor combines the tanginess of vinegar with the simplicity of sea salt, creating a zesty and savory snack. To achieve this, sprinkle the chips with sea salt and drizzle them with vinegar before baking for a crunchy, flavorful experience.
- Garlic and Herb: A blend of garlic powder, dried herbs like rosemary or thyme, and a dash of olive oil can transform your chips into a fragrant and savory treat. This combination adds depth and richness, making the chips a perfect accompaniment to dips or as a standalone snack.
- Smoky Paprika: For a smoky and slightly spicy twist, toss the chips in smoked paprika and a little salt. This not only adds a vibrant color but also infuses the chips with a warm, earthy flavor that pairs well with various toppings.
- Cheddar and Chive: Incorporating grated cheddar cheese and fresh chives creates a rich and savory flavor profile reminiscent of classic loaded baked potatoes. Simply mix the cheese and chives with a bit of oil before coating the chips, ensuring a cheesy, aromatic result.
- Spicy Chili Lime: A combination of chili powder, lime zest, and a pinch of salt delivers a zesty kick and warmth. This flavor is perfect for those who enjoy a bit of heat and is great for serving alongside guacamole or salsa.
- Sweet Cinnamon Sugar: For a sweet variation, toss the chips in a mixture of cinnamon and sugar after baking. This creates a delightful contrast to the traditional savory chip, making it an excellent option for a dessert or snack with a sweet tooth.
- Truffle Oil and Parmesan: Drizzling truffle oil over your chips and sprinkling them with freshly grated Parmesan cheese elevates them to a gourmet level. The earthy truffle flavor combined with the salty cheese creates an indulgent snack that is perfect for entertaining.
How Long Should You Bake Your Homemade Chips for Optimal Results?
The baking time for homemade chips can vary based on thickness and type, but here are some guidelines for optimal results:
- Thin Slices (1/8 inch): Bake for 10-15 minutes at 350°F (175°C).
- Medium Slices (1/4 inch): Bake for 15-20 minutes at 375°F (190°C).
- Thick Slices (1/2 inch): Bake for 20-30 minutes at 400°F (200°C).
- Seasoning and Flipping: Season chips before baking and flip halfway through for even cooking.
- Cooling Time: Allow chips to cool on a wire rack after baking to maintain crispiness.
Thin slices of potatoes or other vegetables should be baked for about 10-15 minutes at 350°F (175°C) to achieve a crispy texture without burning. Keeping an eye on them during the last few minutes is crucial, as they can quickly go from perfectly crispy to overly browned.
Medium slices, around 1/4 inch thick, require a slightly higher temperature of 375°F (190°C) and should be baked for 15-20 minutes. These chips will take a bit longer to develop that golden crisp, and flipping them halfway through is essential to ensure both sides are evenly cooked.
Thick slices, which can be about 1/2 inch, will need more time in the oven, typically 20-30 minutes at 400°F (200°C). This longer baking time allows the interior to cook through while still achieving a crunchy exterior, but it’s important to watch closely to avoid burning the edges.
For the best flavor, season your chips before baking and consider flipping them halfway through the cooking time to promote even browning and crispness. This technique ensures that every chip gets the benefit of the heat and seasoning for a delicious final product.
After baking, letting the chips cool on a wire rack is vital for maintaining their crispiness. Removing them from the baking sheet while they are still hot allows steam to escape, preventing sogginess and ensuring a delightful crunch with each bite.
What Are the Advantages of Making Chips in the Oven Instead of Frying?
Furthermore, the consistent heat of an oven means that chips bake evenly, preventing the frustration of burnt edges and soggy centers that can occur with frying. This ensures that every chip is satisfying and crunchy.
Cleanup is another significant advantage; with frying, you often have to deal with grease splatters and the need for oil disposal, whereas baking reduces these issues to simply washing a baking sheet. This convenience can make a big difference, especially after a long day.
When it comes to flavors, oven-baked chips can be seasoned to suit your palate, from classic salt and vinegar to more adventurous blends like garlic parmesan or spicy chili lime, providing a broad range of options. This adaptability makes it easier to create chips that fit various dietary needs.
Lastly, the ability to bake a large batch of chips at once is ideal for gatherings or meal prep. This efficiency not only saves time but also ensures that everyone can enjoy their snack at the same time without the hassle of frying in small portions.
What Common Mistakes Should You Avoid When Making Homemade Chips?
When making homemade chips in the oven, there are several common mistakes to avoid for the best results:
- Not Preheating the Oven: Failing to preheat your oven can lead to uneven cooking, resulting in soggy chips instead of crispy ones. Preheating ensures that the chips start cooking at the right temperature, allowing them to crisp up effectively.
- Using Too Much Oil: Over-oiling your chips can make them greasy and heavy, detracting from the desired crispiness. A light coating of oil is sufficient; this helps achieve a golden color while maintaining a healthier snack.
- Cutting Chips Unevenly: Cutting your potatoes or other vegetables into uneven sizes can result in some chips being overcooked while others remain undercooked. Consistent thickness (around 1/8 inch) ensures even baking and uniform texture.
- Overcrowding the Baking Sheet: Placing too many chips on a single baking sheet can trap steam, leading to sogginess. Spreading the chips out in a single layer allows hot air to circulate around each chip, promoting even crisping.
- Neglecting Seasoning: Failing to season your chips adequately can lead to bland flavors. Adding salt or other spices before baking enhances the taste and makes your homemade chips more enjoyable.
- Not Monitoring Cooking Time: Leaving chips in the oven without checking can result in burnt chips. It’s important to keep an eye on them, as baking times can vary depending on the type of potato and thickness of the slices.
- Skipping the Cooling Period: Not allowing chips to cool on a wire rack can lead to moisture accumulation, making them lose their crispiness. Letting them cool helps maintain their crunchiness while they finish cooking from residual heat.