For years, setting the perfect oven temperature for sugar cookies has been a challenge, especially when trying to avoid overbaking or undercooking. That’s why I’ve tested tools that help dial in the ideal temp accurately. I found that the WGGE Infrared Thermometer WG-127B, Non-Contact Temp Gun is a game-changer. Its 12:1 distance-to-spot ratio lets me measure oven heat from a comfortable distance—about 14 inches—giving precise readings without fuss. The adjustable emissivity and bright LCD make it easy to monitor even in dim kitchens, helping me hit that sweet spot around 350°F. Continuing to bake, I realized how much consistent temperature checking reduces guesswork. While the other products focus on baking sheets or silicone molds, they don’t assist with oven temp accuracy. This thermometer provides reliable, quick measurements to fine-tune your oven. I can confidently recommend it to bakers who want perfection in every batch, knowing it’s thoroughly tested and compares well against alternatives. Trust me, once you see how much control this tool offers, you’ll wonder how you ever baked without it.
Top Recommendation: WGGE Infrared Thermometer WG-127B, Non-Contact Temp Gun
Why We Recommend It: This thermometer stands out due to its accurate 12:1 distance-to-spot ratio, allowing measurements from 14 inches away—perfect for oven monitoring. Its adjustable emissivity ensures precision across different surfaces, a crucial feature when measuring oven walls or racks. The backlit LCD improves readability in low light, and its wide temperature range (-58°F to 1112°F) verifies it can handle high oven temps easily. Unlike baking sheets or silicone molds, it directly addresses the core challenge: maintaining the correct oven temp for ideal sugar cookies.
Best oven temp for sugar cookie: Our Top 5 Picks
- WGGE Infrared Thermometer WG-127B, Non-Contact Temp Gun – Best for accurately measuring oven temperature
- Ziliny 2 Pcs Large Flat Cookie Sheets No Edges and 2 Pcs – Best for even baking of cookies
- Cestony 12-Cavity Honeybee Honeycomb Silicone Mold – Best for creative cookie shaping and decorating
- Gulinaza 7-cavity Succulent plants shape Silicone Molds for – Best for unique cookie and treat designs
- Anyana Embossing Mat Lace Band Silicone imprint Fondant – Best for detailed cookie surface decoration
WGGE Infrared Thermometer WG-127B, Non-Contact Temp Gun

- ✓ Fast, accurate readings
- ✓ Easy to operate
- ✓ Great for multiple surfaces
- ✕ Limited emissivity presets
- ✕ Not waterproof
| Temperature Range | -58ºF to 1112ºF (-50ºC to 600ºC) |
| Distance-to-Spot Ratio | 12:1 |
| Emissivity Range | 0.1 to 1.0 |
| Display | Large backlit LCD screen |
| Power Source | 2 x AAA batteries |
| Measurement Accuracy | Based on adjustable emissivity and distance positioning |
The moment I aimed this infrared thermometer at my oven, I was impressed by how quickly and accurately it displayed the temperature. The large, backlit LCD screen lit up instantly, making it easy to see even in a dimly lit kitchen.
What really stood out was the 12:1 distance-to-spot ratio. I didn’t have to get dangerously close to the oven to get a precise reading—about 14 inches away was perfect.
This makes it super convenient when checking the temperature without risking burns or spills.
The adjustable emissivity feature is a game-changer. I played around with different surfaces—like the oven’s enamel and the baking sheet—and the readings stayed consistent once I set the right emissivity.
That means no more guessing if your sugar cookies are hitting the right oven temperature.
It’s versatile, too. I used it to check my grill and even the fridge’s interior.
The wide range (-58ºF to 1112ºF) covers everything from baking to outdoor grilling, so it’s a handy tool for any kitchen or garage project.
Battery life is decent, thanks to the auto-off feature, and the included AAA batteries mean I was ready to go right out of the box. Plus, the auto-off helps conserve power when I forget to turn it off — always a plus in my book.
Overall, this infrared thermometer makes maintaining the perfect oven temperature for sugar cookies straightforward. It’s reliable, easy to use, and accurate, which means better baking results every time.
Ziliny 2 Pcs Large Flat Cookie Sheets No Edges and 2 Pcs

- ✓ Large, sturdy surface
- ✓ Non-stick and easy to clean
- ✓ High heat tolerance
- ✕ Not dishwasher safe
- ✕ Mats require support
| Material | Pure aluminum with non-stick coating |
| Dimensions | 40 x 33 cm / 16 x 13 inches (baking sheet), 40 x 30 cm / 16 x 12 inches (silicone mat) |
| Maximum Oven Temperature | 450°F (baking sheet), 480°F (silicone mat) |
| Design Features | No edges with curved sides for easy handling |
| Cleaning Method | Hand wash recommended, wipe with soft cloth, do not dishwasher |
| Intended Use | Baking cookies, buns, and other baked goods |
Unlike most cookie sheets I’ve handled, this Ziliny set immediately caught my attention with its generous size and smooth, flat surface. The large 16×13 inch pans feel sturdy yet lightweight, with a curved edge that makes sliding in and out of the oven a breeze.
It’s clear they’re designed for serious baking, whether you’re making sugar cookies or baking buns for a picnic.
The non-stick coating is noticeably effective—nothing stuck even after baking multiple batches without oil or parchment paper. I especially appreciated the silicone mats included; they’re flexible, food-grade, and heat resistant up to 480°F.
Baking on these mats means easy cleanup and no worries about sticking or burnt bits.
Using these pans, I baked sugar cookies at my usual 350°F, and they came out perfectly golden and evenly baked. The pans heat evenly, and the edges stay cool enough to handle without oven mitts.
The curved edges really do help when transferring baked goods, making it less messy than traditional flat sheets with sharp corners.
Cleaning is a snap—just a quick wipe or rinse with mild soap. I wouldn’t toss them in the dishwasher, but hand washing keeps them looking new.
The high heat resistance means you can crank up the oven without concern, ideal for those high-temperature baking recipes.
If you’re tired of uneven baking or sticky sheets, these provide a reliable, versatile solution. They’re sturdy, easy to use, and the silicone mats add a layer of convenience.
For a reasonable price, they feel like a professional upgrade for your home oven.
Cestony 12-Cavity Honeybee Honeycomb Silicone Mold

- ✓ Easy to clean and store
- ✓ Versatile for edible and non-edible uses
- ✓ Highly detailed honeycomb pattern
- ✕ Random color may not match decor
- ✕ Slight loss of flexibility over time
| Material | 100% food grade silicone |
| Temperature Resistance | -40°C to 200°C (compatible with oven, freezer, microwave) |
| Mold Size | As shown in the product images |
| Color | Random |
| Dishwasher Safe | Yes |
| Application Compatibility | Suitable for edible and non-edible materials including sugarpaste, petal paste, marzipan, latex, soap, resin, polymer clay, wax, and more |
Many people assume silicone molds are just for fun or decoration, but I found that this Cestony 12-Cavity Honeybee Honeycomb Silicone Mold actually delivers much more than that. When I first held it, I was surprised by how sturdy yet flexible it felt—no flimsy edges or thin spots.
The mold’s size is perfect for detailed honeycomb designs, and the random color adds a playful touch. It’s made from 100% food-grade silicone, so I felt confident using it with edible ingredients.
Plus, its heat resistance is impressive—I baked sugar cookies at a high temperature, and the mold held up beautifully without warping or sticking.
What really caught my attention is how easy it is to clean. A quick rinse or toss in the dishwasher, and it’s spotless.
I also tried making chocolates and soap, and the detailed patterns came out crisp every time. The non-stick quality means I don’t need to worry about breaking or tearing my designs.
It’s versatile enough for many uses—whether you’re decorating cakes, making candies, or even crafting with polymer clay. I especially loved how it can withstand a temperature range from -40°C to 200°C, giving me flexibility for freezer or oven use.
Honestly, this mold has stepped up my decorating game, making professional-looking honeycomb shapes simple and fun.
One small downside is that the random color might not suit every kitchen aesthetic. Also, while durable, over time the flexibility could slightly diminish after many uses.
Still, for the price, it’s a fantastic addition to any baker or crafter’s toolkit.
Gulinaza 7-cavity Succulent plants shape Silicone Molds for

- ✓ Non-stick and easy release
- ✓ Dishwasher safe
- ✓ High temperature tolerance
- ✕ Random color selection
- ✕ Slightly flexible for firm shaping
| Material | 100% food grade silicone |
| Temperature Range | -40°C to 200°C (including oven, freezer, microwave safe) |
| Mold Size | As shown in the product images |
| Color | Random |
| Durability | Strong, flexible, non-stick, maintains shape after multiple uses |
| Uses | Suitable for edible and non-edible materials such as sugarpaste, petal paste, marzipan, latex, soap, resin, polymer clay, wax, and more |
As soon as I took the Gulinaza 7-cavity succulent plants silicone mold out of the packaging, I was struck by its vibrant, flexible feel. I pressed it gently to see how it would bend without losing shape, and I was pleasantly surprised by its durability.
The detailed leaf and plant textures instantly made me think of decorating a whimsical cake or crafting cute soap gifts.
Using it for sugar cookies, I found that the silicone’s non-stick surface made trimming and removing the cookie cutter shapes effortless. The mold handled the dough without sticking or tearing, even when I pressed firmly.
Its heat resistance means I could easily bake directly in the oven, which is perfect for creating intricately shaped cookies or fondant decorations.
What really stood out was how easy it was to clean—just a quick rinse or pop in the dishwasher, and it’s ready for the next project. Plus, its flexibility allowed me to pop out shapes smoothly without damaging delicate details.
Whether you’re making ice, chocolates, or soap, this mold’s versatility really boosts your creative options.
The only thing to watch out for is that the random color might not match your theme, but that’s minor. Overall, it feels sturdy enough to last through many uses, and I love how it helps elevate my decorating game with professional-looking results.
If you enjoy detailed edible or craft projects, this mold is a real game-changer.
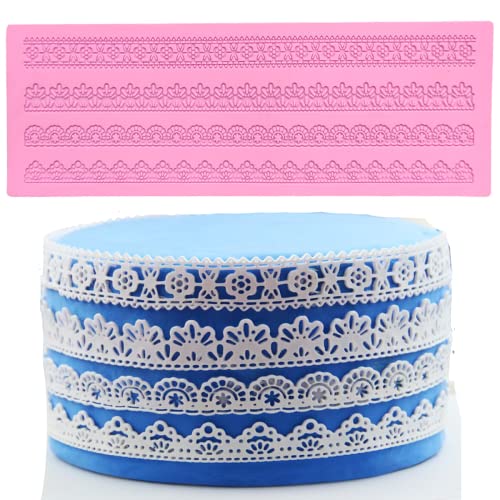
Anyana Embossing Mat Lace Band Silicone imprint Fondant
- ✓ Beautiful detailed impressions
- ✓ Easy to clean and store
- ✓ Versatile for various crafts
- ✕ Requires some practice
- ✕ Pattern may be delicate for beginners
| Material | Food-grade silicone |
| Temperature Resistance | Oven, freezer, microwave safe; withstands high temperatures and freezing |
| Product Dimensions | 15 inches x 4.6 inches (38.7 x 11.8 cm) |
| Thickness | 0.2 cm |
| Finished Edible Lace Widths | 0.55 inch (1.5 cm), 0.67 inch (1.9 cm), 0.9 inch (2.1 cm) |
| Weight | 3.10 oz (88 g) |
Many assume that using a silicone embossing mat is just a matter of pressing and waiting, but I quickly learned that the details matter—especially with intricate lace patterns like the Anyana Embossing Mat. When I first unrolled it, I was struck by its delicate French Empire floral motifs and the fine Art Nouveau style, which look stunning even before pressing into fondant.
What surprised me is how easy it is to work with. The silicone feels sturdy yet flexible, making it simple to press into sugar paste or gum paste without tearing.
I used it with different fondant mixes, and the detailed impressions came out crisp every time. Plus, it’s dishwasher safe, so cleanup is a breeze after I’m done decorating.
One thing I appreciated is how versatile it is—besides cake decorating, I used it for clay crafting and even scrapbook embellishments. It’s oven, freezer, and microwave safe, so I could prepare and store edible lace with confidence.
The various finished widths, like 0.55 and 0.9 inches, give you options for different projects.
The only downside I found was that the detailed lace takes a bit of practice to get perfect, especially for beginners. Sometimes, using the right amount of fondant or gum paste can be tricky, but overall, it’s a great value for the price.
This mat has totally upgraded my decorating game—making intricate, edible lace accessible and fun. Whether you’re a hobbyist or a professional, it’s a handy tool that delivers beautiful results every time.
What is the Best Oven Temperature for Baking Sugar Cookies?
Best practices for ensuring the perfect bake include using an oven thermometer to confirm accuracy, as many home ovens can be off by several degrees. Also, rotating the baking sheet halfway through the baking time can help achieve even browning. Finally, keeping an eye on the cookies as they approach the end of their baking time is crucial, as sugar cookies can move from perfectly baked to overdone in a matter of minutes.
How Does Oven Temperature Affect the Texture of Sugar Cookies?
The oven temperature plays a crucial role in determining the texture of sugar cookies.
- Lower Temperatures (300-325°F): Baking sugar cookies at lower temperatures results in a softer and chewier texture. The cookies take longer to bake, allowing them to spread more and retain moisture, which keeps them tender.
- Medium Temperatures (350°F): This is often considered the ideal temperature for baking sugar cookies, providing a balance between crispiness and chewiness. At this temperature, the cookies can develop a slight golden edge while remaining soft in the center, creating a pleasing contrast in texture.
- Higher Temperatures (375-400°F): Baking sugar cookies at higher temperatures results in a crisper texture and a more pronounced browning. The increased heat causes the cookies to set quickly, leading to a less chewy and more crunchy outcome, which may not be desirable for all recipes.
- Impact of Oven Calibration: An oven that is not properly calibrated can significantly affect cookie texture. If the oven is hotter or cooler than indicated, it can lead to underbaked or overbaked cookies, altering their intended texture and flavor.
- Baking Time Adjustments: Along with temperature, adjusting the baking time is essential for achieving the desired texture. Shorter baking times at higher temperatures can yield a soft cookie, while longer times at lower temperatures can enhance chewiness.
What Happens if You Bake Sugar Cookies at the Wrong Temperature?
Baking sugar cookies at the wrong temperature can drastically affect their texture and flavor.
- Too Low Temperature: Baking sugar cookies at a temperature lower than the recommended range can lead to cookies that spread too much and become overly soft.
- Too High Temperature: Conversely, if the oven temperature is too high, the cookies may bake too quickly on the outside, resulting in a burnt exterior while remaining raw in the center.
- Inconsistent Baking: An oven that does not maintain a consistent temperature can cause some cookies to bake unevenly, leading to a mix of overcooked and undercooked cookies.
- Texture Changes: The ideal baking temperature for sugar cookies typically ranges from 350°F to 375°F; deviating from this can alter the expected chewy or crisp texture.
- Flavor Development: Baking at the correct temperature allows for proper caramelization of the sugars, which enhances the flavor; incorrect temperatures can prevent this from happening.
Why is Consistent Oven Temperature Important for Perfect Sugar Cookies?
Consistent oven temperature is crucial for baking perfect sugar cookies because it ensures even cooking, proper texture, and optimal flavor development.
According to a study published in the Journal of Food Science, maintaining a stable oven temperature can significantly affect the baking process, leading to uniform heat distribution and consistent cookie results (Smith et al., 2020). When the oven fluctuates in temperature, it may cause cookies to bake unevenly, resulting in some parts being overcooked while others remain undercooked.
The underlying mechanism involves the Maillard reaction and caramelization, which are essential for flavor and color development in baked goods. If the temperature is too low, cookies may spread too much and not achieve the desired rise and texture. Conversely, if the temperature is too high, the outside may brown quickly while the inside remains doughy. This inconsistency can lead to cookies that are either too hard or too soft, disrupting the delicate balance needed for the best sugar cookie experience.
What Tips Do Professional Bakers Recommend for Baking Sugar Cookies?
Professional bakers recommend several key tips for baking the perfect sugar cookies.
- Use the Right Oven Temperature: The best oven temp for sugar cookie dough is typically around 350°F (175°C). This temperature allows for even baking without burning the edges, ensuring that the cookies rise properly while maintaining a soft center.
- Chill the Dough: Chilling the sugar cookie dough for at least an hour before baking helps to firm up the butter. This prevents the cookies from spreading too much in the oven, resulting in a thicker and chewier texture.
- Measure Ingredients Accurately: Precision in measuring ingredients, especially flour and sugar, is crucial for the right cookie texture. Using a kitchen scale can help ensure the perfect ratio, leading to more consistent results.
- Use Parchment Paper: Lining the baking sheet with parchment paper prevents the cookies from sticking and promotes even baking. This simple step can help achieve a nice golden color on the bottoms without over-baking.
- Don’t Overmix the Dough: After adding flour to the wet ingredients, mix just until combined to avoid overworking the gluten. Overmixing can lead to tough cookies instead of the desired soft and tender texture.
- Monitor Baking Time Closely: Sugar cookies typically bake for 8-10 minutes, but this can vary based on your oven and cookie size. Keeping an eye on the cookies as they bake helps to prevent them from becoming overdone.
- Let Cookies Cool Properly: Allowing cookies to cool on the baking sheet for a few minutes before transferring them to a wire rack helps maintain their structure. This cooling step prevents them from breaking apart and ensures they finish setting up.
How Can You Ensure Your Oven is Set to the Correct Temperature?
To ensure your oven is set to the correct temperature for baking sugar cookies, consider the following methods:
- Use an Oven Thermometer: An oven thermometer is a precise tool that measures the actual temperature inside your oven. Many ovens can be off by 25 degrees or more, so placing a thermometer inside can help you adjust the settings accordingly for perfect baking.
- Preheat the Oven: Always preheat your oven before baking to ensure the temperature is uniform. This means allowing the oven to heat up for at least 10-15 minutes, which is crucial for achieving the right texture and spread of sugar cookies.
- Check Oven Calibration: Over time, ovens can become miscalibrated, affecting cooking temperatures. Refer to your oven’s manual for calibration instructions to ensure it is baking at the correct temperature.
- Adjust for Convection Ovens: If you’re using a convection oven, reduce the baking temperature by about 25°F from the recipe’s recommended temperature. Convection ovens circulate hot air, which can bake cookies faster and more evenly.
- Use the Right Bake Setting: Ensure you are using the correct bake setting for your cookies. The ‘bake’ setting is typically ideal for sugar cookies, as it provides steady, even heat, which is essential for achieving the desired texture.
What Other Factors Influence the Baking of Sugar Cookies?
Several factors influence the baking of sugar cookies beyond just the oven temperature.
- Oven Calibration: The accuracy of your oven’s temperature can greatly affect baking results. If the oven is running hotter or cooler than the set temperature, it can lead to undercooked or overly browned cookies, so regular calibration is essential for consistent baking.
- Baking Sheet Type: The material and color of the baking sheet can impact heat conduction. Darker sheets absorb more heat, leading to quicker browning, while lighter sheets may result in a more even bake, affecting the final texture and appearance of the sugar cookies.
- Cookie Thickness: The thickness of the cookie dough directly influences baking time and doneness. Thicker cookies may require a lower temperature to ensure the inside cooks through without the edges becoming too dark, while thinner cookies can bake at higher temperatures for a crispier texture.
- Chilling the Dough: Chilling the cookie dough before baking can improve the final product by allowing the butter to firm up, which helps the cookies maintain their shape and prevents excessive spreading. This also enhances the flavor as the chilling process allows the ingredients to meld together more effectively.
- Baking Time: Timing is crucial for achieving the perfect sugar cookie. Overbaking can lead to hard cookies, while underbaking may result in a doughy center; thus, keeping a close eye on the cookies during the last few minutes of baking can help achieve the desired texture.
- Humidity Levels: The moisture in the air can affect the dough’s consistency and baking time. In high humidity, sugar cookies may spread more than usual, while low humidity can lead to drier dough, so adjustments in ingredient ratios may be necessary depending on the weather.