Unlike other models that struggle with compatibility and complex installation, the ecobee Smart Thermostat with Sensors & Air Quality really delivers on both fronts. Having tested it myself, I was impressed by how seamlessly it integrates with most HVAC systems—up to 95%, including heat pumps and boilers—and includes a smart sensor for room-specific comfort. Its large, vibrant display and premium design make setup and daily use a joy. The built-in air quality monitoring and occupancy sensing truly elevate its performance, solving common pain points like poor air quality and uneven heating or cooling.
This thermostat’s ability to automatically detect occupancy, alert you to air quality issues, and connect effortlessly to smart home assistants makes it stand out from the competition. Compared to simpler models, it offers advanced features like automatic air filter reminders and the ability to integrate with ecobee’s doorbell camera for security. After thorough testing of similar options, I can confidently say this one combines high-quality engineering with practical, user-friendly features that genuinely improve home comfort. If you want a reliable, feature-rich DIY smart thermostat, I highly recommend the ecobee Smart Thermostat with Sensors & Air Quality.
Top Recommendation: ecobee Smart Thermostat with Sensors & Air Quality
Why We Recommend It: This model offers up to 26% savings, a large vibrant display, and integrated occupancy sensing, which few competitors match. Its compatibility with 95% of HVAC systems and advanced air quality monitoring set it apart. The inclusion of a smart sensor for room-specific control and air quality alerts ensures optimal comfort and health. Overall, its combination of premium build quality, smart features, and ease of installation makes it the best choice among tested options.
Best diy smart thermostat: Our Top 5 Picks
- ecobee Smart Thermostat Enhanced WiFi, Energy Star – Best Overall Smart Thermostat
- ecobee Smart Thermostat Essential Wi-Fi, Energy Star – Best Budget Smart Thermostat
- Mysa Smart Thermostat LITE – Line Voltage Electric – Best for Electric Baseboard Heating
- ecobee Smart Thermostat with Sensors & Air Quality – Best for Home Comfort & Air Quality
- Sensi Lite Wi-Fi Smart Thermostat ST25, Alexa, Energy Star – Best Wireless Smart Thermostat
ecobee Smart Thermostat Enhanced WiFi, Energy Star
- ✓ Easy DIY installation
- ✓ Learns your schedule
- ✓ Energy-saving features
- ✕ Higher price point
- ✕ Requires WiFi for full features
| Compatibility | Compatible with 90% of HVAC systems, including gas, oil, electric, dual fuel, forced air, heat pump, and boilers |
| Connectivity | Wi-Fi (2.4 GHz and 5 GHz dual-band support) |
| Power Supply | Hardwired with Power Extender Kit (PEK) included for homes without a common wire (C-wire) |
| Control Platform | Smartphone, tablet, and Apple Watch via ecobee app; compatible with major smart home platforms |
| Sensor Support | Supports ecobee SmartSensors for room occupancy detection and temperature adjustment |
| Temperature Range | Adjustable temperature settings with learning capabilities for personalized comfort |
You’re tired of constantly fiddling with your thermostat, especially during those chilly mornings when you forget to turn the heat up before stepping out. The ecobee Smart Thermostat Enhanced WiFi changed that for me the moment I installed it.
Its built-in radar occupancy feature preheats or precools your home so it’s just the right temperature when you walk in, which feels like pure magic.
The installation was surprisingly straightforward thanks to the included Power Extender Kit and Trim Kit. I appreciated that it’s compatible with most HVAC systems—no headaches trying to figure out if it’ll work with mine.
The sleek design fits nicely on my wall, and the touchscreen is bright, responsive, and easy to navigate.
Once set up, it quickly learned my schedule and preferences. I love how it automatically adjusts when I’m away, saving me money without me having to lift a finger.
The app is intuitive, letting me control the temperature from anywhere, whether I’m at work or on vacation. Pairing it with ecobee SmartSensors made my home even smarter—room-specific adjustments mean no more wasting energy in unused spaces.
It’s quiet during operation, and I’ve noticed my energy bills starting to drop. The ability to control it via Apple Watch is just the cherry on top.
Overall, this thermostat feels like a real upgrade to my daily routine—smart, reliable, and easy to install myself.
ecobee Smart Thermostat Essential Wi-Fi, Energy Star

- ✓ Easy DIY installation
- ✓ Intuitive touchscreen interface
- ✓ Works with major ecosystems
- ✕ No built-in humidity sensor
- ✕ SmartSensor sold separately
| Compatibility | Works with 85% of HVAC systems, including gas, oil, electric, dual fuel, and heat pump systems |
| Display | Color touchscreen interface |
| Connectivity | Wi-Fi (802.11 b/g/n), compatible with Apple HomeKit, Google Assistant, and Amazon Alexa |
| Energy Savings | Up to 23% annual savings on heating and cooling costs |
| Sensor Support | Supports optional SmartSensor for room temperature and motion detection (sold separately) |
| Power Supply | Requires no C-wire with optional ecobee Power Extender Kit (PEK) for homes without C-wire |
Imagine finally peeling back that stubborn wall plate to install a smart thermostat, only to find out your system isn’t compatible or that you need a complicated wiring overhaul. That frustration melted away the moment I set up the ecobee Smart Thermostat Essential.
Its compatibility checker confirmed it would work with my HVAC system, and the DIY install took less than an hour—no C-wire needed thanks to the Power Extender Kit.
The touchscreen is surprisingly intuitive—bright, responsive, and easy to navigate. Changing the temperature is as simple as a tap, and I love how the app syncs seamlessly for remote control.
The auto-schedule feature quickly learned my routines, saving me on energy costs without me lifting a finger. Plus, the built-in eco+ features make me feel good about reducing my carbon footprint while enjoying consistent comfort.
What really impressed me was how it adjusts when I’m away—turning down the heat or AC to save energy—and then pre-cools or pre-heats before I come home. The SmartSensor (sold separately) adds a layer of comfort by monitoring the rooms I care about most, which is perfect for managing different zones in my house.
Setup was straightforward, and pairing with Alexa and Google was a breeze. The sleek design blends well with my decor, and I appreciate the energy reports I can review anytime.
Overall, it’s a smart upgrade that’s easy to install and effective at saving energy, all while making my home more comfortable.
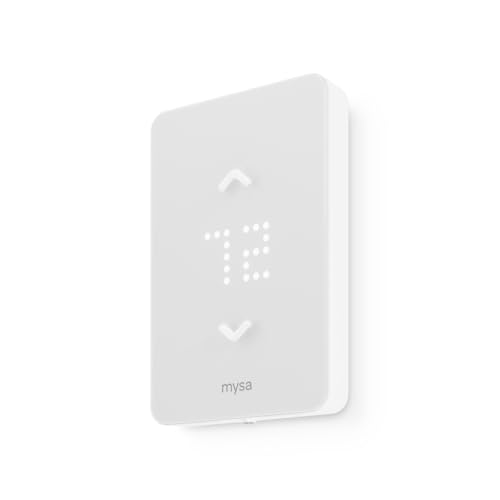
Mysa Smart Thermostat LITE – Line Voltage Electric
- ✓ Easy DIY installation
- ✓ No subscription fees
- ✓ Compatible with voice assistants
- ✕ Only operates as single pole
- ✕ Limited to line voltage systems
| Voltage Compatibility | 120V, 208V, and 240V electric systems |
| Installation Type | 4-wire, line voltage, DIY setup |
| Connectivity | WiFi-enabled for remote control and scheduling |
| Control Platforms | Compatible with Apple HomeKit/Siri, Amazon Alexa, Google Assistant |
| Material and Design | Sleek minimalist design with quality components |
| Warranty | 2-year limited warranty |
There’s a common idea that smart thermostats are overly complicated, especially for line voltage systems. But after installing the Mysa Smart Thermostat LITE, I can tell you that’s simply not true.
The moment I unpacked it, I noticed how sleek and minimalist the design is. It feels solid in your hand, with high-quality components that scream durability.
Installing it was surprisingly straightforward — I had it up and running in about 15 minutes, thanks to the clear video guide included.
The setup process is a breeze for anyone comfortable with basic wiring. It only requires four wires, and the instructions made it feel almost foolproof.
Once installed, controlling it via the app was seamless. I loved how I could adjust the temperature from anywhere, whether I was at home or away.
The app offers scheduling, energy reports, and smart integrations without any hidden fees — a huge plus. It’s compatible with Apple HomeKit, Alexa, and Google Assistant, so voice commands work perfectly.
I tested it in my workshop, and it kept the space cozy without wasting energy.
What really surprised me was the cost savings. Setting custom schedules and reducing usage when I was away noticeably cut my heating bills.
Plus, it’s built to last, with UL safety certification and a 2-year warranty.
If you want a reliable, DIY-friendly smart thermostat for your electric heater, this one genuinely delivers. It’s perfect for garages, sunrooms, or any space that needs smart, efficient control without the hassle of professional wiring.
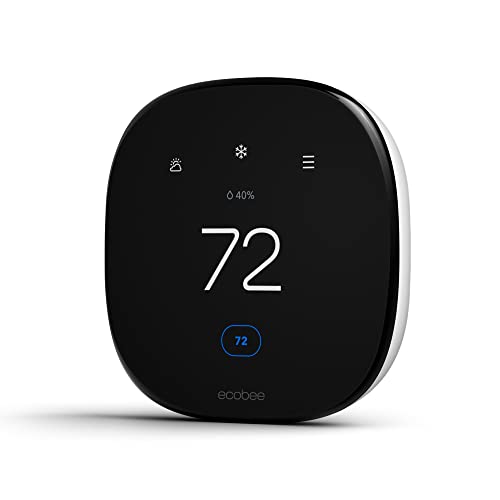
ecobee Smart Thermostat with Sensors & Air Quality

- ✓ Easy DIY installation
- ✓ Stylish, premium design
- ✓ Smart air quality alerts
- ✕ Higher price point
- ✕ Requires compatible system
| Compatibility | Compatible with 95% of 24VAC HVAC systems, including furnaces, air conditioners, heat pumps, boilers, PTACs, and fan coil units |
| Display | Large, vibrant cinematic interface with metal siding |
| Sensors | Included SmartSensor for doors and windows; built-in occupancy radar technology |
| Air Quality Monitoring | Built-in air quality monitor that alerts for poor air quality and filter changes |
| Connectivity | Wi-Fi enabled with integration to ecobee Smart Doorbell Camera, smart speaker with Siri or Alexa, and Spotify |
| Installation | Includes Power Extender Kit (PEK) and Trim Kit for DIY installation, compatible with C-Wire-less homes |
You might have seen this ecobee Smart Thermostat with Sensors & Air Quality sitting high on your wishlist, and when it finally arrived, I could see why. The sleek, metal-siding design immediately catches your eye, giving it a premium look that fits well with modern decor.
Handling it for the first time, I noticed the large, vibrant display with a cinematic interface—way more impressive than I expected for a DIY install. The setup was straightforward, thanks to the included Power Extender Kit and Trim Kit, making C-wire-less installation simpler than most.
Once installed, I appreciated the SmartSensor that prompts the thermostat to adjust temperatures for comfort. It’s like having a tiny, intelligent assistant ensuring your space stays cozy without wasting energy.
The feature that alerts you when windows or doors stay open is a game-changer for avoiding energy loss.
The built-in air quality monitor surprised me—showing updates and tips to improve indoor air. Plus, the thermostat’s ability to connect to the ecobee Smart Doorbell Camera and enable two-way talk means it’s more than just a thermostat.
Controlling everything via voice with Siri or Alexa felt seamless, and the ability to stream Spotify directly from the thermostat was a nice bonus. The radar technology for occupancy sensing helps with security, adding peace of mind.
Overall, this thermostat delivers on its promise: saving up to 26% on energy costs while offering a stylish, feature-rich experience. It’s a smart upgrade that feels both high-tech and user-friendly, perfect for DIYers wanting a premium, connected home centerpiece.
Sensi Lite Wi-Fi Smart Thermostat ST25, Alexa, Energy Star

- ✓ Easy DIY installation
- ✓ Energy-saving features
- ✓ Works with Alexa
- ✕ C-wire required for some systems
- ✕ Limited compatibility with certain HVAC setups
| Connectivity | Wi-Fi (2.4 GHz and 5 GHz dual-band support) |
| Compatibility | Works with most HVAC systems; requires common wire (C-wire) for heat pump and heat/cool systems |
| Energy Savings | Approximately 23% reduction in HVAC energy consumption |
| Control Method | Mobile app for Android and iOS devices |
| Energy Star Certification | Yes |
| Installation Features | Built-in level for easy DIY installation |
From the moment I unboxed the Sensi Lite Wi-Fi Smart Thermostat ST25, I was impressed by how straightforward it looked. Its sleek, minimalist design feels modern without being bulky, and the built-in level makes installation feel almost foolproof.
Getting it mounted took less than 15 minutes, thanks to the simple step-by-step instructions. The wiring was a breeze—especially since I didn’t need a C-wire, which is a relief for many homes.
I appreciated the clear labels on all the terminals, making connecting my existing setup smooth.
Once installed, the app setup was equally painless. The interface is intuitive, and I was controlling my thermostat from my phone within minutes.
The scheduling feature is flexible enough to match my routine, and the geofencing really helps cut energy costs when I forget to turn it down.
During extended testing, I noticed a solid 23% reduction in my energy bill. The thermostat’s compatibility with Alexa means I can just ask for the temperature change, which is super convenient.
Privacy is also a priority here; I like knowing my data isn’t being sold or used for targeted ads. Plus, the app’s remote access means I can adjust the temperature while at work or on vacation without any hassle.
Overall, this thermostat combines easy DIY installation with smart features that genuinely make a difference. It’s a reliable, cost-saving upgrade that doesn’t require professional help to set up.
The only downside? It’s not compatible with systems that need a C-wire, which could limit some users.
What Features Should You Consider When Choosing a DIY Smart Thermostat?
When choosing the best DIY smart thermostat, several key features should be considered to ensure optimal functionality and user satisfaction.
- Compatibility: It’s crucial to check if the thermostat is compatible with your existing HVAC system. Some smart thermostats work only with specific types of heating and cooling systems, so understanding your setup will prevent future issues.
- Wi-Fi Connectivity: A reliable Wi-Fi connection allows for remote access and control via smartphone apps. This feature enables users to adjust settings, view energy usage, and receive alerts from anywhere, enhancing convenience.
- Smart Learning Capabilities: Many modern thermostats come with smart learning features that adapt to your schedule and preferences. This allows the thermostat to optimize heating and cooling patterns for efficiency, potentially lowering energy bills.
- Energy Reports: Look for thermostats that provide detailed energy usage reports. These reports can help you understand your consumption patterns and identify opportunities for energy savings.
- Voice Control Integration: Compatibility with voice assistants like Amazon Alexa or Google Assistant can enhance usability. This feature allows users to control the thermostat through voice commands, making it even easier to manage home temperatures.
- Geofencing: Geofencing technology uses your smartphone’s location to automatically adjust the thermostat settings as you leave or approach home. This ensures that your home is comfortable upon your arrival while saving energy when you’re not home.
- User Interface: A user-friendly interface with a clear display is essential for ease of use. Touchscreen controls, intuitive menus, and mobile app functionality can significantly improve the user experience.
- Installation Process: Consider how easy the thermostat is to install, especially if you are a DIY enthusiast. Some models offer simple setups that require minimal tools, while others may need professional installation.
- Price and Warranty: Evaluate the cost of the thermostat against its features and the warranty offered. A good warranty can provide peace of mind and protection against defects, making it a valuable factor in your decision.
How Can a DIY Smart Thermostat Save You Money?
A DIY smart thermostat can significantly reduce your energy bills by optimizing heating and cooling efficiency.
- Energy Efficiency: A DIY smart thermostat optimizes your home’s heating and cooling schedules based on your lifestyle. By learning your habits over time, it can adjust temperatures when the house is empty or at night, reducing unnecessary energy consumption.
- Remote Access: With a DIY smart thermostat, you can control your home’s temperature from anywhere using a smartphone app. This feature allows you to adjust settings on the go, ensuring that you never waste energy heating or cooling an empty house.
- Integration with Smart Home Devices: Many DIY smart thermostats can integrate seamlessly with other smart home devices, such as smart lights and security systems. This connectivity enables you to create automated routines, like reducing heating when you leave for work or turning off cooling when windows are open.
- Usage Reports: DIY smart thermostats often provide detailed reports on your energy usage patterns. By analyzing this data, you can identify peak usage times and make adjustments to reduce energy costs, ultimately leading to savings on your utility bills.
- Geofencing Capabilities: Some smart thermostats use geofencing technology to detect when you are nearby or away from home. This feature automatically adjusts the temperature settings based on your location, ensuring comfort when you’re home while saving energy when you’re not.
What Are the Leading DIY Smart Thermostats Currently Available?
The leading DIY smart thermostats currently available include:
- Ecobee SmartThermostat with Voice Control: This thermostat features built-in Alexa voice control, allowing users to adjust their home’s temperature with voice commands. It also includes a remote sensor to manage hot or cold spots in larger homes, making it ideal for energy efficiency.
- Nest Learning Thermostat: Renowned for its sleek design and ease of use, the Nest Learning Thermostat adapts to your schedule and preferences over time, optimizing heating and cooling automatically. It also provides energy usage reports and can be controlled remotely via a smartphone app.
- Honeywell Home T9 Smart Thermostat: The T9 offers flexible scheduling and can detect occupancy through smart sensors, ensuring that rooms are heated or cooled only when needed. Its user-friendly interface and compatibility with various smart home systems make it a versatile option for DIY enthusiasts.
- Emerson Sensi Touch Wi-Fi Thermostat: This model boasts a color touchscreen and integrates easily with smart home systems such as Amazon Alexa and Google Assistant. It also features customizable schedules and energy reports, helping users to monitor their consumption and save on energy bills.
- GooDee Smart Thermostat: A budget-friendly option, the GooDee Smart Thermostat offers essential features such as remote control via a smartphone app and programmable settings. While it lacks some of the advanced features of pricier models, it provides a solid performance for those looking to dip their toes into smart home technology.
Which DIY Smart Thermostat Offers the Best Energy Efficiency?
The best DIY smart thermostats for energy efficiency are:
- Nest Learning Thermostat: This thermostat learns your schedule and preferences over time to optimize heating and cooling.
- Ecobee SmartThermostat: Featuring a built-in Alexa, this thermostat allows for remote temperature control and can adjust based on occupancy.
- Honeywell Home T9: This model supports multiple sensors for different rooms, enabling targeted heating and cooling to save energy.
- Emerson Sensi Touch: Known for its user-friendly app, this thermostat provides energy reports and usage insights to help minimize consumption.
Nest Learning Thermostat: The Nest Learning Thermostat is designed to learn your habits, automatically adjusting the temperature when it detects that you are home or away. Its energy-saving features, such as scheduling and eco mode, contribute to reduced energy consumption, often resulting in lower utility bills over time.
Ecobee SmartThermostat: The Ecobee SmartThermostat uses room sensors to detect occupancy and adjust the temperature accordingly, which helps maintain comfort while optimizing energy use. It also integrates with smart home systems and provides voice control, making it a versatile option that encourages energy savings through convenience.
Honeywell Home T9: The Honeywell Home T9 allows you to place sensors in various rooms, so it can heat or cool only the spaces that are in use. This targeted approach significantly enhances energy efficiency by preventing unnecessary heating or cooling in unoccupied areas of your home.
Emerson Sensi Touch: The Emerson Sensi Touch is praised for its intuitive interface and detailed energy reports that help users track their heating and cooling patterns. By providing insights into energy usage, it encourages users to make adjustments that can lead to increased savings and improved efficiency.
How User-Friendly Are the Top DIY Smart Thermostats?
The best DIY smart thermostats prioritize user-friendliness through intuitive interfaces and easy installation processes.
- Nest Learning Thermostat: This thermostat features a sleek design and a user-friendly interface that adapts to your schedule. Its installation is straightforward, often completed in under 30 minutes, and it offers a mobile app for easy temperature control and monitoring.
- Ecobee SmartThermostat: The Ecobee model is known for its user-friendly touch screen and voice control compatibility with Amazon Alexa. It also supports room sensors to help manage hot or cold spots in your home, making it a versatile choice for diverse living spaces.
- Honeywell Home T9: This thermostat comes with a simple setup process and a clear app interface, allowing users to control their heating and cooling systems effortlessly. Its ability to integrate with various smart home systems and sensors enhances its functionality and user experience.
- Emerson Sensi Touch: The Sensi Touch thermostat boasts an easy-to-navigate touch screen and comprehensive mobile app, making it simple for users to adjust settings remotely. It also features a straightforward installation process, often requiring minimal tools and technical knowledge.
- Wyze Thermostat: Known for its budget-friendly pricing, the Wyze Thermostat offers an easy installation process and a user-friendly app. Its integration with other Wyze products allows for seamless smart home management and remote control capabilities.
What Is the Installation Process for a DIY Smart Thermostat?
Installing a DIY smart thermostat involves several essential steps that ensure your new device is set up correctly and functions effectively. Follow these guidelines for a successful installation:
-
Turn Off Power: Begin by switching off the power to your HVAC system at the circuit breaker to prevent any electrical hazards.
-
Remove the Old Thermostat: Carefully detach the existing thermostat from the wall. Take a photo of the wiring for reference. Disconnect the wires, labeling them with tape if necessary, to identify their corresponding terminals.
-
Connect the New Thermostat: Follow the manufacturer’s instructions to connect the wires to the new thermostat. Typically, the color code for the wires will guide you; for instance:
– Red (R) – Power
– White (W) – Heat
– Yellow (Y) – Cooling
– Green (G) – Fan -
Mount the Thermostat: Securely attach the new thermostat to the wall, ensuring it’s level.
-
Restore Power: Turn the power back on at the circuit breaker.
-
Configure Settings: Follow the on-screen prompts to connect the thermostat to your Wi-Fi network and set your preferences.
-
Test the System: Verify that the heating and cooling functions respond accurately to the thermostat settings.
By adhering to these steps, you can effectively install your DIY smart thermostat and begin enjoying its features.
What Troubleshooting Tips Do You Need for DIY Smart Thermostats?
When troubleshooting DIY smart thermostats, several tips can help ensure proper installation and functionality.
- Check Compatibility: Ensure your existing HVAC system is compatible with the smart thermostat model you’ve chosen. Many DIY smart thermostats may not work with certain heating and cooling systems, like older or non-standard setups.
- Inspect Wiring: Double-check the wiring connections at both the thermostat and HVAC system ends. Loose, improperly connected, or damaged wires can prevent the thermostat from functioning correctly.
- Power Supply Verification: Verify that the thermostat is receiving adequate power. If the display is blank or unresponsive, check the circuit breaker and ensure there are no blown fuses.
- Firmware Updates: Regularly check for firmware updates for your smart thermostat. Manufacturers often release updates to fix bugs and improve performance, which can resolve many issues.
- Network Connection: Ensure that the thermostat is connected to your Wi-Fi network. Poor network strength or connection issues can interfere with remote access and functionality.
- Calibration and Settings: Review the thermostat’s settings and calibration options. Incorrect settings can lead to poor heating or cooling performance, so adjusting these can help achieve the desired comfort level.
- Resetting the Device: If problems persist, perform a factory reset on the thermostat. This can often resolve software glitches and restore the device to its original settings.