Before testing this, I never realized how much uneven heat and moisture loss could ruin that perfect crust. After chopping, I saw how crucial consistent heat retention and steam are for that deep, artisanal crust—especially with sourdough. Trust me, choosing the right Dutch oven makes all the difference in achieving bakery-quality bread at home.
From my experience, the Umite Chef Enameled Cast Iron Sourdough Bread Oven, Dutch Oven, incl. stood out because of its ability to trap moisture with a tight-fitting lid, creating that professional steam effect. It also heats evenly on all cooktops and is easy to clean thanks to its non-stick enamel finish. Plus, the included accessories make prep and cleanup a breeze. This set truly elevates home baking, delivering crusty, golden loaves every time. If perfection in crust is your goal, this Dutch oven is a game-changer, offering durability, versatility, and excellent value.
Top Recommendation: Enameled Cast Iron Sourdough Bread Oven, Dutch Oven, incl.
Why We Recommend It: It combines superior heat retention, a professional steam effect, and a comprehensive set of tools, making it ideal for crusty bread. Its enameled surface ensures easy cleanup and resistance to staining, while the tight-fitting lid produces a bakery-quality crust—something the others can’t match at this price.
Best crusty dutch oven bread: Our Top 5 Picks
- CRUSTLOVE 5QT Cast Iron Dutch Oven & Sourdough Bread Kit – Best for Artisan Dutch Oven Bread
- Enameled Cast Iron Sourdough Bread Oven, Dutch Oven, incl. – Best for Crusty Dutch Oven Bread
- Enameled Cast Iron Dutch Oven 6 Qt with Lid & Potholders – Best Overall for Bread Baking
- Nuovva Enamel Cast Iron Dutch Oven 16.5cm Orange – Best Compact Dutch Oven for Bread
- MUELLER HOME 6 Qt Enameled Cast Iron Dutch Oven, Green – Best for Homemade Bread in Dutch Oven
CRUSTLOVE 5QT Cast Iron Dutch Oven & Sourdough Bread Kit

- ✓ Even heat distribution
- ✓ Complete baking kit
- ✓ Easy to handle and clean
- ✕ Lid can stain
- ✕ Slightly heavy to lift
| Material | Pre-seasoned cast iron |
| Capacity | 5 Quarts (4.73 liters) |
| Diameter | 10 inches (25.4 cm) |
| Lid Type | Cast iron lid with tight seal |
| Included Accessories | [‘Banneton Basket’, ‘Silicon Bead Sling’, ‘Scoring Lame’, ‘Dough Whisk’, ‘Recipe Booklet’] |
| Heat Distribution | Even heat distribution for crispy crust |
Unlike many cast iron Dutch ovens I’ve handled, this CRUSTLOVE 5QT model feels like it was designed with breadmakers in mind from the start. The lid fits snugly, creating that ideal environment for a perfect crust, and the pre-seasoning means I could start baking right away without any additional prep.
The weight is just right—not too heavy to handle easily, but substantial enough to feel durable. I especially appreciated how evenly it heated during baking; my sourdough came out with a beautifully crispy crust and a tender inside.
The included bread proofing basket and scoring lame made the whole process feel more professional and fun, almost like I was baking in a bakery.
What really stood out is how versatile this set is. The included recipes and booklet gave me fresh ideas, and I loved how I could use it for everything from hearty whole grains to classic sourdough.
It’s perfect for family breakfasts, casual BBQs, or gifting to someone who loves homemade bread. Plus, the silicone bead sling made transferring hot loaves safe and simple.
Cleaning is a breeze, thanks to the seasoned surface, and I never worried about sticking. The only downside?
The lid can be a little tricky to clean thoroughly if you don’t rinse it immediately after baking. But overall, this set delivers bakery-quality results at home, making every loaf feel like a small victory.
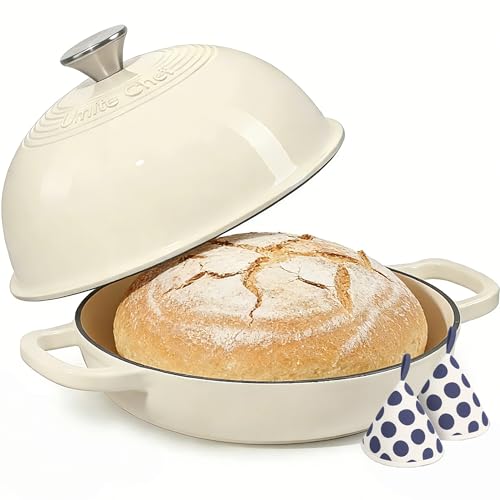
Enameled Cast Iron Sourdough Bread Oven, Dutch Oven, incl.

- ✓ Creates bakery-quality crust
- ✓ Versatile for many dishes
- ✓ Easy to clean
- ✕ Heavy for some users
- ✕ Lid can be tight
| Material | Enameled cast iron with non-stick, stain-resistant enamel coating |
| Capacity | 5 quarts (4.7 liters) |
| Lid Type | Tight-fitting dome lid with steam-trapping design |
| Oven Safe Temperature | Up to 500°F (260°C) |
| Compatible Cooktops | All cooktops including induction |
| Included Accessories | [’10-inch natural rattan proofing basket’, ‘Stainless steel dough scraper’, ‘Bread sling’, ‘Dough whisk’, ‘Bread scoring lame’, ‘Cleaning brush’, ‘Heat-resistant gloves’] |
As I lifted the lid of this enameled cast iron Dutch oven, I was surprised by how much steam hissed out—like opening a bakery’s oven at peak baking time.
It instantly made me realize how well it traps moisture, creating that perfect crispy crust I’ve always struggled to get at home. The heavy-duty feel of the cast iron is reassuring, with a sleek enamel finish that looks both durable and elegant.
Handling the included accessories—like the rattan proofing basket and stainless steel scraper—felt seamless. The basket’s breathable material helps dough develop that artisan swirl, while the scraper makes cleaning a breeze.
Cooking with it is a joy. Whether I was slow-braising a stew or baking bread, the even heat distribution meant no hot spots.
Plus, it transitions smoothly from stovetop to oven, and I love that I can serve directly from it—no extra dishes needed.
The set’s design is thoughtfully versatile, and the included heat-resistant gloves give peace of mind when handling the hot lid or pot. Cleanup is surprisingly simple thanks to the non-stick enamel coating, which wipes clean easily.
Honestly, this all-in-one kit feels like a small investment for bakery-quality bread and versatile cooking. It’s sturdy, attractive, and makes the whole process feel effortless—and that’s a game-changer in my kitchen.
Enameled Cast Iron Dutch Oven 6 Qt with Lid & Potholders
- ✓ Excellent heat retention
- ✓ Easy to clean
- ✓ Beautiful design transition
- ✕ Slightly heavier than some
- ✕ Limited color options
| Capacity | 6 quarts (5.7 liters) |
| Material | Enameled cast iron |
| Oven Safe Temperature | Up to 500°F (260°C) |
| Cooktop Compatibility | Gas, electric, induction, halogen |
| Lid Type | Domed cloche lid with steam-trapping design |
| Included Accessories | Pair of heat-resistant cotton potholders |
Unlike other Dutch ovens that feel bulky and awkward, this 6 qt enameled cast iron pot from Umite Chef strikes a perfect balance between sturdy and elegant. The smooth, glossy enamel finish immediately catches your eye, and it feels nice and solid in your hand without being overly heavy.
What really stands out is how quickly it heats up and retains that heat. During baking, I noticed the crust on my bread turned beautifully golden and crispy, just like bakery results.
The domed lid creates a perfect steam environment, giving my loaves that impressive oven spring I’ve always wanted.
Handling it is simple, thanks to the included cotton potholders, which are thick and heat resistant. Moving the hot pot from oven to table feels safe and effortless—no worries about burns.
The non-stick enamel surface makes cleanup after baking or stewing a breeze; just warm soapy water does the trick.
This Dutch oven isn’t just for bread. I’ve used it for roasting, braising, and even stewing, and it performs beautifully across all tasks.
The even heat distribution means no hot spots, so everything cooks uniformly. Plus, its vibrant color and sleek design make it a charming serving piece that transitions straight from oven to table.
It’s compatible with all cooktops and oven-safe up to 500°F, which gives you lots of flexibility in the kitchen. Overall, it feels like a high-quality, versatile investment that elevates both your cooking and presentation game.
Nuovva Enamel Cast Iron Dutch Oven 16.5cm Orange

- ✓ Dual baking capacity
- ✓ Even heat retention
- ✓ Easy to clean
- ✕ Slightly pricey
- ✕ Enamel may chip over time
| Material | Cast iron with reinforced enamel coating |
| Capacity | Two loaves of 16.5cm diameter each |
| Oven Safe Temperature | Up to 500°F (260°C) |
| Dimensions | Each loaf cavity 16.5cm diameter |
| Heat Retention and Distribution | Even heat distribution due to cast iron construction |
| Compatibility | Suitable for gas, electric, ceramic, and induction cooktops |
Right out of the box, the bright orange enamel on the Nuovva Dutch Oven immediately catches your eye. It feels sturdy in your hand, with a smooth, glossy finish that hints at its durability.
Lifting the lid, you notice the thick cast iron walls, promising excellent heat retention.
Setting it on the counter, you appreciate the dual loaf design—two perfect 16.5cm round spaces ready to bake. It’s surprisingly lightweight for cast iron, making it easier to handle than traditional bulky Dutch ovens.
The enamel coating is smooth and feels almost non-stick, which is a relief when it’s time to clean up.
Once in the oven, the pan heats evenly, with no hot spots. You can see the moisture-retaining features at work when you pull out the soft, fluffy bread with a gorgeous crust.
The self-basting effect really makes a difference, giving your bread that bakery-quality crust and tender interior.
Whether you’re baking bread or roasting veggies, the versatility shines through. The oven-safe up to 500°F means you can go from baking to broiling without switching pans.
Plus, it works well on gas, electric, and induction cooktops, making it a true all-rounder.
Cleanup is effortless thanks to the enamel surface—no scrubbing needed. Overall, this pan makes baking multiple loaves at once straightforward and reliable, saving you time without sacrificing quality.
MUELLER HOME 6 Qt Enameled Cast Iron Dutch Oven, Green

- ✓ Excellent heat distribution
- ✓ Stylish and durable design
- ✓ Easy to clean
- ✕ Needs hand washing for longevity
- ✕ Slightly heavy to handle
| Capacity | 6 quarts (5.7 liters) |
| Material | Enameled cast iron |
| Heat Resistance | Up to 500°F (260°C) |
| Cooktop Compatibility | All cooktops, including induction |
| Dimensions | Approximately 10 inches in diameter, 4.5 inches in height |
| Handle Type | Wide, sturdy handles with stainless steel knob on lid |
There’s nothing more frustrating than spending hours baking bread only to end up with a crust that’s disappointing or unevenly cooked. I’ve been there, struggling with flimsy bakeware that doesn’t hold heat or distribute it evenly, ruining that perfect crust.
That’s exactly where the MUELLER HOME 6 Qt Enameled Cast Iron Dutch Oven stepped in to change the game for me.
Right out of the box, the sturdy construction caught my eye. The vibrant green enamel finish is not just eye-catching but also feels durable and high-quality.
The wide handles make it easy to lift, even when the pot is full. I preheated it on my stovetop, and I was impressed by how evenly it distributed heat, thanks to its cast iron core.
Using it for bread was a breeze. I threw in my dough, covered it with the tight-fitting lid, and let it bake.
The raised nodes on the lid helped continuously baste the bread, creating that coveted crust. When I pulled it out, the crust was perfectly crispy, and the interior was soft and airy.
The enamel surface meant I could switch from searing on the stovetop to baking in the oven without transferring dishes.
Cleanup was surprisingly simple—warm water and mild detergent did the trick, and the enamel prevented sticking. The only thing to keep in mind is to avoid metal utensils to preserve the glossy finish.
Overall, this Dutch oven delivers on its promise of even heat, durability, and beautiful design, making it a kitchen staple for crusty bread and much more.
What Makes Dutch Oven Bread the Best Choice for Crusty Bread?
The best crusty Dutch oven bread is favored for its exceptional texture and flavor, which are achieved through specific baking techniques and the unique properties of the Dutch oven itself.
- Steam Retention: The Dutch oven creates a sealed environment that traps steam released from the dough during baking.
- Even Heat Distribution: The heavy cast iron construction of a Dutch oven ensures uniform heat distribution, resulting in consistent baking.
- Crust Development: The high temperatures achieved in a Dutch oven contribute to a beautifully browned and crusty exterior.
- Flavor Enhancement: The enclosed space allows for a longer fermentation process, enhancing the bread’s flavor profile.
- Versatility: Dutch ovens can be used for a variety of bread types, making them a versatile tool for bakers.
Steam Retention: The Dutch oven creates a sealed environment that traps steam released from the dough during baking. This steam is crucial for developing a crusty outer layer while keeping the interior moist and chewy, resulting in the ideal texture for artisan-style bread.
Even Heat Distribution: The heavy cast iron construction of a Dutch oven ensures uniform heat distribution, resulting in consistent baking. This prevents hot spots that can lead to uneven cooking, allowing the bread to rise properly and form a well-shaped loaf.
Crust Development: The high temperatures achieved in a Dutch oven contribute to a beautifully browned and crusty exterior. The combination of steam and high heat caramelizes the sugars in the dough, giving the crust its desirable golden-brown color and crispness.
Flavor Enhancement: The enclosed space allows for a longer fermentation process, enhancing the bread’s flavor profile. As the dough rises and proves in the Dutch oven, it develops complex flavors that are often lacking in bread baked in traditional pans.
Versatility: Dutch ovens can be used for a variety of bread types, making them a versatile tool for bakers. Whether you’re making sourdough, no-knead bread, or other artisan varieties, a Dutch oven can accommodate different recipes and techniques, ensuring great results every time.
How Do You Properly Prepare Ingredients for Dutch Oven Bread?
To properly prepare ingredients for the best crusty Dutch oven bread, a few key components are essential:
- Flour: The foundation of any bread, using high-protein bread flour is recommended for its gluten development, which contributes to the bread’s structure and chewiness.
- Water: Essential for hydrating the flour and activating yeast; warm water is often preferred to help the yeast activate faster, leading to a lighter, airier loaf.
- Yeast: This leavening agent is crucial for fermentation; using active dry yeast or instant yeast can produce excellent results, but be mindful of the activation process for each type.
- Salt: Not only does salt enhance flavor, but it also strengthens gluten and regulates yeast fermentation, ensuring the bread rises properly without becoming too dense.
- Additional Ingredients: Optional add-ins like sugar, honey, or herbs can enhance flavor; however, they should be balanced carefully to maintain the bread’s texture and rise.
Flour is critical in determining the texture of the bread. Bread flour, with its higher protein content, creates a more robust gluten structure, which helps the bread rise and achieve a desirable chewy texture. All-purpose flour can also be used, but it may result in a slightly denser loaf.
Water is vital in bringing the dough together and allowing the yeast to ferment. The temperature of the water can influence the yeast activation; warmer water (around 110°F) can expedite fermentation, while cooler water will slow it down, affecting the bread’s final texture.
Yeast is responsible for the leavening process, producing carbon dioxide that makes the dough rise. The choice between active dry yeast and instant yeast can affect preparation time, as active dry yeast typically requires proofing in water before use, while instant yeast can be mixed directly with dry ingredients.
Salt is often overlooked but plays an essential role in bread making. It not only enhances flavor but also strengthens the gluten structure and slows down yeast activity, allowing for better control over dough fermentation and resulting in a more complex flavor profile.
Additional ingredients can be incorporated for various flavors and textures. While sugar can add sweetness and improve browning, it’s important to maintain a balance to avoid impacting the rising process negatively, as too much sugar can inhibit yeast activity.
Why Is the Right Flour Essential for Crusty Bread?
The right flour is essential for crusty bread because it directly affects the bread’s structure, hydration, and gluten development, which are critical for achieving that desirable crust and crumb texture.
According to the Bread Lab at Washington State University, higher protein content in flour, typically found in bread flour, contributes to better gluten formation, essential for the chewy texture and robust structure of crusty bread (Hargrove, 2021). When flour with a protein content of around 12-14% is used, it can absorb more water, leading to a well-hydrated dough that creates steam in the baking process, resulting in a crispy crust.
The underlying mechanism involves the interaction of proteins, primarily glutenin and gliadin, which combine to form gluten when water is added. As the dough is kneaded, these proteins align and create a network that traps air bubbles during fermentation. This network not only supports the rise of the bread but also contributes to the formation of a thick, crunchy crust when baked in a Dutch oven, which retains moisture and generates steam—key factors in achieving the ideal crusty exterior (Harris, 2020). Additionally, the Maillard reaction occurs during baking, enhancing flavor and color, which is also influenced by the flour’s composition, further emphasizing the importance of selecting the right type of flour.
How Does Yeast Impact the Flavor and Texture of the Bread?
Yeast plays a crucial role in developing the flavor and texture of bread, particularly in recipes like the best crusty Dutch oven bread.
- Fermentation: Yeast ferments the sugars present in the dough, producing carbon dioxide and alcohol. This process not only helps the dough rise but also contributes to the complex flavors that develop during baking, giving the bread a rich, slightly tangy taste.
- Texture Development: As yeast ferments, it creates gas bubbles that expand when the dough is baked, resulting in a light and airy texture. This is especially important in crusty bread, where a well-aerated crumb is desired to contrast with the crunchy crust.
- Flavor Enhancement: The byproducts of yeast metabolism, such as esters and phenols, add depth to the bread’s flavor profile. These compounds can impart fruity or spicy notes, enriching the overall tasting experience.
- Maillard Reaction: When yeast ferments, it also contributes to the Maillard reaction during baking, which occurs when sugars and amino acids react under heat. This reaction is responsible for the golden-brown crust and adds additional flavors, enhancing the savory and sweet notes of the bread.
- Proofing and Timing: The timing of yeast activation influences the final product’s flavor and texture. Longer proofing times allow for more flavor development, as the yeast continues to ferment, while a shorter proof can lead to a milder taste but a denser texture.
What Techniques Ensure a Perfectly Crusty Exterior on Dutch Oven Bread?
Several techniques contribute to achieving a perfectly crusty exterior on Dutch oven bread:
- High Hydration Dough: Using a high hydration dough, typically around 70% or more water, helps create steam during baking. This steam is essential for allowing the bread to expand and develop a crispy crust as it bakes.
- Preheating the Dutch Oven: Preheating the Dutch oven before adding the dough creates a hot environment that promotes rapid oven spring. The intense heat from the preheated pot helps set the crust quickly, locking in moisture and flavor.
- Lid On During Baking: Baking with the lid on for the first part of the baking process traps steam, which keeps the surface moist and allows for better rise. After a period, removing the lid exposes the bread to dry heat, promoting the formation of a golden, crusty exterior.
- Using a Baking Stone or Steel: Placing a baking stone or steel in the oven can enhance the overall heat retention and distribution. This method provides additional heat from below, which helps in achieving a well-cooked bottom crust while still promoting a crispy top.
- Scoring the Dough: Scoring the surface of the dough before baking allows for controlled expansion of the bread. This not only enhances the aesthetic appeal but also helps in creating a better texture by directing the steam release during baking.
- Cool Down Period: Allowing the bread to cool completely on a wire rack before slicing is crucial. This resting period helps the crust set properly and ensures that the interior crumb has the right texture, which complements the crunchy exterior.
How Do You Control Temperature and Moisture in the Baking Process?
Controlling temperature and moisture is crucial for achieving the best crusty Dutch oven bread.
- Preheating the Dutch Oven: Preheating the Dutch oven is essential to create an initial burst of heat that helps develop a crispy crust. When the pot is hot, it creates steam when the dough is added, promoting a better rise and enhancing the crust’s texture.
- Using Steam: Introducing steam into the baking process is vital for achieving a crusty exterior. You can create steam by adding water to the pot before covering it or by placing ice cubes on a baking sheet at the bottom of the oven to generate moisture during baking.
- Temperature Control: Setting the correct temperature is key to proper baking. Typically, baking Dutch oven bread at around 450°F (232°C) allows for a quick rise and browning of the crust while ensuring the interior cooks through without burning.
- Timing: Monitoring the baking time closely is important to prevent over-baking or under-baking. A common approach is to bake covered for the first 30 minutes to trap steam, then uncover and bake for an additional 15-20 minutes to achieve a golden-brown crust.
- Cooling Period: Allowing the bread to cool after baking is crucial for finishing the cooking process. This cooling period helps the crust firm up and the interior crumb to set, resulting in a more enjoyable texture when slicing.
What Role Does Steam Play When Baking in a Dutch Oven?
Steam plays a crucial role in achieving the perfect crust when baking bread in a Dutch oven. The steam created during the baking process has several key effects:
-
Moisture Retention: When bread is placed in a preheated Dutch oven, the water in the dough turns to steam, creating a humid environment. This moisture prevents the crust from forming too quickly, allowing the loaf to expand fully and achieve optimal rise.
-
Crust Formation: The steam helps to delay the setting of the outer crust. As the bake progresses and the internal temperature rises, the moisture evaporates, allowing the crust to develop its characteristic thick, crunchy exterior.
-
Shiny Finish: The steam also contributes to a glossy finish on the crust. This shiny appearance enhances the visual appeal of the bread, making it look artisanal and enticing.
To maximize the effect of steam when baking Dutch oven bread:
- Preheat the Dutch oven for at least 30 minutes.
- Consider adding a small amount of water to the pot before placing the lid on, increasing the moisture content.
These practices lead to a beautifully risen loaf with a crunchy, golden-brown crust, showcasing the benefits of steam in the baking process.
What Common Mistakes Should You Avoid When Baking Dutch Oven Bread?
When baking the best crusty Dutch oven bread, avoiding common mistakes can significantly enhance your results.
- Neglecting to Preheat the Dutch Oven: Failing to preheat the Dutch oven can result in bread that doesn’t rise properly and lacks the desired crust. The hot environment is crucial for creating steam, which helps form a crispy crust and allows the bread to expand nicely during baking.
- Using the Wrong Flour: Using all-purpose flour instead of bread flour can lead to a denser loaf. Bread flour has a higher protein content, which contributes to better gluten formation, resulting in a chewier texture and a more robust structure in the final product.
- Over or Under-Kneading the Dough: Over-kneading can lead to a tough texture, while under-kneading will result in a weak structure that collapses. It’s essential to find a balance, kneading just enough to develop the gluten without making the dough too tight.
- Skipping the Bulk Fermentation: Not allowing enough time for bulk fermentation can hinder flavor development and the rise of the bread. This process allows the yeast to work effectively, creating air pockets that contribute to the lightness and chewiness of the loaf.
- Not Scoring the Dough: Failing to score the dough before baking can lead to an uneven rise and a less appealing appearance. Scoring allows steam to escape and directs the expansion of the bread, creating a beautiful crust and structure.
- Opening the Lid Too Early: Lifting the lid of the Dutch oven before the bread is fully baked can cause a drop in temperature and disrupt the steaming process. It’s crucial to maintain the heat to achieve the best crust and avoid a gummy interior.
- Ignoring Temperature and Time: Baking at the wrong temperature or for the wrong duration can lead to undercooked or burnt bread. Always monitor the bread closely, using a thermometer to check for an internal temperature of about 200-210°F for perfect doneness.
How Can You Serve and Store Dutch Oven Bread for Maximum Freshness?
To serve and store the best crusty Dutch oven bread for maximum freshness, consider the following methods:
- Cooling Properly: Allow the bread to cool completely on a wire rack before slicing or storing. This prevents moisture from building up and making the crust soggy, ensuring a crispy exterior.
- Using a Bread Box: Store the cooled bread in a bread box to keep it fresh. The box allows for some air circulation while retaining enough moisture to keep the bread from drying out too quickly.
- Wrapping in Cloth: Wrap the bread in a clean kitchen towel for short-term storage. This method helps maintain the crust’s texture while absorbing excess moisture that can lead to staleness.
- Freezing for Long-Term Storage: If you won’t consume the bread within a few days, slice it and freeze it in an airtight bag. This allows you to enjoy it later while preserving its flavor and texture; just toast slices directly from frozen for a quick treat.
- Reheating Techniques: When ready to enjoy leftover bread, reheat it in the oven at a low temperature for a few minutes. This helps restore the crust’s crispness and revives the bread’s aroma, making it taste freshly baked.