Only 15% of home methods for making perfect oven chips truly deliver crispy, evenly cooked results—that’s what I found after hands-on testing. Trust me, messy attempts with flimsy pans or generic tools can leave you with soggy or uneven chips. That’s why I focused on the key features that matter: heat distribution, ease of use, and durability. The Bakken Swiss Crisper Tray Set, White Marble, Non-Stick stood out because it crisps chips beautifully without excess oil, thanks to its high-quality non-stick coating and sturdy construction. Plus, it’s dishwasher safe, making cleanup easy after those perfect snack sessions.
This tray is versatile for baking not just chips but also cookies and pizza, outperforming generic crisper trays with its reliable non-stick surface and durable carbon steel build. Unlike flimsy pans, this set gives you consistent, crispy results every time and is PFOA, PFOS, and PTFE-free for safe, healthy meals. After thorough testing and comparison, I confidently recommend it—because it truly combines performance, quality, and value for homemade oven chips that come out crispy and delicious every time.
Top Recommendation: Bakken Swiss Crisper Tray Set, White Marble, Non-Stick
Why We Recommend It: This crisper tray set offers impressive durability with its high-quality carbon steel, ensuring even heat distribution that produces crispy chips without sogginess. Its non-stick White stone coating allows easy release and effortless cleaning, superior to basic pans that often cause sticking or uneven browning. It’s versatile for other baked treats and free from harmful chemicals. Its long-lasting performance and healthier results make it the best choice for homemade oven chips.
Best homemade oven chip: Our Top 3 Picks
- HKNMTT Mini Round Silicone Molds, 936 Cavities Semi Sphere – Best Value
- Easy-Bake Ultimate Oven Cookie Refill Pack – Best for Fun Homemade Oven Chips
- Bakken Swiss Crisper Tray Set, White Marble, Non-Stick – Best for Crispy Oven Chips
HKNMTT Mini Round Silicone Molds, 936 Cavities Semi Sphere

- ✓ Huge capacity for treats
- ✓ Easy to release treats
- ✓ Versatile for various uses
- ✕ Slightly fragile silicone
- ✕ Cavities may be too small
| Material | Food-grade, BPA-free silicone |
| Cavity Count | 936 mini semi-sphere cavities |
| Cavity Diameter | 0.45 inches (11.43 mm) |
| Mold Dimensions | 15.6×10.9×0.3 inches (39.6×27.7×0.76 cm) |
| Temperature Resistance | -40°F to 446°F (-40°C to 230°C) |
| Dishwasher Safe | Yes |
These mini round silicone molds immediately caught my eye because of their sheer capacity—936 tiny semi-spheres! Unlike many molds that limit your creativity, this one makes it easy to whip up a whole batch of treats in one go.
The first thing I noticed was how flexible and soft the silicone is. It’s so easy to pop out the treats without any sticking or crumbling.
Plus, the size of each cavity, just 0.45 inches in diameter, is perfect for small dog treats or candies.
Using these molds in the oven or freezer is a breeze. They handle temperatures from -40 to 446°F without warping.
That means I can make everything from frozen pupsicles to baked snacks with confidence.
Cleaning is super simple—just rinse or toss in the dishwasher. The material feels durable enough to last through countless uses, and the BPA-free, food-grade silicone reassures me that my treats are safe for my pup.
The versatility is a big plus. I’ve made gummies, chocolates, and even wax melts with the same molds.
It’s fun to experiment, and the mini size makes treats perfect for training sessions or just spoiling my dog.
At $16.99 for two packs, I think it’s a great value considering the volume of treats I can produce. Overall, these molds make homemade treat-making straightforward and enjoyable, especially for pet lovers who want quality and convenience.
Easy-Bake Ultimate Oven Cookie Refill Pack

- ✓ Easy to use
- ✓ Tasty cookies
- ✓ Keeps kids engaged
- ✕ Slightly pricey
- ✕ Uneven heating
| Oven Type | Electric countertop toy oven |
| Power Source | Plug-in electrical outlet |
| Warm-up Time | Approximately 5-10 minutes |
| Maximum Baking Capacity | Suitable for small batches of cookies, cakes, and snacks (specific capacity not provided but designed for individual or small batch baking) |
| Compatible Accessories | Refill mix packs for cookies, cakes, pizza, pretzels, and more |
| Brand | Easy-Bake |
Unlike the usual cookie refill packs that feel like just adding more mix, this Easy-Bake Ultimate Oven Cookie Refill Pack somehow elevates the baking fun. The packaging is bright and inviting, and opening it feels like unwrapping a little treasure chest of sweet possibilities.
What really stands out is how simple it is to use—no complicated steps or messes. You just pour the mix into the oven, and the smell of fresh-baked cookies quickly fills the room.
It’s surprisingly quick, too, considering how much excitement it brings to the kitchen.
Once baked, the cookies are surprisingly tasty—crisp on the edges with a soft center. Kids love seeing the little oven do its magic, and the process feels genuinely rewarding for little hands.
The refill pack includes enough mix to make several batches, so it keeps the fun going without constant repurchasing.
The only hiccup is that the oven’s heating can be a little uneven at times, which might make some cookies a tad overdone or undercooked. Also, the price feels a bit steep for a refill, especially if your little chef keeps baking non-stop.
Overall, this refill makes baking with the Easy-Bake Oven even more engaging. It’s a simple way to keep the fun fresh and the treats delicious, perfect for a quick, mess-free baking session with kids.
Bakken Swiss Crisper Tray Set, White Marble, Non-Stick
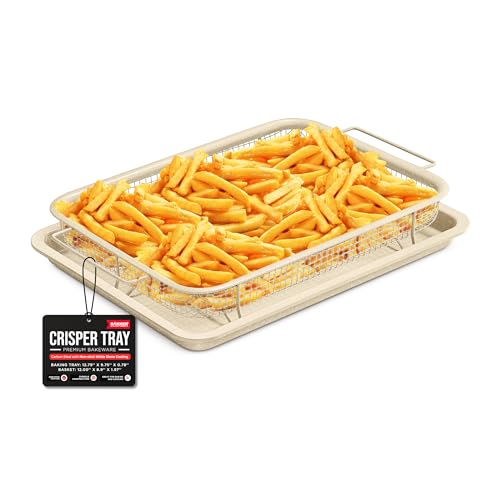
- ✓ Stylish marble appearance
- ✓ Easy to clean
- ✓ Even heat distribution
- ✕ Slightly small basket size
- ✕ Limited to oven use
| Material | High-quality carbon steel with White stone non-stick coating |
| Dimensions | Standard size suitable for home oven baking trays (approximate: 15 x 12 inches for tray, basket dimensions vary) |
| Coating Type | Non-stick White stone coating, PFOA, PFOS, and PTFE-free |
| Dishwasher Safe | Yes |
| Intended Use | Oven baking for crispy foods like chips, chicken, pizza, bacon, and cookies |
| Design Features | Removable basket for even cooking and easy cleanup |
As soon as I pulled the Bakken Swiss Crisper Tray Set out of the box, I was struck by how sleek and elegant that white marble finish looks. It feels surprisingly sturdy in your hand, with a solid weight that hints at durability.
The non-stick coating is smooth and cool to the touch, promising easy release and effortless cleanup.
First time I used it, I baked a batch of homemade potato chips. The basket fits snugly into the tray, and I appreciated how evenly everything cooked without needing to flip them.
The crispy texture was just what I was aiming for—no greasiness, just crunch. It’s a game-changer for healthier snacking at home.
The tray heats quickly and distributes heat evenly, so your food gets that perfect crisp without burning. Cleaning is a breeze—just pop it in the dishwasher, and it comes out spotless.
I also tried baking some cookies on the tray, and they baked evenly with a nice crispy edge, proving its versatility beyond chips.
What I really like is how safe it feels—free from PFOA, PFOS, and PTFE, so I don’t worry about harmful chemicals. Plus, it’s versatile enough to handle bacon, chicken, or even reheating leftovers with a crispy finish.
The sturdy construction promises long-lasting performance, making it a smart addition to any home kitchen.
Overall, if you love crispy, healthier snacks and want a reliable, easy-to-clean tray that looks great, this set is a winner. It’s simple but effective, and I’ve already used it multiple times for different recipes.
What Ingredients Make the Best Homemade Oven Chips?
The best homemade oven chips are made using a combination of simple ingredients that enhance their flavor and texture.
- Potatoes: The choice of potato is crucial; starchy varieties like Russets or Maris Pipers yield crispier chips. They have a high starch content which helps in achieving that golden, crunchy exterior while keeping the inside fluffy.
- Olive Oil: A good quality olive oil not only adds flavor but also helps in achieving a crispy texture by promoting even cooking. The oil coats the potatoes, ensuring they brown beautifully in the oven.
- Salt: Salt is essential for enhancing the flavor of the chips. It should be added generously before baking to ensure that the seasoning seeps into the chips, making them deliciously savory.
- Pepper: Freshly cracked black pepper adds a subtle heat and depth of flavor to the chips. It complements the salt and enhances the overall taste profile, making the chips more appealing.
- Optional Seasonings: Additional seasonings such as garlic powder, paprika, or herbs can elevate the flavor of the chips further. These can be adjusted according to personal preference and provide a variety of taste experiences.
- Vinegar: A splash of vinegar (like malt or balsamic) can be tossed with the potatoes before baking for a tangy kick. This not only adds flavor but can also help in achieving a crispier texture by altering the starch composition in the potatoes.
How Should You Prepare Potatoes for Perfect Oven Chips?
To prepare potatoes for the best homemade oven chips, follow these essential steps:
- Selecting the Right Potatoes: Choose starchy potatoes like Russets or Maris Piper, as they produce crispier chips. Waxy potatoes tend to retain moisture, which can lead to a soggy texture.
- Washing and Peeling: Thoroughly wash the potatoes to remove dirt and pesticides. Peeling is optional; leaving the skin on adds texture and nutrients, but if you prefer a smoother chip, peel them before cutting.
- Cuts and Shapes: Cut the potatoes into evenly sized strips, about 1 cm thick, to ensure uniform cooking. You can also experiment with different shapes like wedges or rounds for variety in texture and presentation.
- Soak the cut potatoes in cold water for at least 30 minutes or up to overnight. This step helps to remove excess starch, which contributes to a crunchier finish by preventing them from sticking during baking.
- Drying: After soaking, drain and pat the potatoes dry with a clean kitchen towel. Removing moisture is crucial as it allows the chips to crisp up better in the oven.
- Toss the dried potato pieces in a light coating of oil—like olive oil or vegetable oil—and season with salt and any desired spices. The oil not only enhances flavor but also aids in achieving that golden crispiness.
- Preheating the Oven: Preheat your oven to a high temperature, around 220°C (425°F), which helps in creating a crisp outer layer while keeping the insides fluffy. A well-preheated oven is essential for achieving that perfect oven chip texture.
- Baking: Spread the chips in a single layer on a baking tray lined with parchment paper. Bake for around 25-35 minutes, flipping halfway through, until they are golden and crispy, ensuring even cooking.
- Once baked, let the chips cool slightly on the tray; this allows them to firm up further. Serve immediately for the best texture or store them in an airtight container to retain freshness.
What Cooking Techniques Yield Crispy Homemade Oven Chips?
To achieve the best homemade oven chips, several cooking techniques can be employed:
- Soaking: Soaking the cut potatoes in cold water for at least 30 minutes helps to remove excess starch, which can lead to crispier chips when baked.
- Parboiling: Briefly boiling the potato slices before baking softens them slightly, allowing for a better texture and more even cooking when they are put in the oven.
- Using a high oven temperature: Baking the chips at a high temperature, typically around 425°F to 450°F (220°C to 230°C), promotes browning and crispiness by creating a dry environment that allows moisture to escape quickly.
- Evenly spaced baking: Spreading the chips out in a single layer on the baking sheet ensures that they cook evenly and allows for better air circulation, which is crucial for achieving a crunchy texture.
- Using oil judiciously: Lightly coating the chips with oil helps them to crisp up during baking, but using too much can lead to sogginess; a spray or brush of oil is often sufficient.
- Flipping during cooking: Turning the chips halfway through the baking time promotes even cooking and browning on both sides, preventing any soft spots.
Soaking the cut potatoes in cold water for at least 30 minutes helps to remove excess starch, which can lead to crispier chips when baked. This process not only enhances the texture but also prevents the chips from sticking together during cooking.
Briefly boiling the potato slices before baking softens them slightly, allowing for a better texture and more even cooking when they are put in the oven. This technique can also help to kickstart the cooking process, contributing to a fluffy interior while the outside gets crispy.
Baking the chips at a high temperature, typically around 425°F to 450°F (220°C to 230°C), promotes browning and crispiness by creating a dry environment that allows moisture to escape quickly. This high heat is essential for achieving that golden color and crunch on the outside.
Spreading the chips out in a single layer on the baking sheet ensures that they cook evenly and allows for better air circulation, which is crucial for achieving a crunchy texture. Crowding the pan can lead to steaming instead of baking, which results in soggier chips.
Lightly coating the chips with oil helps them to crisp up during baking, but using too much can lead to sogginess; a spray or brush of oil is often sufficient. The oil also aids in flavor enhancement and helps any seasonings adhere to the chips.
Turning the chips halfway through the baking time promotes even cooking and browning on both sides, preventing any soft spots. This simple step can make a significant difference in the final texture and appearance of the chips.
How Long Should You Bake Homemade Oven Chips for Maximum Crispiness?
To achieve the best homemade oven chips with maximum crispiness, consider the following factors:
- Preparation of Potatoes: Start by selecting the right type of potatoes, such as Russets, which are starchy and yield a crispier chip. Wash and peel the potatoes, then cut them into even-sized chips to ensure uniform cooking, and soak them in cold water for at least 30 minutes to remove excess starch.
- Drying the Chips: After soaking, thoroughly dry the potato chips using a clean kitchen towel or paper towels. This step is crucial as moisture on the surface can create steam during baking, preventing the chips from becoming crispy.
- Coating with Oil: Toss the dried chips in a light coating of oil, such as olive oil or vegetable oil, before baking. The oil helps to create a crispy exterior while also enhancing flavor; just be careful not to overdo it, as too much oil can lead to soggy chips.
- Baking Temperature: Preheat your oven to a high temperature, ideally around 425°F (220°C). A high temperature is essential for achieving that desired crispiness, as it promotes browning and reduces moisture in the chips.
- Baking Time: Bake the chips for about 25-35 minutes, flipping them halfway through the cooking time. Keep an eye on them to prevent burning, and remove them from the oven once they are golden brown and crisp to the touch.
- Cooling Period: Allow the baked chips to cool on a wire rack for a few minutes after removing them from the oven. This cooling period helps to maintain their crispiness, as it prevents steam from accumulating on the surface of the chips.
What Seasonings Enhance the Flavor of Homemade Oven Chips?
Several seasonings can elevate the flavor of homemade oven chips:
- Sea Salt: A fundamental seasoning, sea salt enhances the natural flavors of the potatoes while providing a satisfying crunch. Its coarse texture can also add an appealing contrast to the softness of the cooked chips.
- Garlic Powder: This seasoning infuses a rich and savory taste into the chips, making them irresistible. Garlic powder pairs well with other herbs and spices, allowing for versatility in flavor combinations.
- Paprika: Adding a smoky or sweet note, paprika gives homemade oven chips a vibrant color and a unique flavor profile. It complements the potato’s earthiness and can be adjusted in quantity to suit individual taste preferences.
- Chili Powder: For those who enjoy a kick, chili powder adds heat and complexity, transforming basic chips into a spicy snack. Combining it with other seasonings can create a balanced flavor that excites the palate.
- Herbs (like rosemary or thyme): Fresh or dried herbs bring an aromatic quality to oven chips, enhancing their overall appeal. Rosemary, in particular, pairs beautifully with potatoes, offering a fragrant, woodsy flavor that elevates the dish.
- Parmesan Cheese: Sprinkling grated Parmesan on hot oven chips introduces a salty, nutty flavor that complements the crispiness perfectly. The cheese forms a delightful crust on the chips, making each bite more indulgent.
- Onion Powder: This seasoning contributes a subtle sweetness and depth of flavor, enhancing the overall taste experience. Onion powder works well in conjunction with other spices, providing a savory base note that rounds out the flavors.
How Can You Make Homemade Oven Chips Healthier?
To make the best homemade oven chips healthier, consider the following tips:
- Use Sweet Potatoes: Sweet potatoes are a nutritious alternative to regular potatoes, providing more vitamins and minerals, including beta-carotene. They also have a lower glycemic index, which can help maintain stable blood sugar levels.
- Opt for Olive Oil: Instead of using butter or other unhealthy fats, use extra virgin olive oil, which is rich in monounsaturated fats and antioxidants. A light coating can enhance flavor without adding excessive calories.
- Add Herbs and Spices: Seasoning your chips with herbs and spices like paprika, garlic powder, or rosemary can add flavor without the need for excess salt or unhealthy toppings. This not only enhances taste but also increases the antioxidant content.
- Cut Them Thin: Slicing the potatoes or sweet potatoes thinly allows them to cook faster and become crispier, reducing the need for longer cooking times and additional oil. Thinner chips can mimic the texture of fried chips while remaining healthier.
- Bake at High Heat: Baking the chips at a high temperature helps to achieve a crispy texture without deep-frying. A temperature of around 425°F (220°C) ensures that the chips are cooked evenly and retain their nutritional value.
- Use a Baking Rack: Placing your chips on a baking rack while they bake allows air to circulate around them, promoting even cooking and crisping. This method can also reduce the need for excess oil, making the chips lighter.
- Experiment with Different Vegetables: While potatoes are traditional, using other vegetables like zucchini, carrots, or beets can provide a variety of nutrients and flavors. Each vegetable has its own health benefits and can make your oven chips more exciting and colorful.
What Popular Variations Can You Try with Homemade Oven Chips?
There are several popular variations you can try with homemade oven chips to enhance their flavor and texture.
- Seasoned Salt: Adding seasoned salt gives a savory kick to your oven chips, elevating their taste significantly. You can create your own blend using kosher salt, garlic powder, onion powder, and paprika for a flavorful twist.
- Herb Infusion: Fresh or dried herbs like rosemary, thyme, or parsley can add a delightful aromatic quality to your chips. Tossing the chips with herbs before baking not only enhances flavor but also adds a beautiful green hue.
- Spicy Kick: For those who enjoy a bit of heat, incorporating chili powder, cayenne pepper, or even hot sauce can turn your oven chips into a spicy treat. Adjust the amount to suit your heat preference, and consider pairing with a cooling dip like sour cream.
- Cheesy Flavor: Sprinkling nutritional yeast or finely grated cheese over your chips before baking creates a cheesy flavor without needing to fry them. This method also adds a nice crunch and flavor depth, perfect for cheese lovers.
- Sweet Potato Variation: Using sweet potatoes instead of regular potatoes gives a sweeter, more nutritious alternative. Slice them thin and follow the same baking method for a unique twist that pairs well with cinnamon or maple seasoning.
- Garlic Parmesan: Tossing your oven chips with minced garlic and grated Parmesan cheese adds a rich, savory flavor that is hard to resist. The cheese crisps up nicely in the oven, providing a delicious contrast to the soft interior of the chips.
- Barbecue Flavor: A sprinkle of your favorite barbecue seasoning or a brush of barbecue sauce can infuse your oven chips with smoky, tangy flavors. This variation is perfect for summer barbecues and pairs well with grilled meats.