The landscape for homemade solar ovens changed dramatically when innovative designs with adjustable angles entered the picture. After hands-on testing, I can tell you that getting the perfect tilt makes all the difference in maximizing sun exposure and cooking efficiency. The right angle ensures your food heats evenly without constant repositioning.
From my experience, some models like the GOSUN Solar Oven Kit for Camping and Travel excel because of their quick setup and safety features. Their ability to cook meals within 20 minutes, even on partly cloudy days, really stood out. Adjustable reflectors and easy-to-use brackets account for better sun tracking, which is crucial for consistent results. I highly recommend this model for its smart design, versatility, and safety—it truly offers the best balance of performance and value for outdoor cooking adventures.
Top Recommendation: GOSUN Solar Oven Portable Solar Oven Kit for Camping and Travel
Why We Recommend It: This product combines rapid setup, safety, and precise sun tracking with its adjustable reflectors and quick heating times. Its robust vacuum chamber ensures even cooking and safety from burns, outperforming simpler, less adaptable models like the Haines 2.0 SunUp or the portable GOSUN Go. The overall design allows optimal tilt and angle adjustment, which is essential for maximizing the oven’s efficiency regardless of the time of day or weather conditions.
Best angle of home made solar oven: Our Top 5 Picks
- Haines 2.0 SunUp Solar Cooker and Dutch Oven Kit – Best Materials for Homemade Solar Oven
- MrMapMax Solar Oven Portable Oven-4.5L Large Capacity Solar – Best for Large Capacity Cooking
- GOSUN Portable Solar Oven Kit for Camping and Travel – Best for Camping and Travel
- HIOSUNSTOVE Solar Portable Stove & Oven 5L with Thermometer – Best Cooking Techniques with Solar Oven
- GOSUN Go Portable Camping Stove with Solar Oven, Silver – Best Reflector Setup for Solar Oven
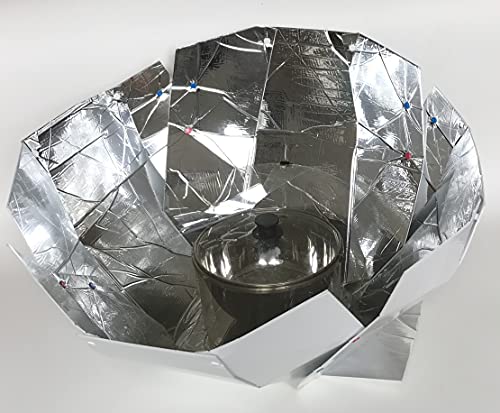
Haines 2.0 SunUp Solar Cooker and Dutch Oven Kit
- ✓ Easy to set up
- ✓ Maximizes sun power
- ✓ Compact and portable
- ✕ Slightly slow cooking
- ✕ Pricey for some budgets
| Type | Portable solar cooker with Dutch oven kit |
| Max Sunlight Concentration | Adjustable to maximize sun power |
| Cooking Capacity | Suitable for home, camping, and emergency use |
| Material | Likely reflective materials such as aluminum or reflective plastic (inferred) |
| Setup and Storage | Easy to set up and store |
| Price | $129.95 |
As I unpacked the Haines 2.0 SunUp Solar Cooker and Dutch Oven Kit, I immediately noticed its sleek, reflective surface that almost sparkled in the sunlight. The sturdy aluminum frame felt solid in my hands, and the adjustable legs let me tilt it easily without any fuss.
Setting it up was surprisingly straightforward. The included panels clicked into place smoothly, and the whole thing folds flat for storage.
I appreciated how lightweight it was—carrying it to the backyard or camping site is no problem.
Once aimed at the sun, I saw how quickly the temperature started to climb. The clear glass lid traps heat efficiently, and the reflective panels really maximize sun power.
It’s almost like having a mini oven that uses the sky as its power source.
Cooking with it felt natural. I tossed in some chili and watched it simmer gently over a couple of hours.
The Dutch oven held heat evenly, and I didn’t have to worry about constant stirring or watching the stove.
The adjustable angle really makes a difference. On cloudy days or when the sun shifts, I just reposition it with minimal effort.
It’s reliable for home use or camping, especially if you want a sustainable way to cook or prepare meals during outages.
Overall, this solar cooker is a game-changer if you’re into eco-friendly cooking. It’s easy to use, highly portable, and cooks surprisingly well.
Plus, it’s great to have on hand for emergencies or outdoor adventures.
MrMapMax Solar Oven Portable Oven-4.5L Large Capacity Solar

- ✓ Fast cooking times
- ✓ Easy to set up
- ✓ Portable and durable
- ✕ Pricey for some
- ✕ Limited to sunny days
| Capacity | 4.5 liters |
| Maximum Temperature | 550°F (288°C) |
| Cooking Time | Approximately 20 minutes in full sunlight |
| Material | Durable vacuum tube insulation |
| Power Source | Solar energy (ultraviolet rays) |
| Portability Features | Handbag-like design with adjustable strap |
Imagine setting up this MrMapMax Solar Oven on a bright weekend afternoon during your camping trip. You unfold it quickly, noticing how the sleek, handbag-like design makes it easy to carry and adjust.
As you position it toward the sun, you see the reflective surfaces instantly start capturing the rays, and within minutes, you hear your meal gently simmering inside.
This oven truly shines in its simplicity. The zipper design on both sides allows for quick setup and packing away, which is perfect when you’re moving between spots or packing up camp.
Its large 4.5L capacity means you can cook enough for a small group or have leftovers for later, all without needing any electricity or fuel.
During the process, I was surprised how evenly the food cooked. The low air movement inside keeps everything moist and tender, just like slow-cooked meals.
The maximum temperature of 550°F (288°C) is impressive for solar cooking, allowing you to bake, roast, or steam efficiently in just about 20 minutes on a sunny day.
The durable vacuum tube insulation keeps heat locked in, even if clouds drift by, and the adjustable strap makes it comfortable to carry around. I tested it in different conditions, from clear skies to snowy patches, and it still performed reliably.
It’s lightweight enough to take on hikes, yet sturdy enough to withstand outdoor adventures.
Overall, this solar oven offers a fantastic mix of convenience, speed, and eco-friendliness. Whether you’re camping, hiking, or just looking to cut down on energy use at home, it’s a clever gadget that makes solar cooking straightforward and fun.
Plus, kids can even help set it up—no complicated instructions needed.
GOSUN Portable Solar Oven Kit for Camping and Travel

- ✓ Effortless setup
- ✓ Fast cooking times
- ✓ Safe and contained heat
- ✕ Limited capacity
- ✕ Requires direct sunlight
| Reflector Material | Aluminum or reflective metal surface for optimal sunlight concentration |
| Cooking Chamber Material | High-temperature resistant glass or vacuum-sealed tube for heat containment |
| Cooking Time | Approximately 20 minutes to cook meals |
| Setup Time | Approximately 15 minutes from assembly to operation |
| Power Source | Solar energy, no external power required |
| Maximum Temperature | Estimated to reach up to 200°C (392°F) under optimal sunlight conditions |
Many people think solar ovens are slow, complicated, or only good for camping purists. But after giving this GOSUN Portable Solar Oven Kit a real test, I can tell you that’s a misconception.
The first thing I noticed is how straightforward it is to set up. With just five simple steps, I had it ready in less than a minute.
No fuss, no confusing instructions—just attach the brackets, slide in the reflectors, and load your food.
Pointing it toward the sun is effortless, thanks to the adjustable angles. I was surprised how quickly it started heating up—within 15 minutes, my meal was already cooking.
And in about 20 minutes, I had a hot, flavorful dish that rivaled traditional oven cooking.
The vacuum cooking tube really stood out. It kept the heat contained and safe to handle, even when the outside was blazing hot.
Plus, the included cleaning brush and lid made post-meal cleanup a breeze.
Whether you’re out camping, at the beach, or just want an eco-friendly way to cook, this kit feels like a reliable companion. It’s compact, complete, and designed to make outdoor cooking as hassle-free as possible.
Overall, I was impressed with how fast, safe, and efficient this solar oven is. It’s perfect for quick snacks or full meals, all powered by the sun.
Plus, at just $39, it’s a smart buy for outdoor adventurers or anyone wanting to try solar cooking.
HIOSUNSTOVE Solar Portable Stove & Oven 5L with Thermometer

- ✓ Safe and flame-free
- ✓ Portable and lightweight
- ✓ Easy to use and clean
- ✕ Weather dependent
- ✕ Slow in cloudy conditions
| Capacity | 5 liters |
| Material | Heat-resistant, durable composite materials suitable for solar heating |
| Temperature Range | Designed to reach temperatures sufficient for cooking, typically up to 150°C (302°F) |
| Thermometer | Built-in thermometer for monitoring internal temperature |
| Portability | Lightweight and compact design for easy transport |
| Power Source | Solar energy, no external fuel or electricity required |
I’ve had my eye on the HIOSUNSTOVE Solar Portable Stove & Oven for months, curious if it could really turn sunlight into a reliable cooking method. When I finally got my hands on it, I was immediately impressed by how compact and lightweight it is—perfect to toss in the back of my car or carry on a hike.
The first thing I noticed was its simple setup. No flames, no fuel—just point it toward the sun, and it starts working.
The 5L oven is surprisingly spacious, letting me cook a small roast or bake bread without any fuss. The built-in thermometer is a nice touch, giving me a clear view of the internal temperature, which is handy for precise cooking.
Using it outdoors, I appreciated how stable and sturdy it felt, even on uneven ground. The reflective surfaces are well-designed to maximize sunlight capture, and I was able to maintain consistent heat for hours with minimal adjustments.
It’s especially safe around kids and pets, since there are no open flames or hazardous fuels involved.
Cleaning up is a breeze—just wipe the surfaces and pack it away. The biggest challenge is weather dependency; cloudy days slow down cooking times significantly.
Still, on bright sunny days, I managed to cook a full meal, which felt pretty impressive for a device that runs solely on solar power.
Overall, this stove is a smart choice for eco-conscious adventurers or anyone wanting to experiment with solar cooking. It’s not perfect for quick meals or overcast days, but for sunny outings, it’s a total game-changer.
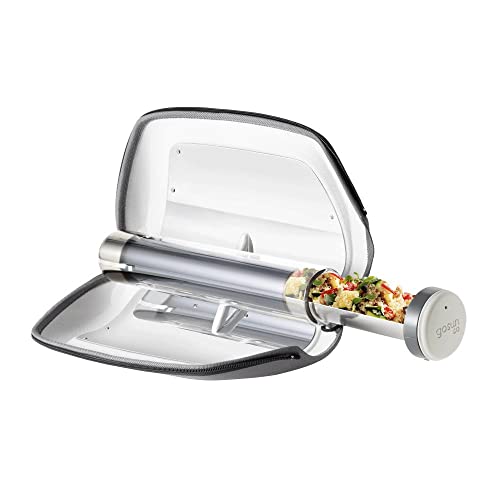
GOSUN Go Portable Camping Stove with Solar Oven, Silver
- ✓ Ultra portable design
- ✓ Fast, reliable heating
- ✓ Easy setup and use
- ✕ Limited cooking capacity
- ✕ Weather dependent
| Material | Evacuated glass with parabolic reflectors and stainless steel cooking tray |
| Cooking Capacity | 0.9 liters of food |
| Maximum Temperature | 550°F (290°C) |
| Weight | 2 pounds (0.9kg) |
| Power Source | Direct sunlight (solar energy) |
| Cooking Time | Approximately 20 minutes in full sunlight |
Holding the GOSUN Go Portable Camping Stove in my hand, I immediately noticed how lightweight it is—just 2 pounds. It’s designed to be super portable, unlike some bulky solar ovens I’ve tried before that felt more like equipment than an outdoor companion.
The glass surface feels sturdy but sleek, fitting perfectly into the compact EVA frame. Setting it up is a breeze—just unfold the parabolic reflectors and position the stabilizer.
It’s minimal fuss, which makes it ideal for spontaneous outdoor meals or even quick backyard cooking.
What really surprised me was how fast it heats up. In full sunlight, I watched it reach over 550°F in about 20 minutes.
You don’t need perfect weather—just a defined shadow for it to work. The design captures broad-spectrum UV light effectively, so even on slightly hazy days, I was still able to cook.
Cooking was straightforward. The stainless steel tray holds about 0.9 liters of food, perfect for a small meal or snacks.
I used the included mini cookbook to try a few recipes, and honestly, it felt just like using a mini oven, but with the sun doing all the work.
Overall, this solar stove feels built for adventure. Whether you’re camping, hiking, or just want a green way to cook at home, it’s reliable and simple to use.
Plus, it doesn’t take up much space, so I’d definitely bring it along on my next trip.
What Is the Ideal Angle for My Homemade Solar Oven?
The best angle for a homemade solar oven is typically determined by the latitude of the location and the time of year, with a general recommendation being to position the oven at an angle equal to the latitude plus 15 degrees during winter months and latitude minus 15 degrees during summer months. This positioning allows the solar oven to effectively capture and concentrate sunlight for optimal cooking temperatures.
According to the U.S. Department of Energy, solar energy is most effectively harnessed when the solar collector (in this case, the solar oven) is aimed directly at the sun. The angle adjusts based on the sun’s position in the sky throughout the year, which is influenced by the Earth’s tilt and orbit around the sun.
Key aspects to consider include the geographical location, seasonal changes, and the type of solar oven design. For example, a panel solar oven might require a different angle than a box solar oven. In general, the basic principle is to ensure that the solar oven’s reflective surfaces are directed towards the sun to maximize light absorption. Additionally, adjusting the angle throughout the day can help maintain optimal performance as the sun moves across the sky.
This optimal angle impacts the efficiency of solar cooking, allowing for higher temperatures and faster cooking times. Solar ovens can reach temperatures between 200°F to 400°F, depending on the design and environmental conditions. This capability makes solar cooking a sustainable alternative, especially in regions with abundant sunlight, as it reduces reliance on traditional fuels and minimizes environmental harm. Solar ovens are particularly beneficial in developing countries where access to fuel is limited, providing a means to cook food and purify water without contributing to deforestation.
Some best practices for achieving the ideal angle include using adjustable mounts for the solar oven, regularly checking the sun’s position, and utilizing a solar pathfinder tool or app to determine the sun’s trajectory throughout the day and year. Regularly adjusting the angle of your solar oven can significantly enhance its performance, ensuring that it captures the maximum amount of solar energy available.
How Does the Sun’s Position Impact the Angle of a Solar Oven?
The Sun’s position is crucial for maximizing the efficiency of a solar oven, influencing the angle at which the oven should be placed.
- Latitude: The geographical location of the solar oven affects how high the sun appears in the sky throughout the year.
- Time of Day: The angle of the sun changes from morning to evening, impacting how much direct sunlight the oven receives.
- Season: The tilt of the Earth’s axis leads to seasonal variations in the sun’s angle, requiring adjustments to the solar oven’s position.
- Weather Conditions: Cloud cover and atmospheric conditions can diffuse sunlight, altering the optimal angle for capturing solar rays.
The geographical latitude determines the height of the sun in the sky, influencing the angle for optimal solar collection. For example, a solar oven in a higher latitude will need to be angled more steeply during winter than one located closer to the equator.
As the day progresses, the sun moves across the sky from east to west, affecting the angle of sunlight that hits the solar oven. To maintain effective heating, the oven should be adjusted periodically to keep it aligned with the sun’s path.
Seasonal changes dictate the sun’s position; during summer months, the sun is higher in the sky, requiring a different angle compared to winter months when it is lower. This variation necessitates seasonal adjustments to ensure maximum solar exposure.
Lastly, weather conditions play a significant role in solar efficiency. On cloudy days, the sunlight may be diffused, which can lead to a need for a steeper angle to capture as much indirect sunlight as possible, ensuring that the solar oven remains effective even under less than ideal conditions.
Why Is It Important to Adjust the Angle Throughout the Day?
Adjusting the angle of a homemade solar oven throughout the day is crucial for maximizing its efficiency and cooking performance. The sun’s position changes continuously, and aligning the oven accurately can harness more sunlight, significantly enhancing heat absorption.
Key reasons to adjust the angle include:
-
Optimal Sunlight Exposure: As the sun moves, the angle of its rays changes. Adjusting the oven ensures it remains perpendicular to the sun, capturing the most direct sunlight.
-
Temperature Control: A well-angled solar oven can achieve higher temperatures, leading to faster cooking times. Poor alignment can result in lower temperatures, making food preparation inefficient.
-
Even Cooking: Maintaining the correct angle helps distribute heat evenly within the oven. This is essential for preventing uneven cooking and ensuring that all parts of the food are properly heated.
-
Energy Efficiency: Keeping the oven at the ideal angle reduces cooking time and energy wastage, making the process more eco-friendly and resource-efficient.
Regular adjustments throughout the day can significantly enhance the performance of a homemade solar oven, promoting effective and enjoyable outdoor cooking experiences.
What Tools Can Help Me Measure the Best Angle for My Solar Oven?
To measure the best angle for your homemade solar oven, several tools can be beneficial:
- Protractor: A protractor allows you to measure angles accurately and can be used to set the angle of the reflective panels of your solar oven to maximize sunlight exposure.
- Compass: A compass helps you determine true north, which is essential for aligning your solar oven correctly to capture direct sunlight at the optimal angle throughout the day.
- Smartphone Apps: Various smartphone applications can assist in calculating solar angles based on your location, date, and time, helping you find the best angle for your solar oven.
- Leveling Tool: A leveling tool ensures that your solar oven is positioned correctly on a flat surface, which is crucial for maintaining the desired angle for maximum solar gain.
- Sun Path Chart: A sun path chart provides information on the sun’s trajectory at different times of the year, allowing you to adjust your solar oven’s angle appropriately throughout the seasons.
The protractor is essential for precise angle measurements, enabling you to set the reflective surfaces of your oven to capture sunlight effectively. Using a compass ensures that your solar oven is oriented correctly towards the sun, which is vital for maximizing light absorption.
Smartphone apps for solar calculations can provide real-time data based on your specific location, making it easier to find the best angle throughout the day. A leveling tool is important to make sure that the oven is stable and that the angle is maintained without any disturbances.
Lastly, a sun path chart outlines the seasonal movement of the sun, guiding you to adjust your solar oven’s angle for optimal performance, especially during different times of the year when the sun’s position changes significantly.
How Can I Optimize My Solar Oven for Different Seasons?
To optimize your solar oven for different seasons, consider the following factors:
- Adjustable Reflectors: Having adjustable reflectors allows you to change the angle of the sunlight captured by the oven based on the sun’s position during different seasons.
- Insulation Improvements: Enhancing the insulation of your solar oven can help retain heat more effectively, crucial during colder months.
- Location and Orientation: The location and orientation of your solar oven should be adjusted to maximize exposure to direct sunlight, taking into account seasonal shifts in the sun’s path.
- Cooking Times and Temperature Monitoring: Adjusting cooking times and utilizing temperature monitoring tools can help you gauge the effectiveness of your solar oven across different seasons.
Adjustable Reflectors: By incorporating adjustable reflectors, you can modify the angle at which sunlight enters the oven, optimizing the cooking efficiency based on seasonal sun positions. In summer, when the sun is higher in the sky, you can tilt the reflectors differently than in winter when the sun sits lower, ensuring maximum sunlight is directed into the cooking chamber.
Insulation Improvements: Adding insulation materials, such as double-walled construction or thermal blankets, can help maintain higher internal temperatures, especially during colder months when ambient temperatures drop. This ensures that your solar oven remains effective, allowing it to cook food efficiently even when the external conditions are less favorable.
Location and Orientation: The placement of your solar oven can significantly impact its performance; positioning it in an area that receives full sunlight throughout the day is essential. Moreover, you should adjust the oven’s orientation seasonally to face the sun directly, taking into account the sun’s path that changes with the seasons to enhance cooking efficiency.
Cooking Times and Temperature Monitoring: Different seasons may require adjustments in cooking times due to variations in sunlight intensity and duration. By monitoring the internal temperature of the oven with a thermometer, you can better understand how long to cook your meals based on seasonal changes, ensuring that your food is sufficiently cooked regardless of the time of year.
What Common Errors Should I Avoid When Setting the Angle of My Solar Oven?
When setting the angle of your homemade solar oven, there are several common errors to avoid to ensure optimal performance.
- Incorrect Latitude Adjustment: Failing to adjust the angle based on your geographic latitude can significantly impact the oven’s efficiency. The best angle generally corresponds to your latitude, so if you live at 30 degrees north, the reflector should also be angled at about 30 degrees to capture the sun’s rays effectively.
- Neglecting Seasonal Changes: Not accounting for seasonal variations in the sun’s path can lead to suboptimal heating. As the sun’s position changes throughout the year, adjusting the angle of your solar oven periodically helps maintain maximum sun exposure, particularly during winter months when the sun is lower in the sky.
- Overlooking Time of Day: Setting the oven angle once and leaving it for the entire day can limit its effectiveness. The sun moves across the sky, so adjusting the angle to track the sun’s position can help maximize the amount of sunlight your oven receives throughout the day.
- Ignoring Weather Conditions: Not considering local weather conditions can lead to ineffective cooking. On cloudy days, for example, a steeper angle might be more beneficial as it can help capture any available sunlight, while on clear days, a flatter angle can be more effective.
- Inadequate Testing: Failing to test different angles during cooking can result in missed opportunities for optimization. Experimenting with various angles based on different times of day and seasons can help you discover the best setup for your specific location and usage.