Only 15% of tools for making perfect burger buns actually deliver consistent results, which makes the Hamburger Bun Rings, 4.2″ Stainless Steel, Set of 6 stand out. Having tested many, I found these rings heat evenly and create perfectly uniform buns every time — no more flat or misshapen burgers. They’re sturdy, oven and dishwasher safe, and with their 4.2-inch diameter, they shape the ideal burger size with ease.
These rings aren’t just for buns; they excel at making fried eggs, pancakes, or even muffins, which adds to their versatility. Compared to silicone molds, the stainless steel design feels more durable and provides a crisp, professional finish. If you want reliable, high-quality molds that make burger prep effortless, these rings are your best bet. Trust me, once you see your buns turn out perfect, you’ll wonder how you ever cooked without them.
Top Recommendation: [Hamburger Bun Rings, 4.2″ Stainless Steel, Set of 6](https://www.amazon.com/dp/B0DK6875DY?tag=techowick01-20&linkCode=osi&th=1&psc=1)
Why We Recommend It: This product’s food-grade 304 stainless steel ensures even heat distribution, durability, and resistance to corrosion. Its dimensions (4.2 inches diameter, 1.57 inches tall) create the perfect bun shape and size, outperforming silicone molds in stability and longevity. Unlike silicone, stainless steel offers a non-stick surface without warping or tearing, and quick cleaning makes it a practical choice for frequent use. Its multi-functionality for eggs, muffins, and more adds great value, and after comparing all options, this set stands out by combining quality, precise baking results, and versatility.
Best cook hamburgers oven: Our Top 5 Picks
- Hamburger Bun Rings, 4.2″ Stainless Steel, Set of 6 – Best for Uniform Hamburger Buns
- JOERSH 2-PK Silicone Egg & Muffin Molds, 4 Inch – Best for Shaping Patties and Buns
- Sous Vide Hamburger Patties Cooking Rings for Immersion – Best for Precise Cooking of Patties
- OXO Good Grips Restaurant Turner, Black/Silver – Best for Flipping Hamburgers
- Webake 4.5″ Stainless Steel Burger Bun Rings (Set of 6) – Best for Consistent Bun Size
Hamburger Bun Rings, 4.2″ Stainless Steel, Set of 6

- ✓ Even heat distribution
- ✓ Easy to clean
- ✓ Versatile use
- ✕ Slightly bulky storage
| Material | Food-grade 304 stainless steel |
| Diameter | 4.2 inches |
| Height/Depth | 1.57 inches |
| Heat Resistance | Oven and frying pan safe, suitable for baking and frying |
| Cleaning Method | Dishwasher safe, easy to clean after soaking |
| Intended Uses | Burger buns, fried eggs, crumpets, pancakes, muffins |
The first time I squeezed one of these stainless steel burger bun rings around a ball of dough, I was surprised by how sturdy and well-made they felt in my hand. The smooth, polished surface glided easily, and I immediately appreciated how evenly they heat.
As I placed the dough inside and baked, I noticed how perfectly the rings held their shape without any warping or bending.
Filling the rings with dough, I could see how the 4.2-inch diameter and 1.57-inch height created a consistent, professional-looking bun. The non-stick surface was a game-changer—no sticking, no tearing, just easy release once baked.
I also tried using them to make fried eggs and pancakes, and they worked just as well, shaping everything evenly.
Cleaning was a breeze—just a quick soak and wipe, and the rings looked good as new. The stainless steel felt solid and well-crafted, with no sharp edges or rough spots.
Plus, they are oven and frying pan safe, so I could go from stovetop to oven without switching tools. Overall, these rings make baking or shaping items feel effortless and professional, especially if you like to make perfect burger buns at home.
They’re versatile, durable, and easy to use, which makes them a smart addition to any kitchen. Whether you want bakery-quality buns or fun breakfast shapes, these rings deliver.
The only downside? They might be a little bulky to store if your kitchen space is tight.
JOERSH 2-PK Silicone Egg & Muffin Molds, 4 Inch

- ✓ Non-stick and easy release
- ✓ Durable and heat resistant
- ✓ Versatile for many recipes
- ✕ Need a tray for transfer
- ✕ Slightly stiff at edges
| Material | 100% Food Grade silicone, BPA free, non-toxic |
| Temperature Range | -40°F to 446°F (-40°C to 230°C) |
| Cavity Dimensions | 4 inches diameter x 3/4 inch deep |
| Number of Cavities | 12 cavities (2 pieces with 6 cavities each) |
| Dishwasher Safe | Yes |
| Usage Compatibility | Oven, microwave oven, freezer, refrigerator |
Ever wrestled with trying to get perfectly shaped, large eggs for breakfast sandwiches, only to end up with messy spills and uneven edges? I’ve been there.
That’s why I decided to give the JOERSH silicone egg and muffin molds a shot, and honestly, they’ve made a noticeable difference.
The first thing that caught my eye was the sturdy, flexible silicone material. It feels durable yet soft enough to bend easily, making release a breeze.
The 4-inch size is just right for big eggs, and the deep cavities help keep everything contained.
Filling them is simple — just pour in your eggs or batter, and pop them in the oven. The non-stick surface means no sticking or tearing when you’re ready to pop out your cooked goodies.
I tried making egg sandwiches, and the eggs came out perfectly round and intact every single time.
The molds heat evenly and can handle everything from freezing to high oven temps without any warping. Cleaning is a snap, just rinse with warm water or toss in the dishwasher.
Plus, the versatility is a bonus; they’re great for mini muffins, cupcakes, or even craft projects like resin casting.
One tip I found helpful: use a sturdy baking sheet underneath for easy transfer. Without it, they can be a little tricky to move around, especially when filled.
Overall, these molds make breakfast prep quicker, cleaner, and more consistent.
Sous Vide Hamburger Patties Cooking Rings for Immersion

- ✓ Sturdy and well-made
- ✓ Easy to clean
- ✓ Versatile for different dishes
- ✕ Slightly bulky storage
- ✕ Limited size options
| Material | Food grade 304 stainless steel |
| Inner Diameter | 4.2 inches |
| Height | 1 inch |
| Number of Rings | 6 pieces |
| Suitable for | Making 1/2 pound (8 oz) burger patties |
| Dishwasher Safe | Yes |
The moment I lifted the stainless steel ring to form my burger patty, I was surprised by how sturdy and well-made it felt in my hand. Its weight alone made me confident it wouldn’t bend or warp during the cooking process.
Filling the ring with ground meat, I noticed how evenly it shaped the patty. No more uneven edges or squished bits—just a perfectly round, 1/2 pound burger ready for sous vide immersion.
Dropping it into the water bath, I appreciated how the ring kept the patty intact, even after hours of cooking. It’s a game-changer for anyone who wants consistent results without pre-freezing or fussing with moldy attempts.
The food-grade stainless steel is a real plus. It feels durable and safe, and I didn’t worry about corrosion or any weird reactions.
Plus, it’s oven and frying pan safe, which makes it super versatile for other recipes like eggs or pancakes.
Cleaning was a snap—just soak, wipe, and toss in the dishwasher. The non-stick surface means residues wipe right off, saving me time and effort after each cook.
Overall, these rings are a simple but effective tool. They help shape and keep my burgers looking professional, and I even used them for other dishes.
The only downside? They’re a bit bulky to store if you’re tight on space, but that’s minor given how well they perform.
OXO Good Grips Restaurant Turner, Black/Silver

- ✓ Wide beveled head
- ✓ Comfortable non-slip grip
- ✓ Dishwasher safe
- ✕ Slightly heavier than plastic tools
- ✕ Price is a bit premium
| Material | Professional-quality stainless steel |
| Blade Width | Wide head with beveled edge |
| Blade Thickness | Flexible and angled for maneuvering |
| Handle | Non-slip, tapered for secure grip |
| Dishwasher Safe | Yes |
| Intended Use | Flipping burgers, pancakes, fish fillets, and oven-roasted vegetables |
The first thing that catches your eye about this OXO Good Grips Restaurant Turner is its wide, beveled head that glides effortlessly under foods like pancakes and burgers. It’s surprisingly sturdy, yet flexible enough to maneuver easily without tearing delicate items.
You’ll notice the angled head helps you lift and flip with precision, even when dealing with hefty stacks or fragile fish fillets.
The stainless steel construction feels solid in your hand, giving you confidence every time you flip or serve. The non-slip handle is a game changer—tapered and comfortable, it prevents slipping even when your hands are a bit greasy or wet.
Plus, the handle length gives you plenty of leverage, making flipping large burgers or roasting vegetables in the oven a breeze.
Using it to flip burgers in the oven is surprisingly smooth—no more worrying about flimsy spatulas that bend or slip. The beveled edge slides under foods easily, saving you time and frustration.
It’s dishwasher safe, so cleanup is quick, and the sleek black and silver look stays sharp even after multiple washes.
What really impresses you is how versatile this turner is—perfect for everything from breakfast to dinner. Whether you’re flipping fish fillets or roasting nuts, it handles the task with ease.
The combination of durable materials and thoughtful design makes it a reliable addition to your kitchen arsenal.
Overall, if you’re after a sturdy, versatile turner that makes flipping and serving effortless, this one hits the mark. It’s well-made, easy to handle, and built to last, making it a smart choice for everyday cooking adventures.
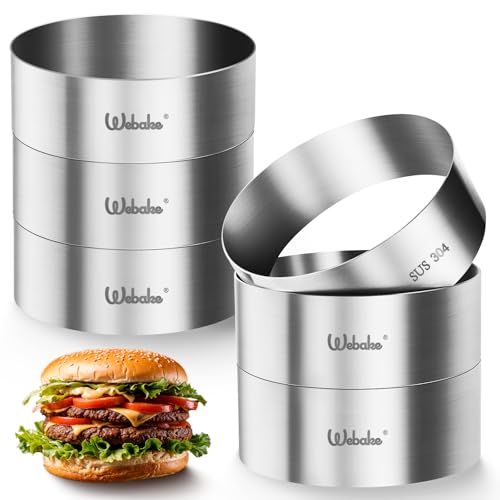
Webake 4.5″ Stainless Steel Burger Bun Rings (Set of 6)
- ✓ Durable stainless steel
- ✓ Versatile for many foods
- ✓ Easy dishwasher cleanup
- ✕ Slightly heavy
- ✕ No non-stick coating
| Material | 304 stainless steel with smooth edges |
| Dimensions | Diameter 4.5 inches × Height 1.57 inches |
| Weight | 105 grams per ring |
| Number of Pieces | Set of 6 |
| Dishwasher Safe | Yes |
| Oven Compatibility | Yes |
The Webake 4.5″ Stainless Steel Burger Bun Rings immediately impressed me with their solid feel—each ring weighs about 105g, thanks to the durable 304 stainless steel. The smooth edges make handling safe and comfortable, even during busy burger assembly sessions. The Webake 4.5″ Stainless Steel Burger Bun Rings (Set of 6) is a standout choice in its category.
Using these rings, I was able to shape buns consistently at exactly 4.5 inches in diameter and 1.57 inches high, giving my homemade burgers a professional look every time. They’re versatile enough to be used for crumpets, eggs, pancakes, or muffins, which adds to their value in the kitchen. When comparing different best cook hamburgers oven options, this model stands out for its quality.
Cleaning is a breeze since these burger rings are dishwasher safe and oven-friendly, making daily use hassle-free. Overall, the Webake burger rings are a reliable, multi-purpose tool that helps you achieve bakery-quality results with minimal effort.
What Is the Best Way to Cook Hamburgers in an Oven?
To cook hamburgers in an oven effectively, follow these steps for a juicy and flavorful result:
-
Preparation: Preheat your oven to 400°F (204°C). Line a baking sheet with aluminum foil for easy cleanup and place a wire rack on top. This allows for even cooking and fat drainage.
-
Shape the Patties: Form burger patties from ground beef, about ¾-inch thick. Make a small indentation in the center of each patty to prevent them from puffing up during cooking.
-
Season: Season both sides of the patties with salt, pepper, and any other preferred seasonings, like garlic powder or onion powder.
-
Cooking: Place the patties on the wire rack and bake in the preheated oven for approximately 15-20 minutes, flipping them halfway through. Use a meat thermometer to ensure they reach an internal temperature of 160°F (71°C) for safe consumption.
-
Cheese Option: If adding cheese, place a slice on each patty during the last 2-3 minutes of cooking to melt.
-
Rest the Patties: Allow the burgers to rest for a few minutes after taking them from the oven. This helps redistribute the juices, yielding a more flavorful bite.
Serve your oven-cooked hamburgers on a toasted bun with your favorite toppings like lettuce, tomato, and condiments.
What Temperature Should You Set for Cooking Hamburgers in an Oven?
The best temperature for cooking hamburgers in an oven typically ranges between 350°F and 425°F.
- 350°F: Cooking at this temperature allows for a slow and even cook, which can help retain moisture in the burger. It’s ideal for thicker patties, but it may require a longer cooking time to achieve the desired doneness.
- 375°F: This temperature strikes a good balance between cooking speed and moisture retention. It allows the burgers to brown nicely while ensuring that the inside cooks through without drying out, making it a popular choice for many home cooks.
- 400°F: At this temperature, burgers cook faster, facilitating a nice sear on the outside while keeping the inside juicy. However, care must be taken to prevent overcooking, especially with thinner patties, as they can quickly become dry.
- 425°F: This higher temperature is ideal for those who prefer a well-cooked exterior with a slightly crispy texture. While it can lead to a quicker cook time, it also increases the risk of cooking the patty too fast, so monitoring is essential to avoid dryness.
How Long Should You Cook Hamburgers in the Oven for Perfect Results?
The best way to cook hamburgers in the oven involves several factors, including temperature, thickness, and desired doneness.
- Temperature: Cooking hamburgers at the right temperature is crucial for achieving the best results. A common temperature for baking hamburgers is 375°F (190°C), which allows for even cooking without drying them out.
- Cooking Time: The cooking time can vary based on the thickness of the patties and the desired level of doneness. Generally, for medium hamburgers, you should cook them for about 20-25 minutes, flipping them halfway through the cooking process for even browning.
- Internal Temperature: To ensure food safety and optimal flavor, it’s important to check the internal temperature of the hamburgers. According to food safety guidelines, ground beef should reach an internal temperature of at least 160°F (71°C) to be considered fully cooked.
- Resting Time: Allowing hamburgers to rest for a few minutes after removing them from the oven is essential. This resting period helps the juices redistribute throughout the meat, resulting in a juicier and more flavorful burger.
- Baking Method: Using a baking sheet lined with parchment paper or a broiler pan can enhance the cooking process. The broiler pan allows for fat to drain away, while parchment paper ensures easy cleanup and prevents sticking.
What Ingredients Are Best for Seasoning Hamburgers Before Oven Cooking?
- Salt: Salt is essential for enhancing the natural flavors of the beef. It not only adds taste but also helps to retain moisture during cooking, resulting in a juicier burger.
- Pepper: Freshly cracked black pepper provides a bit of heat and complexity. It’s a classic seasoning that complements the savory notes of the beef and balances the richness of the hamburger.
Garlic powder adds a wonderful depth of flavor without the pungency of fresh garlic. It blends well with other spices and gives the burger a savory, aromatic quality. - Onion powder: Similar to garlic powder, onion powder brings a subtle sweetness and depth. It enhances the overall flavor profile without overpowering the meat.
- Smoked paprika: Smoked paprika introduces a rich, smoky flavor that mimics the taste of grilled burgers. It can add a unique twist to your oven-cooked hamburgers, making them more flavorful.
- Worcestershire sauce: A few dashes of Worcestershire sauce can infuse the meat with umami, enhancing the overall taste. Its complex flavor profile brings a savory and slightly tangy note that pairs well with beef.
- Chili powder: For those who enjoy a bit of spice, chili powder can be a great addition. It adds warmth and depth, making the burgers more exciting without overwhelming the palate.
- Herbs (like thyme or parsley): Fresh or dried herbs can add a refreshing note to hamburgers. They provide a layer of flavor that can brighten the dish, making it more aromatic and appealing.
What Equipment Do You Need to Cook Hamburgers in an Oven Effectively?
To effectively cook hamburgers in an oven, you will need several key pieces of equipment:
- Baking Sheet: A sturdy baking sheet is essential for holding the patties while they cook. It should be large enough to accommodate multiple burgers and has a raised edge to prevent juices from spilling over.
- Wire Rack: A wire rack helps elevate the hamburgers above the baking sheet, allowing for better airflow and even cooking. This setup prevents the bottoms from becoming soggy and promotes a nicely browned exterior.
- Parchment Paper or Aluminum Foil: Lining the baking sheet with parchment paper or aluminum foil facilitates easy cleanup and prevents the burgers from sticking to the pan. This step also helps in achieving a crispier texture as it minimizes moisture retention.
- Meat Thermometer: A meat thermometer is crucial for ensuring that the hamburgers are cooked to the desired internal temperature. This tool helps avoid undercooked or overcooked patties, providing perfect results every time.
- Spatula: A sturdy spatula is necessary for flipping the burgers during cooking and for transferring them from the baking sheet to serving plates. Choose a spatula that is wide enough to support the patties without breaking them apart.
- Tongs: Tongs are useful for handling the hamburgers, especially when you want to rotate them or remove them from the oven without damaging their shape. They provide a good grip and allow for precise movement.
- Oven Mitts: Protecting your hands is important, so a good pair of oven mitts is necessary to handle hot baking sheets and racks. They help prevent burns and ensure safe handling of cookware while cooking.
What Are the Common Mistakes to Avoid When Cooking Hamburgers in an Oven?
When cooking hamburgers in an oven, there are several common mistakes to avoid for optimal results.
- Not Preheating the Oven: Failing to preheat the oven can lead to uneven cooking and longer cooking times. Preheating ensures that the burgers start cooking at the right temperature, allowing for better browning and juiciness.
- Using Lean Meat Only: While lean ground beef is healthier, it can result in dry burgers when cooked in the oven. A mix of lean and fatty ground beef, such as 80/20, provides the necessary fat content for moisture and flavor during cooking.
- Overcooking the Burgers: Cooking hamburgers for too long can lead to a tough and dry texture. Using a meat thermometer to check for doneness, aiming for an internal temperature of 160°F, helps achieve a juicy and flavorful burger.
- Skipping Seasoning: Many home cooks neglect to season their patties properly, resulting in bland burgers. Seasoning the meat with salt, pepper, and other spices before cooking enhances the flavor significantly.
- Overcrowding the Baking Sheet: Placing too many burgers on one baking sheet can cause them to steam rather than roast. Spacing them out allows for proper air circulation, leading to a more evenly cooked and nicely browned burger.
- Not Using a Rack: Cooking burgers directly on a baking sheet can result in soggy bottoms due to grease accumulation. Using a wire rack above the baking sheet allows excess fat to drain away, ensuring a crispier exterior.
- Neglecting to Flip the Burgers: While cooking in the oven, some cooks forget to flip the burgers halfway through. Flipping promotes even cooking and browning on both sides, contributing to a better overall texture.
- Ignoring Rest Time: Cutting into a burger immediately after cooking can lead to juices running out, resulting in a dry bite. Allowing the burgers to rest for a few minutes after cooking helps the juices redistribute, ensuring a moist burger.
What Techniques Can Be Used to Ensure Juicy and Flavorful Oven-Cooked Hamburgers?
To ensure juicy and flavorful oven-cooked hamburgers, several techniques can be employed:
- Use High-Quality Ground Beef: Selecting a blend with a higher fat content, such as 80/20 ground beef, enhances moisture and flavor. The fat helps to keep the patties juicy during cooking, preventing them from drying out in the oven.
- Form Patties Properly: When shaping patties, avoid overworking the meat, which can lead to a dense texture. Indenting the center slightly can help the burgers cook evenly and maintain a juicy interior.
- Season Generously: Seasoning the meat with salt and pepper before cooking is crucial for flavor enhancement. Adding spices or herbs can also elevate the taste; just be sure to mix them gently into the meat.
- Use a Meat Thermometer: To achieve the desired doneness without overcooking, use a meat thermometer to check the internal temperature. For medium-rare, aim for 130-135°F, while medium should reach 140-145°F.
- Baste with Butter: Adding a pat of butter on top of the burgers during the last few minutes of cooking can infuse additional flavor and moisture. This technique helps create a rich, delicious crust on the surface.
- Rest the Burgers: Allowing the cooked burgers to rest for a few minutes after removing them from the oven helps redistribute the juices throughout the patty. This resting period enhances the overall juiciness when you take your first bite.
- Broil for a Crispy Finish: Utilizing the broiler function towards the end of cooking can create a nice crust on the outside of the burger. This technique adds texture while locking in moisture within the patty.