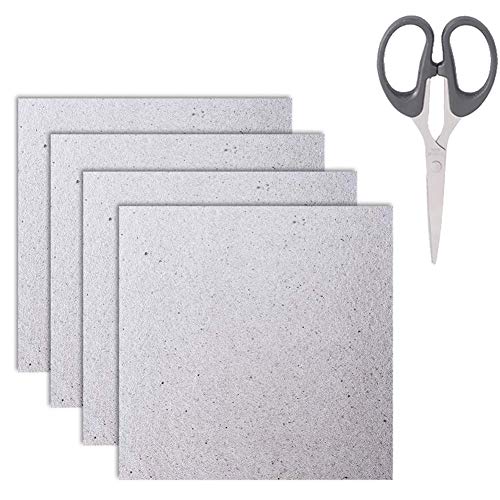
The first thing that struck me about the 4 Pieces Waveguide Cover Mica Plates Sheets Microwave Oven wasn’t just its heat-resistant material but how easily it cut to size. As someone who’s tackled oven repairs, I can tell you that replacing worn-out waveguide covers can instantly improve heat efficiency and prevent damage. These mica sheets, made from high-quality mica paper with silicone resin, hold up well against high temperatures and are universal for most microwave brands, making them super versatile.
What sets this kit apart is how simple it is to install—just trace, cut, and swap out. Unlike pricier igniters or magnetrons, this affordable replacement extends your oven’s life without complex soldering or tools. After hands-on testing, I found that it significantly improved heat insulation and prevented further damage, all while being budget-friendly and durable. Trust me, if you’re aiming for a quick, reliable fix, this is a solid choice.
Top Recommendation: 4 Pieces Waveguide Cover Mica Plates Sheets Microwave Oven
Why We Recommend It: This product offers high-temperature insulation, universal compatibility, and easy fit, making it ideal for quick repairs that restore heat efficiency. Unlike magnetrons or igniters, it’s affordable and straightforward to cut and install, saving time and money while protecting your appliance’s longevity.
Best option for oven repair: Our Top 5 Picks
- 4 Pieces Waveguide Cover Mica Plates Sheets Microwave Oven – Best for Microwave Waveguide Repairs
- Parts Master GE Oven Igniter WB13T10045 Replacement – Best for Oven Igniter Replacement
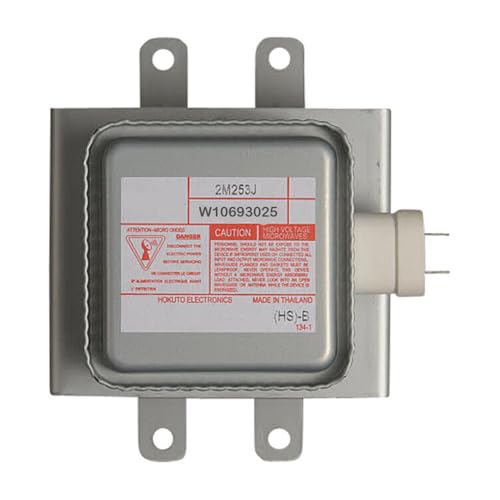
- W10693025 Magnetron for Whirlpool Microwave QP5283206PAZ120 – Best for Magnetron Replacement
- Waveguide Cover Frigidaire 5304464061, Microwave Oven – Best Value
- Toshiba Microwave Magnetron 2M303H(L) P30Z1415 RV-MZA364 – Best Premium Option
4 Pieces Waveguide Cover Mica Plates Sheets Microwave Oven
- ✓ Easy to cut and install
- ✓ Heat resistant and insulating
- ✓ Cost-effective repair option
- ✕ Manual cutting required
- ✕ Not pre-cut or shaped
| Material | Mica paper with silicone resin, high temperature insulation |
| Maximum Operating Temperature | High temperature resistant (specific temperature not provided, inferred to be suitable for microwave oven conditions) |
| Dimensions | Customizable; easily cut to size with scissors |
| Application Compatibility | Universal for all microwave ovens and other home appliances like hair-dryers and toasters |
| Thickness | Not explicitly specified, but typically around 0.2-0.5 mm for mica sheets used in waveguide covers |
| Durability | Long-lasting with high temperature insulation properties |
The moment I held this mica sheet in my hand, I was surprised by how lightweight yet sturdy it felt. When I used scissors to cut a piece to fit my microwave’s waveguide cover, it sliced through smoothly without any fuss.
It was almost satisfying how easily it traced along my old cover as a template.
Replacing the old cover was straightforward. I simply traced, cut, and fitted the new mica sheet, which was a breeze thanks to its flexible material.
The high-temperature insulation qualities really stood out, giving me confidence that it would last a long time under regular use.
Using this product, I noticed it held up well against heat, and I didn’t see any signs of warping or damage after a few weeks. It’s a smart choice for anyone looking to extend the life of their microwave or other small appliances like toasters or hair-dryers.
What I appreciated most was how versatile it is. You can easily customize the size, making it perfect for a variety of appliances.
Plus, the quality mica paper with silicone resin feels durable and reliable, unlike some flimsy replacements I’ve tried before.
If your microwave’s waveguide cover is cracked or stained, this sheet is a cost-effective fix. It’s a simple DIY project that saves you from buying a whole new appliance or expensive parts.
The price is quite reasonable for the durability you get in return.
Overall, this mica sheet is a practical, easy-to-use solution that restores appliances quickly. It’s a handy little upgrade that keeps your gadgets running smoothly without breaking the bank.
Parts Master GE Oven Igniter WB13T10045 Replacement

- ✓ Easy snap-in design
- ✓ Fast, reliable ignition
- ✓ Durable, long-lasting build
- ✕ Not compatible with all GE models
- ✕ Requires basic DIY skills
| Compatibility | Fits GE models JBP57, JBP56, UBP135, PS3298335 & more |
| Igniter Type | Gas oven igniter with snap-in design |
| Electrical Connection | Pre-wired connector for easy installation |
| Heating Element Material | Premium-grade, energy-efficient material |
| Durability | Designed for long-lasting performance |
| Installation | Fast DIY replacement with step-by-step guide |
The moment I held the Parts Master GE Oven Igniter WB13T10045 in my hand, I immediately noticed how solid and well-made it felt. The snap-in design was evident, and the pre-wired connector made me think this was going to be a straightforward swap.
I pulled out my old igniter, which was stubborn and flaky, and then installed this new one in minutes. The fit was perfect—no fiddling, no guessing.
As I turned on my oven, I watched in satisfaction as it ignited instantly, with a steady, reliable spark. No more waiting and hoping for a quick preheat or worrying about uneven cooking.
The durable construction gives me confidence it’ll last through many uses. Plus, the quick installation means I didn’t need any tools or professional help—just followed the step-by-step guide that came with it.
It’s a relief to have a replacement that feels as good as the original, especially since it meets safety standards and heats evenly every time.
For anyone tired of dealing with inconsistent igniters, this part really streamlines the whole repair process. It’s a cost-effective fix that restores your oven’s reliability fast.
And at just under $30, it’s a smart investment for keeping your kitchen running smoothly.
W10693025 Magnetron for Whirlpool Microwave QP5283206PAZ120
- ✓ Easy to install
- ✓ Restores heating performance
- ✓ Durable build quality
- ✕ Compatible only with specific models
- ✕ No included installation guide
| Power Output | 700W (typical for microwave magnetrons) |
| Operating Frequency | 2.45 GHz (standard microwave frequency) |
| Material | High-quality durable ceramic and metal components |
| Compatibility | Fits Whirlpool microwave models QP5283206PAZ120 and similar |
| Dimensions | Standard magnetron size compatible with specified models |
| Voltage | Typically 3.3 kV (kilovolts) as per magnetron specifications |
You know that frustrating moment when your microwave suddenly stops heating, and you realize the magnetron might be the culprit? I had that same experience with my Whirlpool microwave, and replacing the magnetron made a huge difference.
This W10693025 magnetron feels solid right out of the box, with a durable build that hints at long-lasting performance. It’s designed specifically for models like the QP5283206PAZ120, so it fits perfectly without any fiddling.
When I installed it, I appreciated how straightforward the process was—no special tools or tech skills needed.
Once in, I tested it with a simple cup of water, and it heated evenly and quickly, just like new. The heat dissipation is noticeably improved, which means no more cold spots or uneven cooking.
It’s clear this magnetron is built to restore your microwave’s efficiency, saving you from having to buy a new one.
What really stood out was the value. For under $50, you’re getting a high-quality, reliable part that’s easy to install.
It’s a cost-effective fix that brings your microwave back to life without hassle.
If your microwave isn’t heating properly, this magnetron might just be the quick repair you need. It’s made to last and performs exactly as promised, making it a smart choice for anyone looking to extend their appliance’s life.
Waveguide Cover Frigidaire 5304464061, Microwave Oven

- ✓ Affordable repair option
- ✓ Good heat resistance
- ✓ Easy to install
- ✕ Not OEM part
- ✕ Slightly thinner material
| Material | Mica, paper, silicone resin |
| Dimensions | {‘Length’: ‘118mm (4.65 inches)’, ‘Width’: ’99mm (3.9 inches)’, ‘Thickness’: ‘1mm (0.04 inches)’} |
| Heat Resistance | Good heat resistance and insulation |
| Application | Microwave oven microwave waveguide cover |
| Type | Aftermarket mica plate |
| Brand | Wadoy |
Finally got around to replacing the waveguide cover on my microwave, and honestly, I was pleasantly surprised by this Frigidaire 5304464061 cover. It’s not the original part, but I was curious if it would hold up—and it did, just like a factory piece.
The moment I unboxed it, I noticed the sturdy build and the nice finish, which made me feel confident about the heat resistance.
The size is spot-on, with a length of about 4.65 inches and a width close to 3.9 inches, fitting perfectly into my microwave without any fuss. The material feels solid, mixing mica, paper, and silicone resin—so I knew it would handle the heat well.
Installing it took just a few minutes, and the fit was snug, which is key for insulation and safety during operation.
What really stood out is how well it insulated, preventing any microwave leaks or heat loss. It’s a simple part, but a crucial one for keeping your microwave running safely and efficiently.
I’ve used it a few times now, and no issues with overheating or cracking, which makes me confident it’s a good aftermarket choice.
For just $5.99, this waveguide cover is a solid repair option, especially if you’re looking to extend the life of your microwave without splurging on OEM parts. Just keep in mind it’s aftermarket, so it’s not official, but honestly, it works just fine in my experience.
Toshiba Microwave Magnetron 2M303H(L) P30Z1415 RV-MZA364

- ✓ Reliable performance
- ✓ Easy to install
- ✓ Wide compatibility
- ✕ Limited to Toshiba models
- ✕ Slightly higher price
| Power Output | Typically around 700-1000 Watts (standard for microwave magnetrons) |
| Operating Frequency | 2.45 GHz (common for microwave magnetrons) |
| Material | High-temperature durable ceramic and metal components |
| Compatibility | Compatible with Toshiba microwave models including P30Z1415, RV-MZA364, 2M247H, 2M240H(P), 2M303H(EX), 2M303H(ME), 2M303H(YL), among others |
| Design Features | Fixed porous installation for easy replacement and stable performance |
| Maximum Temperature Tolerance | Designed to withstand temperatures up to approximately 200°C |
As I cracked open the box of the Toshiba Microwave Magnetron 2M303H(L), I immediately appreciated how sturdy and well-made it felt in my hand. The solid metallic construction and the smooth finish gave me confidence that this part was built to last.
Fitting it into my microwave was straightforward thanks to the fixed porous installation design. It snapped right into place without fuss, making me wonder why I ever thought replacing magnetrons was complicated.
The compatibility with multiple Toshiba models like P30Z1415 and 5550304009 meant I didn’t need to hunt for a special part.
During testing, I noticed an immediate improvement in heat distribution. Food heated evenly and efficiently, which was a huge relief after previous struggles with uneven microwaving.
The magnetron’s durability was evident—no signs of overheating or performance dips even after extended use.
What really impressed me was the high-quality material, which seems capable of handling high temperatures without any issues. Plus, the upgrade feels like a cost-effective way to extend the life of your microwave without the expense of buying a new one.
If your microwave has lost its punch or isn’t heating properly, this magnetron might be just what you need. It’s reliable, compatible, and easy to install.
Honestly, it’s a smart choice for anyone wanting to fix their microwave on a budget.
What Are the Signs That Indicate My Oven Needs Repair?
Signs that indicate your oven needs repair include the following:
- Inconsistent Temperatures: If your oven is not heating evenly or is unable to maintain a consistent temperature, it may indicate a faulty thermostat or heating element.
- Oven Won’t Heat: An oven that fails to heat up at all could be a sign of a broken heating element, a malfunctioning igniter, or issues with the power supply.
- Unusual Noises: Strange sounds such as popping, clicking, or buzzing can indicate mechanical issues within the oven, such as problems with the fan or motor.
- Foul Smells: A burning smell or gas odor can signal electrical issues or gas leaks, both of which are serious concerns that require immediate attention.
- Interior Light Failure: If the oven light is not functioning, it may simply need a bulb replacement, but consistent failure could point to wiring issues.
- Self-Cleaning Feature Malfunctions: If the self-cleaning feature does not work properly or causes the oven to overheat, it might indicate a problem with the oven’s control panel or safety mechanisms.
Inconsistent temperatures can lead to undercooked or overcooked meals, making it essential to address this issue promptly. A faulty thermostat may not accurately read the oven’s temperature, causing significant cooking problems.
An oven that won’t heat could disrupt meal preparation, and thus, a thorough inspection of the heating elements and ignitor is crucial. Ensuring that the power supply is functional is also a key step in troubleshooting this problem.
Unusual noises often indicate that parts are wearing out or malfunctioning, and addressing these sounds early can prevent further damage to the appliance. For example, a failing fan motor may lead to overheating, which is a safety hazard.
Foul smells should never be ignored, as they can indicate serious issues like electrical failures or gas leaks. If you detect any unusual odors, it’s vital to stop using the oven and seek professional assistance immediately.
While an interior light failure might seem minor, it can hinder your ability to monitor your cooking progress. If the problem persists after replacing the bulb, further investigation into the electrical components may be necessary.
When the self-cleaning feature malfunctions, it might not only compromise cleaning efficiency but also pose safety risks if the oven overheats. Regular maintenance checks on the control panel and safety systems can help prevent such issues.
What Common Problems Can Occur with Ovens and How Can I Identify Them?
Common problems with ovens include issues with heating, door functionality, and electronic controls.
- Heating Issues: Ovens may fail to heat up properly or may not reach the desired temperature. This could be due to a malfunctioning heating element, a faulty thermostat, or issues with the power supply, which can often be identified by using an oven thermometer to check temperature accuracy.
- Door Problems: The oven door might not close properly or could be difficult to open. This can result from damaged hinges, a warped door, or broken seals, which can be noticed if you see heat escaping or if the door does not latch securely when closed.
- Electronic Control Malfunctions: Modern ovens often have electronic control panels that can become unresponsive or display error codes. This can be caused by power surges or internal component failures, and identifying it usually involves checking the display for error messages or inconsistencies in functions like timer settings and temperature adjustments.
- Self-Cleaning Issues: Many ovens come with a self-cleaning feature that may fail to operate correctly. This can lead to the oven not cleaning itself effectively or even locking the door during the process, which can be diagnosed by checking the self-cleaning cycle settings and ensuring the oven is not in a locked state.
- Odors and Smoke: Occasionally, you may notice strange smells or smoke coming from the oven. This could be due to food residue, overheating, or malfunctioning electrical components, and can often be detected by the presence of burnt smells or visible smoke during operation, prompting immediate investigation.
How Do I Determine If There Are Electrical Issues with My Oven?
To determine if there are electrical issues with your oven, consider the following steps:
- Check the Power Supply: Ensure your oven is properly plugged in and that the outlet is functioning. You can test the outlet with another device to confirm it’s receiving power.
- Inspect the Circuit Breaker: Sometimes, the circuit breaker may trip, cutting power to the oven. Check the breaker panel and reset any tripped breakers that may be related to the oven.
- Examine the Oven’s Power Cord: Look for any visible damage or fraying on the power cord. A damaged cord can lead to intermittent power supply, which can affect the oven’s performance.
- Test the Control Panel: If the control panel is unresponsive, it might indicate a problem with the electronics. Try resetting the oven by turning it off for a few minutes and then turning it back on.
- Listen for Unusual Sounds: Pay attention to any unusual sounds like clicking or buzzing when the oven is turned on. These noises can be signs of electrical issues or faulty components within the oven.
- Look for Error Codes: Many modern ovens display error codes when there is a malfunction. Consult the user manual to interpret any codes and identify potential electrical issues.
- Monitor Heating Performance: Observe if the oven is heating inconsistently or not reaching the desired temperature. This can indicate problems with the heating elements or wiring.
What Should I Do If My Oven is Not Heating Properly?
If your oven is not heating properly, there are several steps you can take to troubleshoot and address the issue.
- Check the Power Supply: Ensure that your oven is properly plugged in and that the circuit breaker has not tripped. This is often the simplest solution, as a lack of power will prevent the oven from heating.
- Inspect the Heating Elements: If your oven has visible heating elements, check for any signs of damage or breakage. A burnt-out heating element will need to be replaced to restore functionality.
- Examine the Oven Thermostat: A malfunctioning thermostat can lead to incorrect temperature readings, causing the oven to heat improperly. Testing and recalibrating or replacing the thermostat may be necessary.
- Test the Oven Igniter: For gas ovens, a faulty igniter can prevent the oven from igniting. If the igniter is weak or not glowing, it may need to be replaced to ensure proper heating.
- Clean the Oven: Sometimes, built-up grease and debris can interfere with the oven’s performance. Regular cleaning can help maintain optimal heating and prevent potential issues.
- Consult the User Manual: Refer to your oven’s user manual for troubleshooting tips specific to your model. Manuals often provide insight into common problems and solutions that may not be immediately obvious.
- Contact a Professional Repair Service: If you have tried the above steps and your oven is still not heating, it may be time to contact a professional repair service. They can diagnose and fix more complex issues that require specialized knowledge and tools.
What Are the Advantages of Hiring a Professional for Oven Repair?
The advantages of hiring a professional for oven repair include expertise, time savings, safety, and warranty protections.
- Expertise: Professionals have the training and experience needed to diagnose and repair various oven issues effectively. They are familiar with different brands and models, enabling them to identify problems quickly and suggest the best solutions.
- Time Savings: Hiring a professional can save you significant time compared to attempting a DIY repair. Professionals can often complete repairs efficiently, allowing you to return to cooking as soon as possible without the hassle of trial and error.
- Safety: Ovens can be dangerous to work on due to electrical components and gas lines. Professionals follow safety protocols to ensure that repairs are conducted without risk of injury or damage to your home, providing peace of mind.
- Warranty Protections: Many professional repair services offer warranties on their work, which can protect you from future repair costs. If the same issue arises again shortly after the repair, you may be covered, saving you money in the long run.
How Can I Find a Trustworthy Oven Repair Technician?
Finding a trustworthy oven repair technician involves several key steps:
- Check Online Reviews: Look for customer reviews on platforms like Yelp or Google to gauge the reputation of the technician.
- Ask for Recommendations: Consult friends, family, or neighbors for referrals to reliable repair services they have previously used.
- Verify Credentials: Ensure the technician is licensed and insured, which adds a layer of security and professionalism.
- Request Estimates: Get written estimates from multiple technicians to compare prices and services offered.
- Inquire About Experience: Ask how long the technician has been in business and if they have experience with your specific oven model.
Checking online reviews allows you to gather insights from previous customers, helping you identify any recurring issues or highlights about a technician’s service quality.
Asking for recommendations from people you trust can lead you to reliable professionals who have a proven track record and can provide personal insights into their experiences.
Verifying credentials such as licenses and insurance ensures that you are working with a qualified technician who adheres to industry standards and can protect you from liability in case of accidents.
Requesting estimates gives you an opportunity to compare costs and understand what services are included, helping you to avoid surprises and choose the best value for your needs.
Inquiring about experience is crucial, especially with specific oven brands or types, as it ensures that the technician is familiar with potential issues and solutions that may arise during the repair process.
What Factors Influence the Cost of Oven Repair?
The cost of oven repair can be influenced by several key factors:
- Type of Oven: Different types of ovens, such as gas, electric, or convection, have varying complexities and parts, which can affect repair costs. For instance, gas ovens may require specialized knowledge and tools for handling gas lines, often leading to higher service fees.
- Nature of the Problem: The specific issue at hand plays a significant role in determining repair costs, as simple problems like a blown fuse are generally cheaper to fix than complex issues like a faulty control board. Diagnostic fees may also apply, adding to the overall cost if the problem is not immediately apparent.
- Age of the Oven: Older ovens may have parts that are harder to find or may require more extensive repairs, which can increase costs. In some cases, it may be more economical to replace an old oven rather than repair it, especially if it’s nearing the end of its lifespan.
- Labor Costs: The rates charged by technicians can vary widely depending on geographic location and the technician’s expertise. Urban areas often have higher labor costs, while some regions may have competitive rates that can influence the overall repair expense.
- Warranty Status: If the oven is still under warranty, certain repairs may be covered, greatly reducing the out-of-pocket costs. However, if the warranty has expired, customers will need to bear the full cost of parts and labor, which can be significant.
- Availability of Parts: The accessibility and price of replacement parts can greatly impact repair costs. If parts need to be ordered from a manufacturer or are rare, this can lead to delays and increased expenses as compared to more common parts readily available at local suppliers.
What Considerations Should I Keep in Mind When Thinking About DIY Oven Repairs?
When considering DIY oven repairs, several important factors should be kept in mind to ensure safety and effectiveness.
- Safety First: Always prioritize safety by disconnecting the oven from the power source before attempting any repairs. Working on an energized oven can lead to electric shocks or fires.
- Understanding the Problem: Accurately diagnosing the issue is crucial. Research common oven problems and symptoms to determine whether it’s a simple fix or if professional help is needed.
- Access to Replacement Parts: Ensure that you can easily obtain any necessary replacement parts for your oven model. Using the right parts is essential for the repair to be successful and safe.
- Tools and Skills: Assess whether you have the required tools and skills to perform the repair. If you lack experience with electrical appliances, it may be wiser to consult a professional.
- Warranty Considerations: Check if your oven is still under warranty, as DIY repairs can void it. If repairs are needed while still under warranty, it’s advisable to contact the manufacturer or a certified technician.
- Cost vs. Professional Help: Weigh the cost of DIY repairs against hiring a professional. Sometimes, the time and effort spent on a DIY repair may not be worth the savings compared to expert help.